Make OpenClaw private with a NetBird mesh VPN

 +
+
In Article 2 we put Caddy in front of
OpenClaw for HTTPS, and in Article 3
we added a Telegram channel. The gateway works — but Caddy is still listening on
0.0.0.0, reachable by anything that can route to the box. This is the capstone
of the series: we join the server and your laptop to a NetBird mesh,
repoint openclaw.local at the mesh IP, and close the public ports. The same
https://openclaw.local/chat URL keeps working — but only for your devices.
Every command and error below is from the actual run.
Continues from Articles 1–3 on the same WEC Instance — Ubuntu, OpenClaw behind Caddy 2. We use managed NetBird (the free tier at app.netbird.io) with agent 0.73.2 on both the server (Linux, kernel WireGuard) and the client (macOS, userspace). NetBird is WireGuard-based and open source; you can also self-host the control plane, which is a bigger topic for another day.
How NetBird works (and what you'll build)
NetBird has two parts, and the distinction is the whole point:
- The control plane (NetBird's managed management + signal service) — this is the only thing with a public presence. Every device that wants to join authenticates to it (with your setup key or SSO login), and it brokers the exchange of each peer's WireGuard public key.
- The data plane — once authenticated, peers talk directly to each other, end-to-end encrypted over WireGuard. Your actual traffic never flows through a public port you manage; the control plane just did the introductions.
So you're building a mesh where Peer A (your laptop) reaches Peer B (the OpenClaw box) by its private 100.x address — and openclaw.local points there, with Caddy bound to that interface only. The public/LAN side has nothing listening.
The key idea for later: the mesh isn't limited to two peers. Authenticate once, and every new service — Ollama, a VDI, WordPress — joins as another peer with its own 100.x address, reachable privately with no public ports to open. You set up the auth model once; you add services forever.
The public internet only ever reaches NetBird's control plane — and that just authenticates peers, it never carries your app traffic. Your services aren't "firewalled off" so much as invisible: OpenClaw has no public IP, so there's simply no route to it from the internet. The only way in is to be an authenticated peer on the mesh.
In this tutorial we wire up the first two peers — your laptop and the
OpenClaw box. The other services make the point: once auth is set up,
Ollama, a VDI, WordPress each just join the same mesh as another 100.x
peer — no public ports, no per-service exposure.
Stand up a NetBird control plane
Every NetBird mesh has two roles: peers — your machines, i.e. the OpenClaw box from Parts 1–3 and your laptop — and a control plane that authenticates those peers and issues their join keys. You already have the peer (your OpenClaw box); now you need a control plane for it to join. Two ways to get one:
- Option A — self-host it on WiLine (recommended). Deploy WEC's NetBird Marketplace template: a dedicated WEC Instance that runs your own NetBird control plane — dashboard, trusted certificate, zero shell. Now your entire private network lives on WiLine — the OpenClaw box and its control plane — with no third-party dependency.
- Option B — managed NetBird (no extra box). Don't want to run your own control plane? Use the free tier at app.netbird.io — sign in and you're done; the control plane is NetBird's cloud. Then skip to Enroll your machines.
With Option A you'll run two instances: your OpenClaw box (Parts 1–3, unchanged) and a second, dedicated control-plane box (this template). That's the correct topology — a control plane should be its own machine, never sharing with a workload. With Option B there's only your one OpenClaw box. Either way you never rebuild the OpenClaw box — in Enroll your machines you just install the NetBird agent on it and it joins the mesh as a peer.
The steps below set up Option A. WEC runs the install; you give it an email and a
public IP, and a few minutes later you have your own NetBird dashboard on
https://<your-ip>.apps.wiline.cloud with a valid certificate.
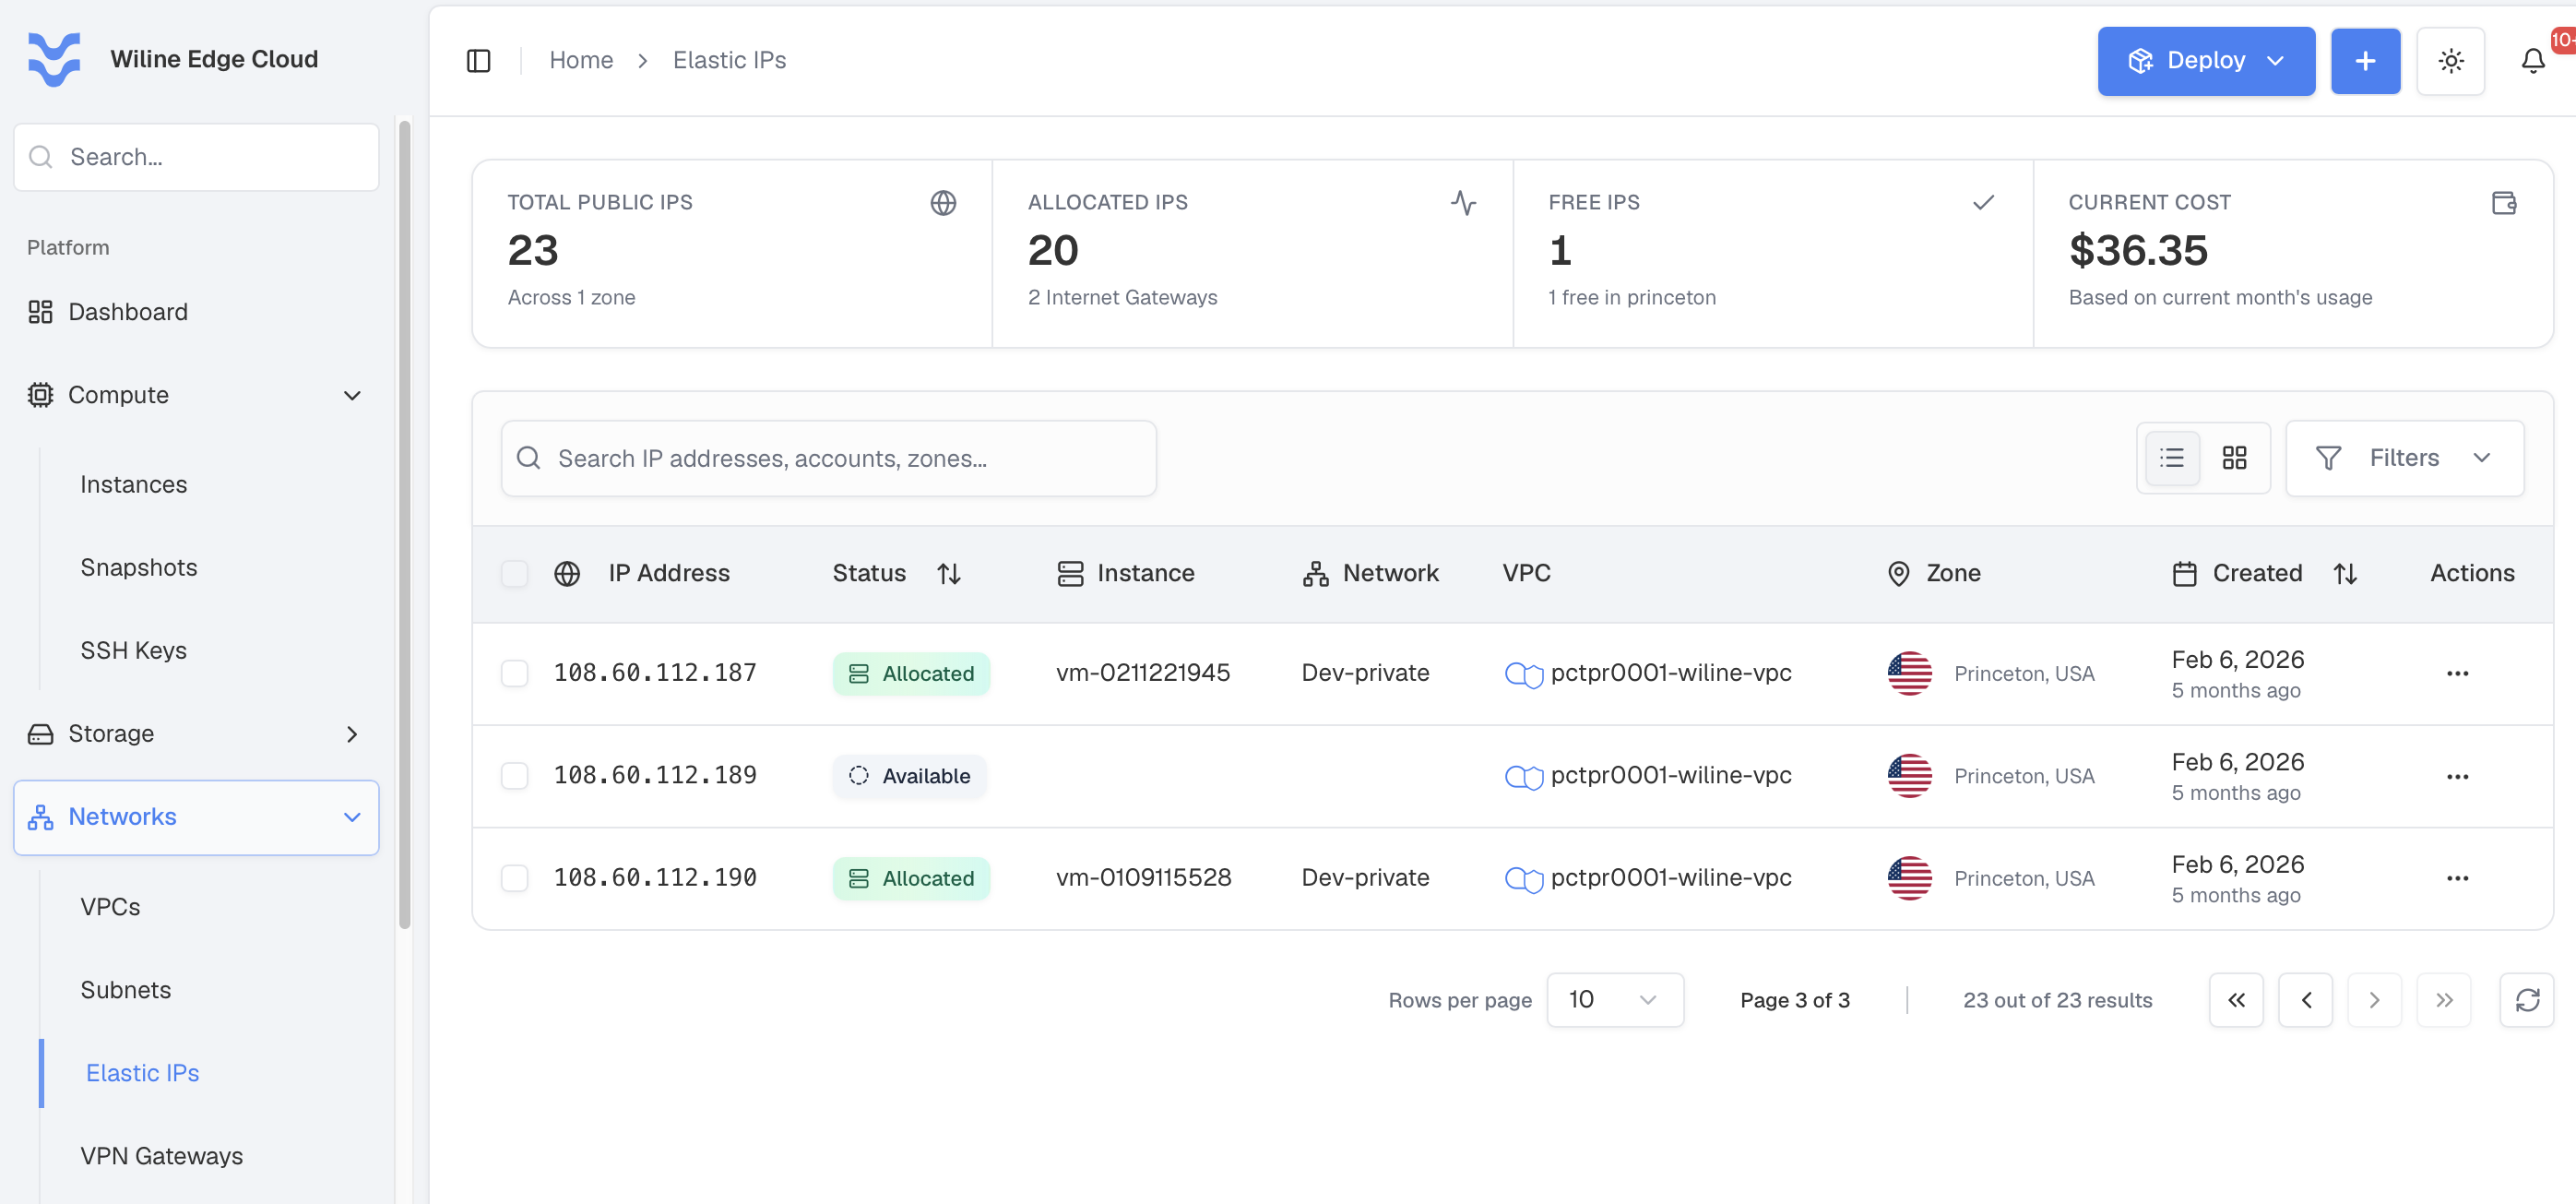
1. Get a public (Elastic) IP
The dashboard needs a public address. Under Networks → Elastic IPs, allocate a
new IP or pick a free one, and note its value (ours: 108.60.112.165). It must be
in the VPC and zone you'll deploy into. Full steps:
Configure Elastic IPs.
2. Deploy a VM with the template
This new instance becomes your NetBird control plane — a separate box from your OpenClaw instance, which stays untouched. Open Deploy → Deploy a VM (full walkthrough: Deploy a Virtual Machine). The choices that matter here:
- Network — pick the network in the same VPC/zone as your Elastic IP (we used
Local SubnetinPrinceton-VPC), so the IP can attach afterward. - Template → Marketplace → Ubuntu 24.04 LTS Netbird.
- Template Configuration — your Let's Encrypt email and the Elastic IP from step 1 as the external address.
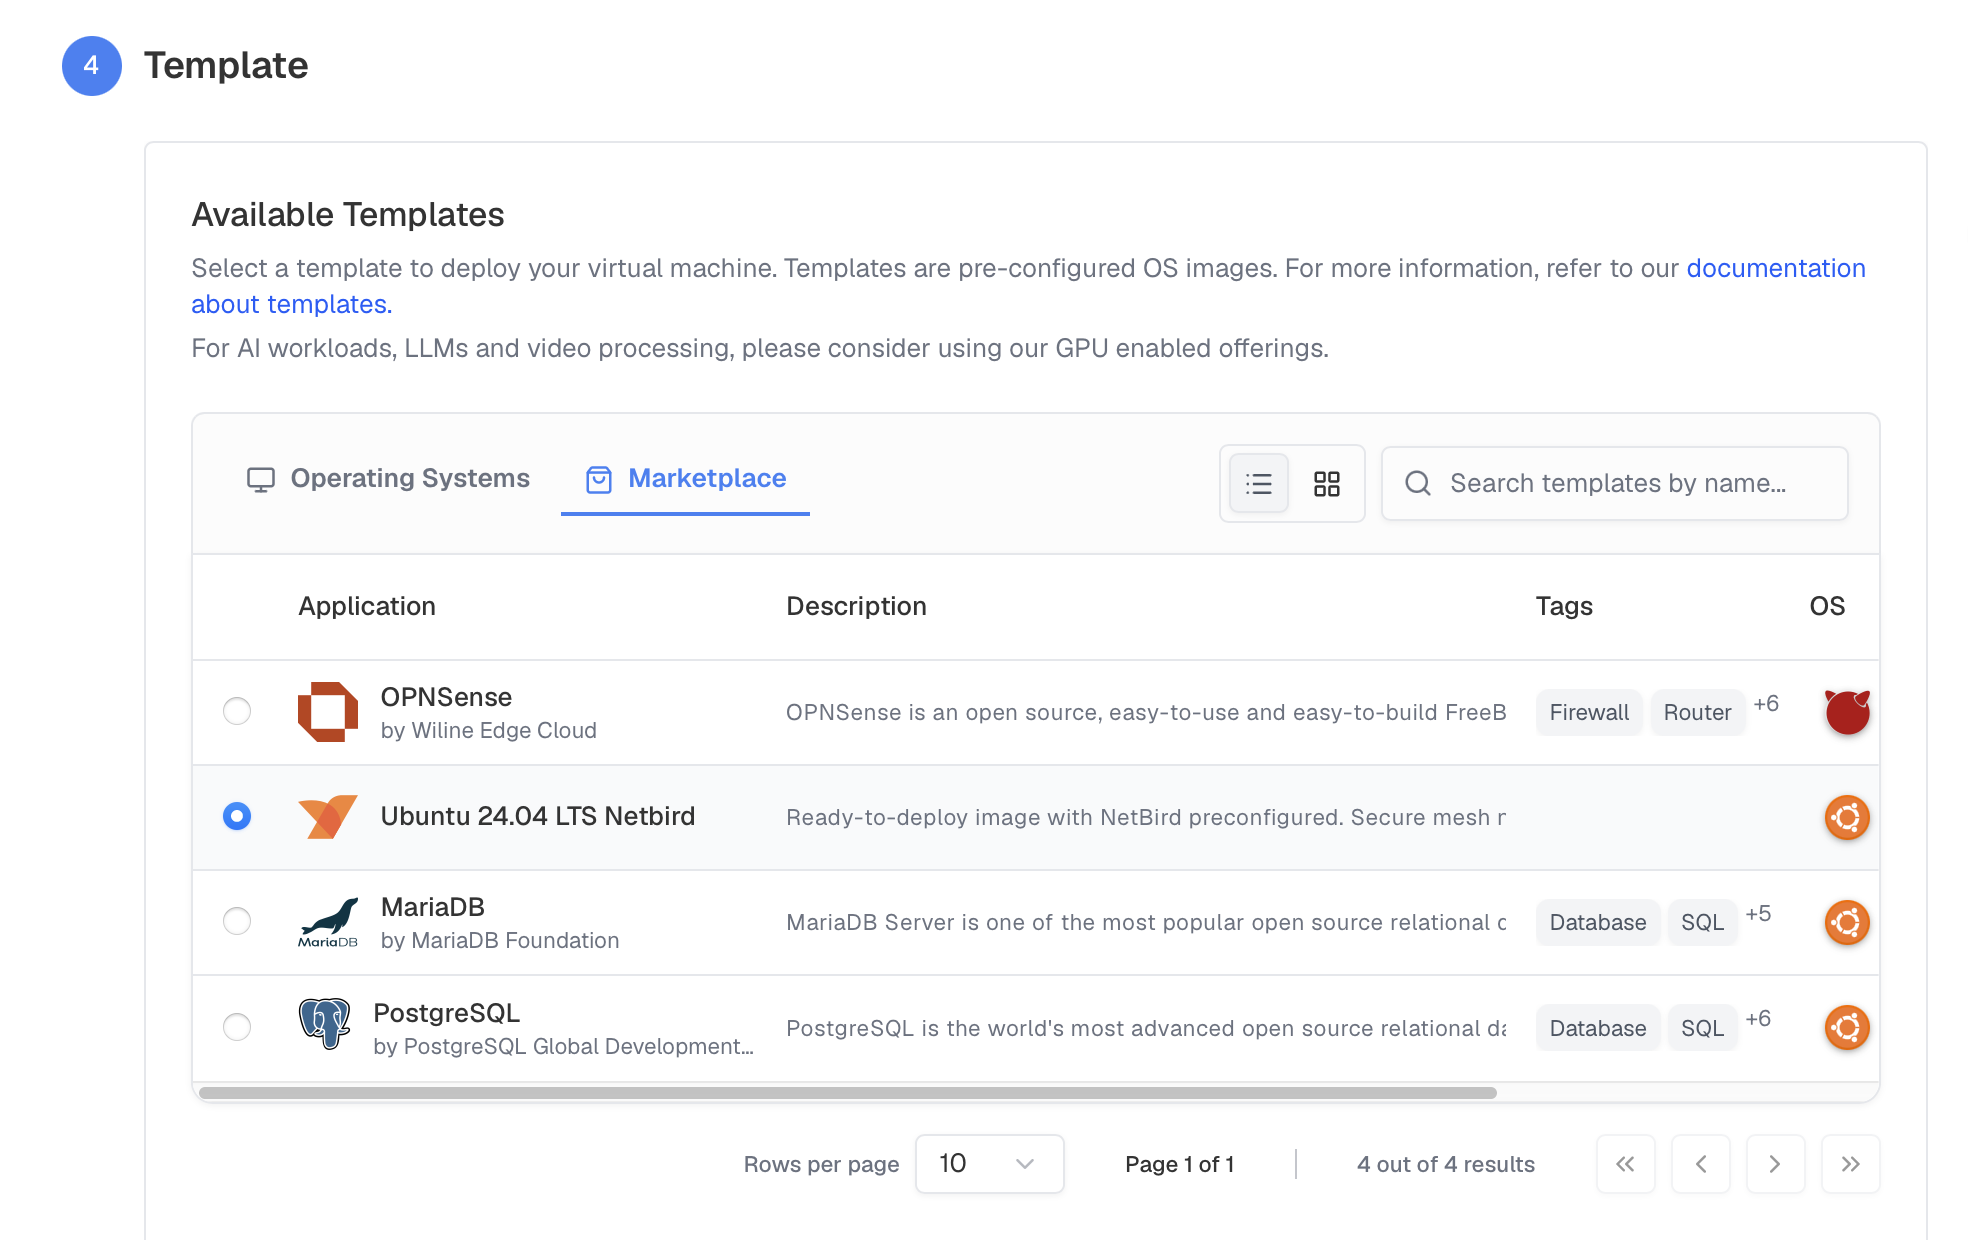
Finish the wizard and deploy.
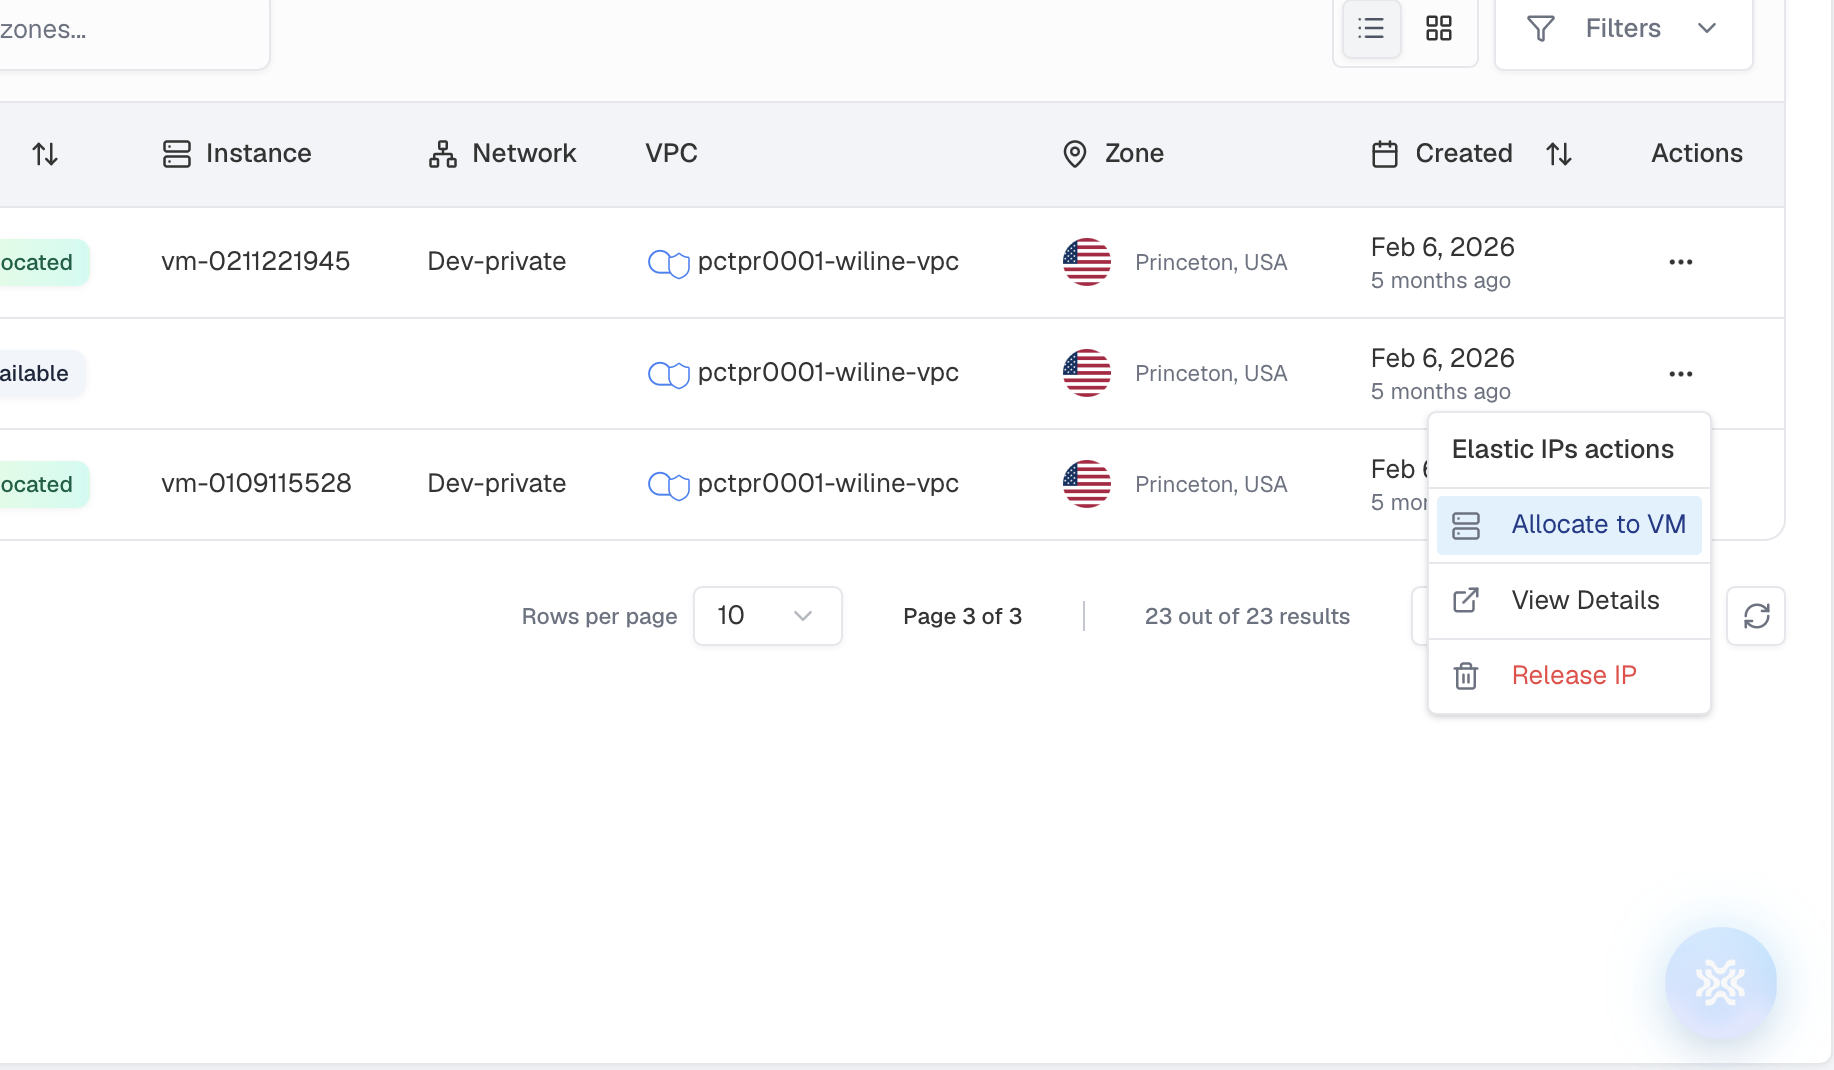
3. Attach the Elastic IP to the new instance
The IP isn't bound at deploy time — you attach it once the VM is up. Go to
Networks → Elastic IPs → your IP → ⋯ → Allocate, and select your new instance
(netbird-tutorial). Only VMs in the same VPC appear in the list.
4. Wait for first boot, then verify it's up
The instance shows Running in Compute → Instances within a minute — but the template keeps working for a few minutes after that, pulling and starting the NetBird containers and bringing up the dashboard. Don't expect the URL to answer immediately.
Check from your laptop over HTTPS (not ping — ICMP is firewalled off, so a
failed ping doesn't mean it's down):
curl -skS -m 10 -o /dev/null -w "%{http_code}\n" https://<your-ip>.apps.wiline.cloud
000/ connection refused → still provisioning; wait a minute and retry.301then200→ it's up (HTTP redirects to HTTPS).
To watch it directly, SSH in (ssh ubuntu@<your-ip>) and confirm the containers are
running and the ports are bound:
cloud-init status
sudo docker ps
sudo ss -tlnp | grep -E ':(80|443)'
It's ready once netbird-dashboard, netbird-traefik, and netbird-server show
Up and 80/443 are listening.
5. Open the dashboard and create your account
Open https://<your-ip>.apps.wiline.cloud — click through the certificate
warning if you get one (same self-signed-cert click-through as
Article 2).
This is your own NetBird control plane, running on your WEC Instance. On the first visit it asks you to create the admin account — enter a name, email, and password, click Create, then sign in with those same credentials. (That setup screen appears only once; afterwards the dashboard shows a normal Sign in page.)
You land on the NetBird dashboard — your private control plane on your own domain:
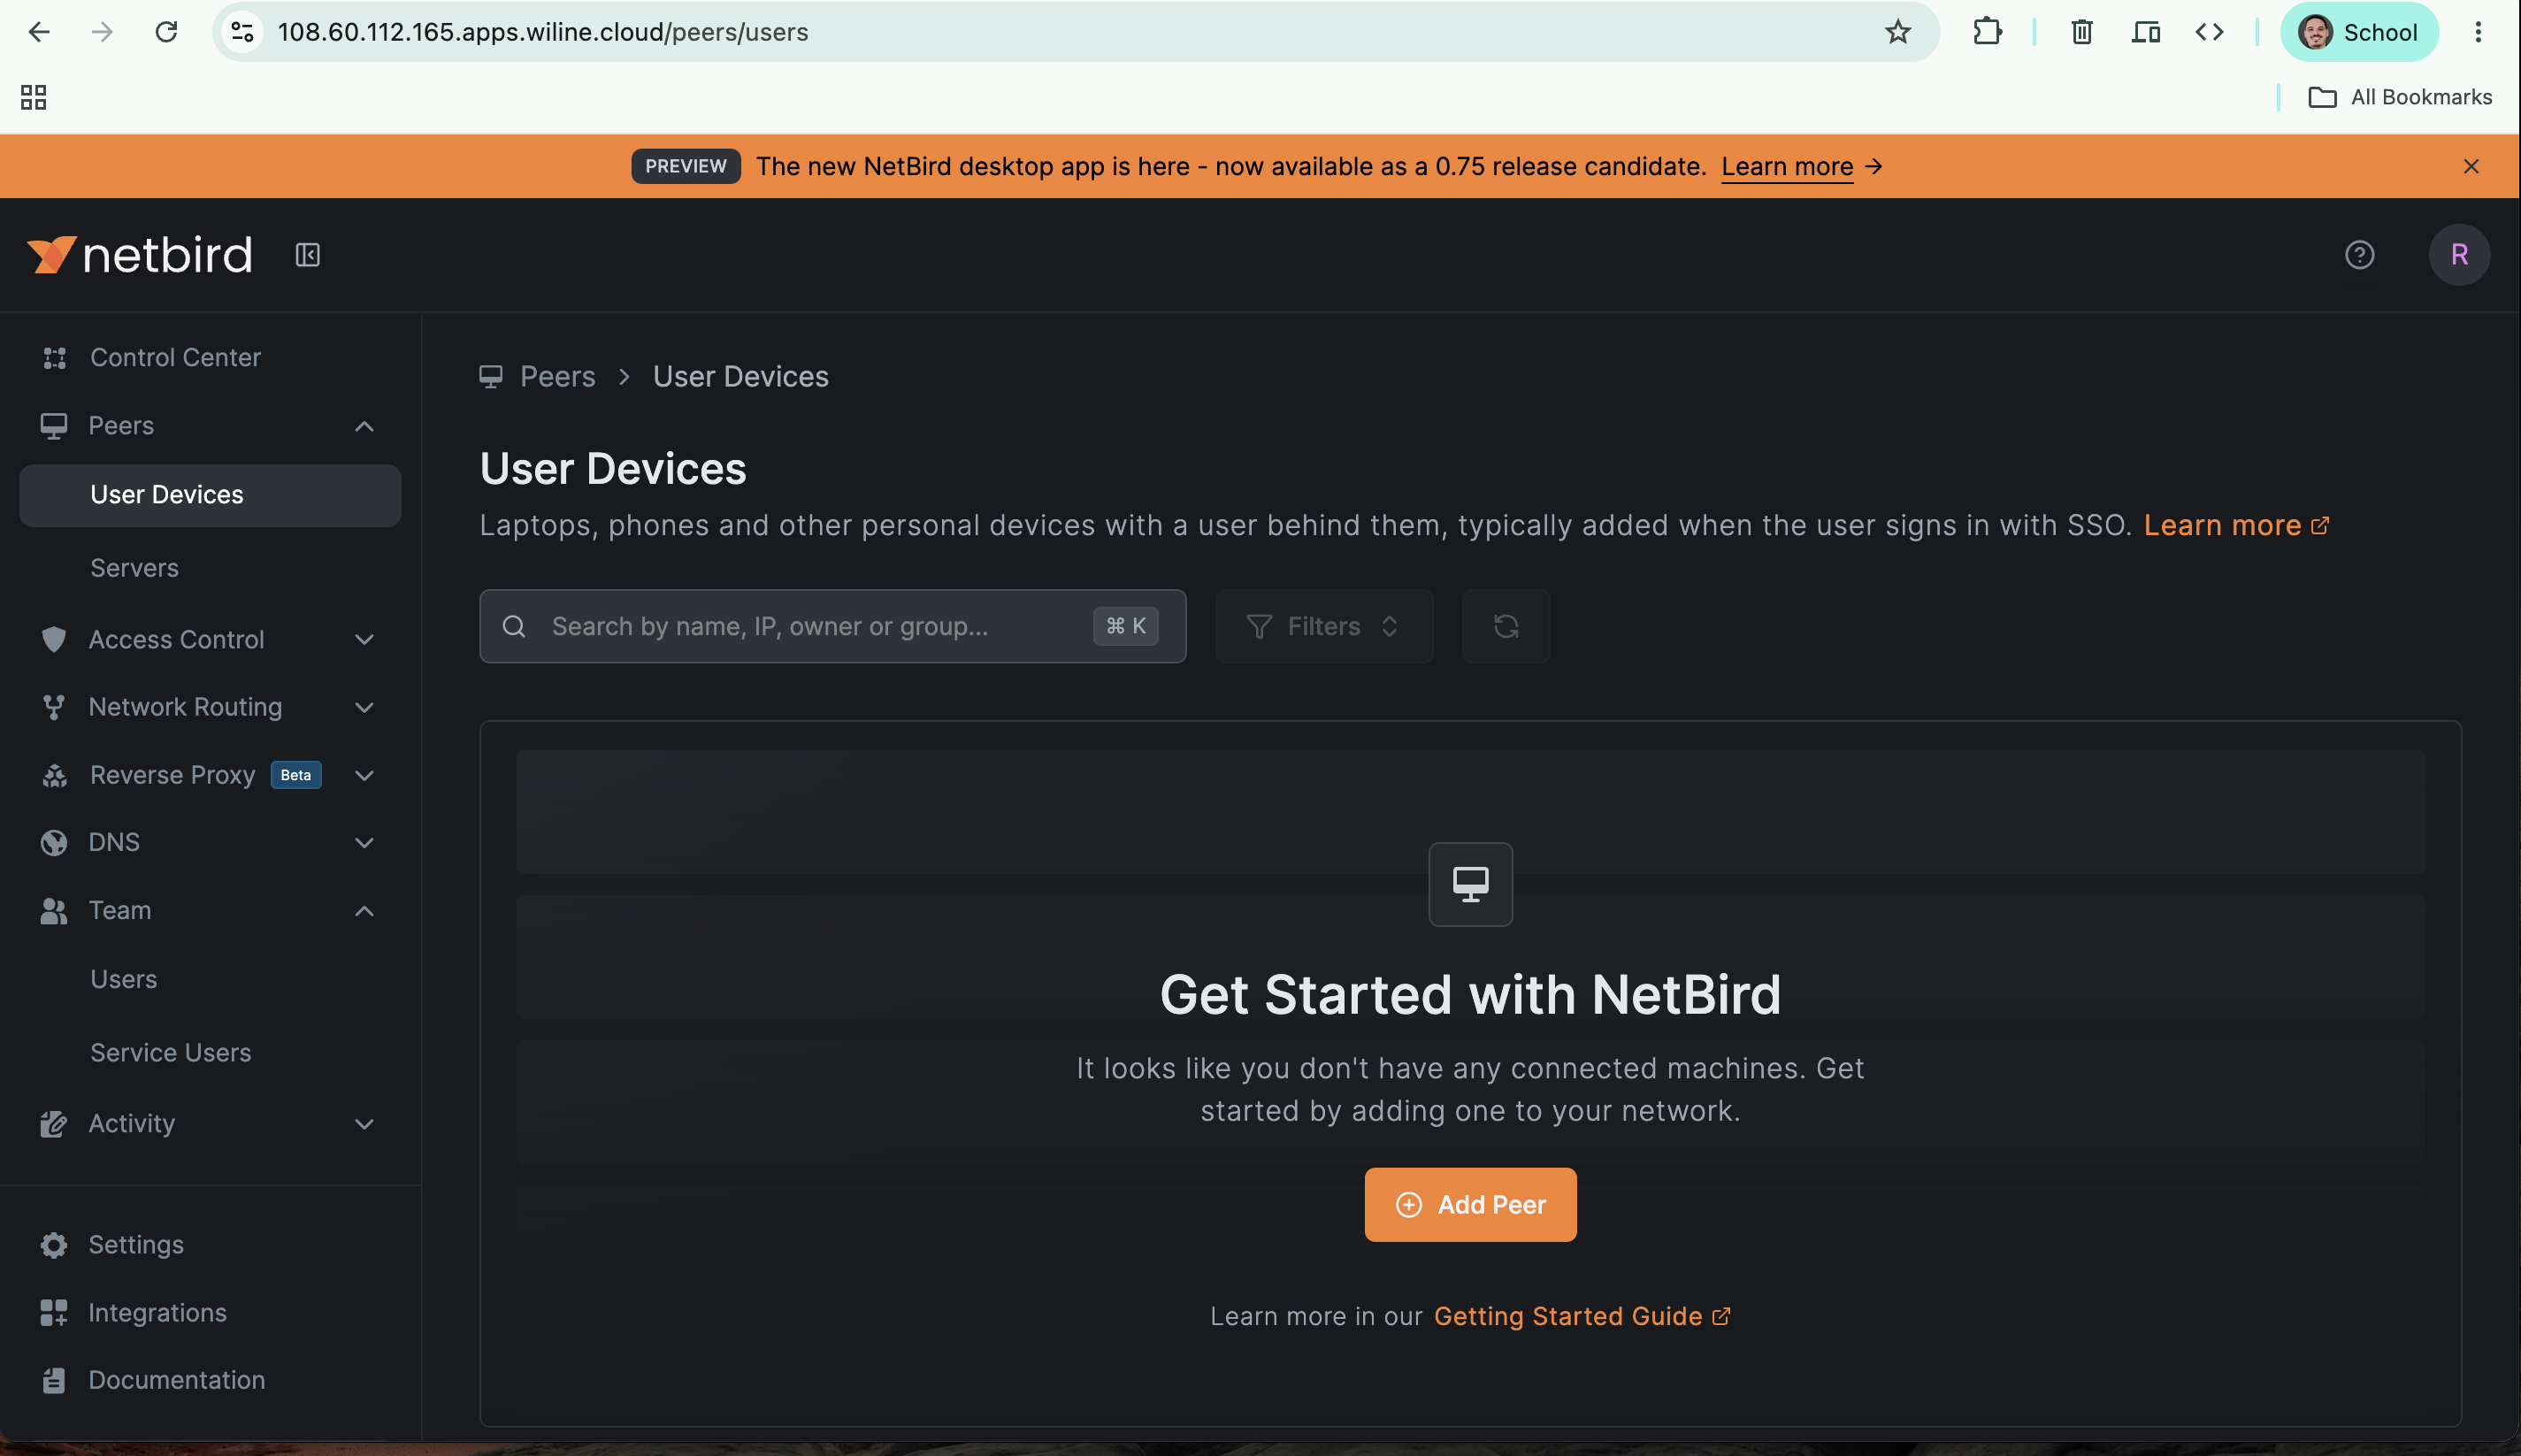
Click Add Peer and NetBird hands you the enrollment command for your server —
note the --management-url pointing at your own domain:
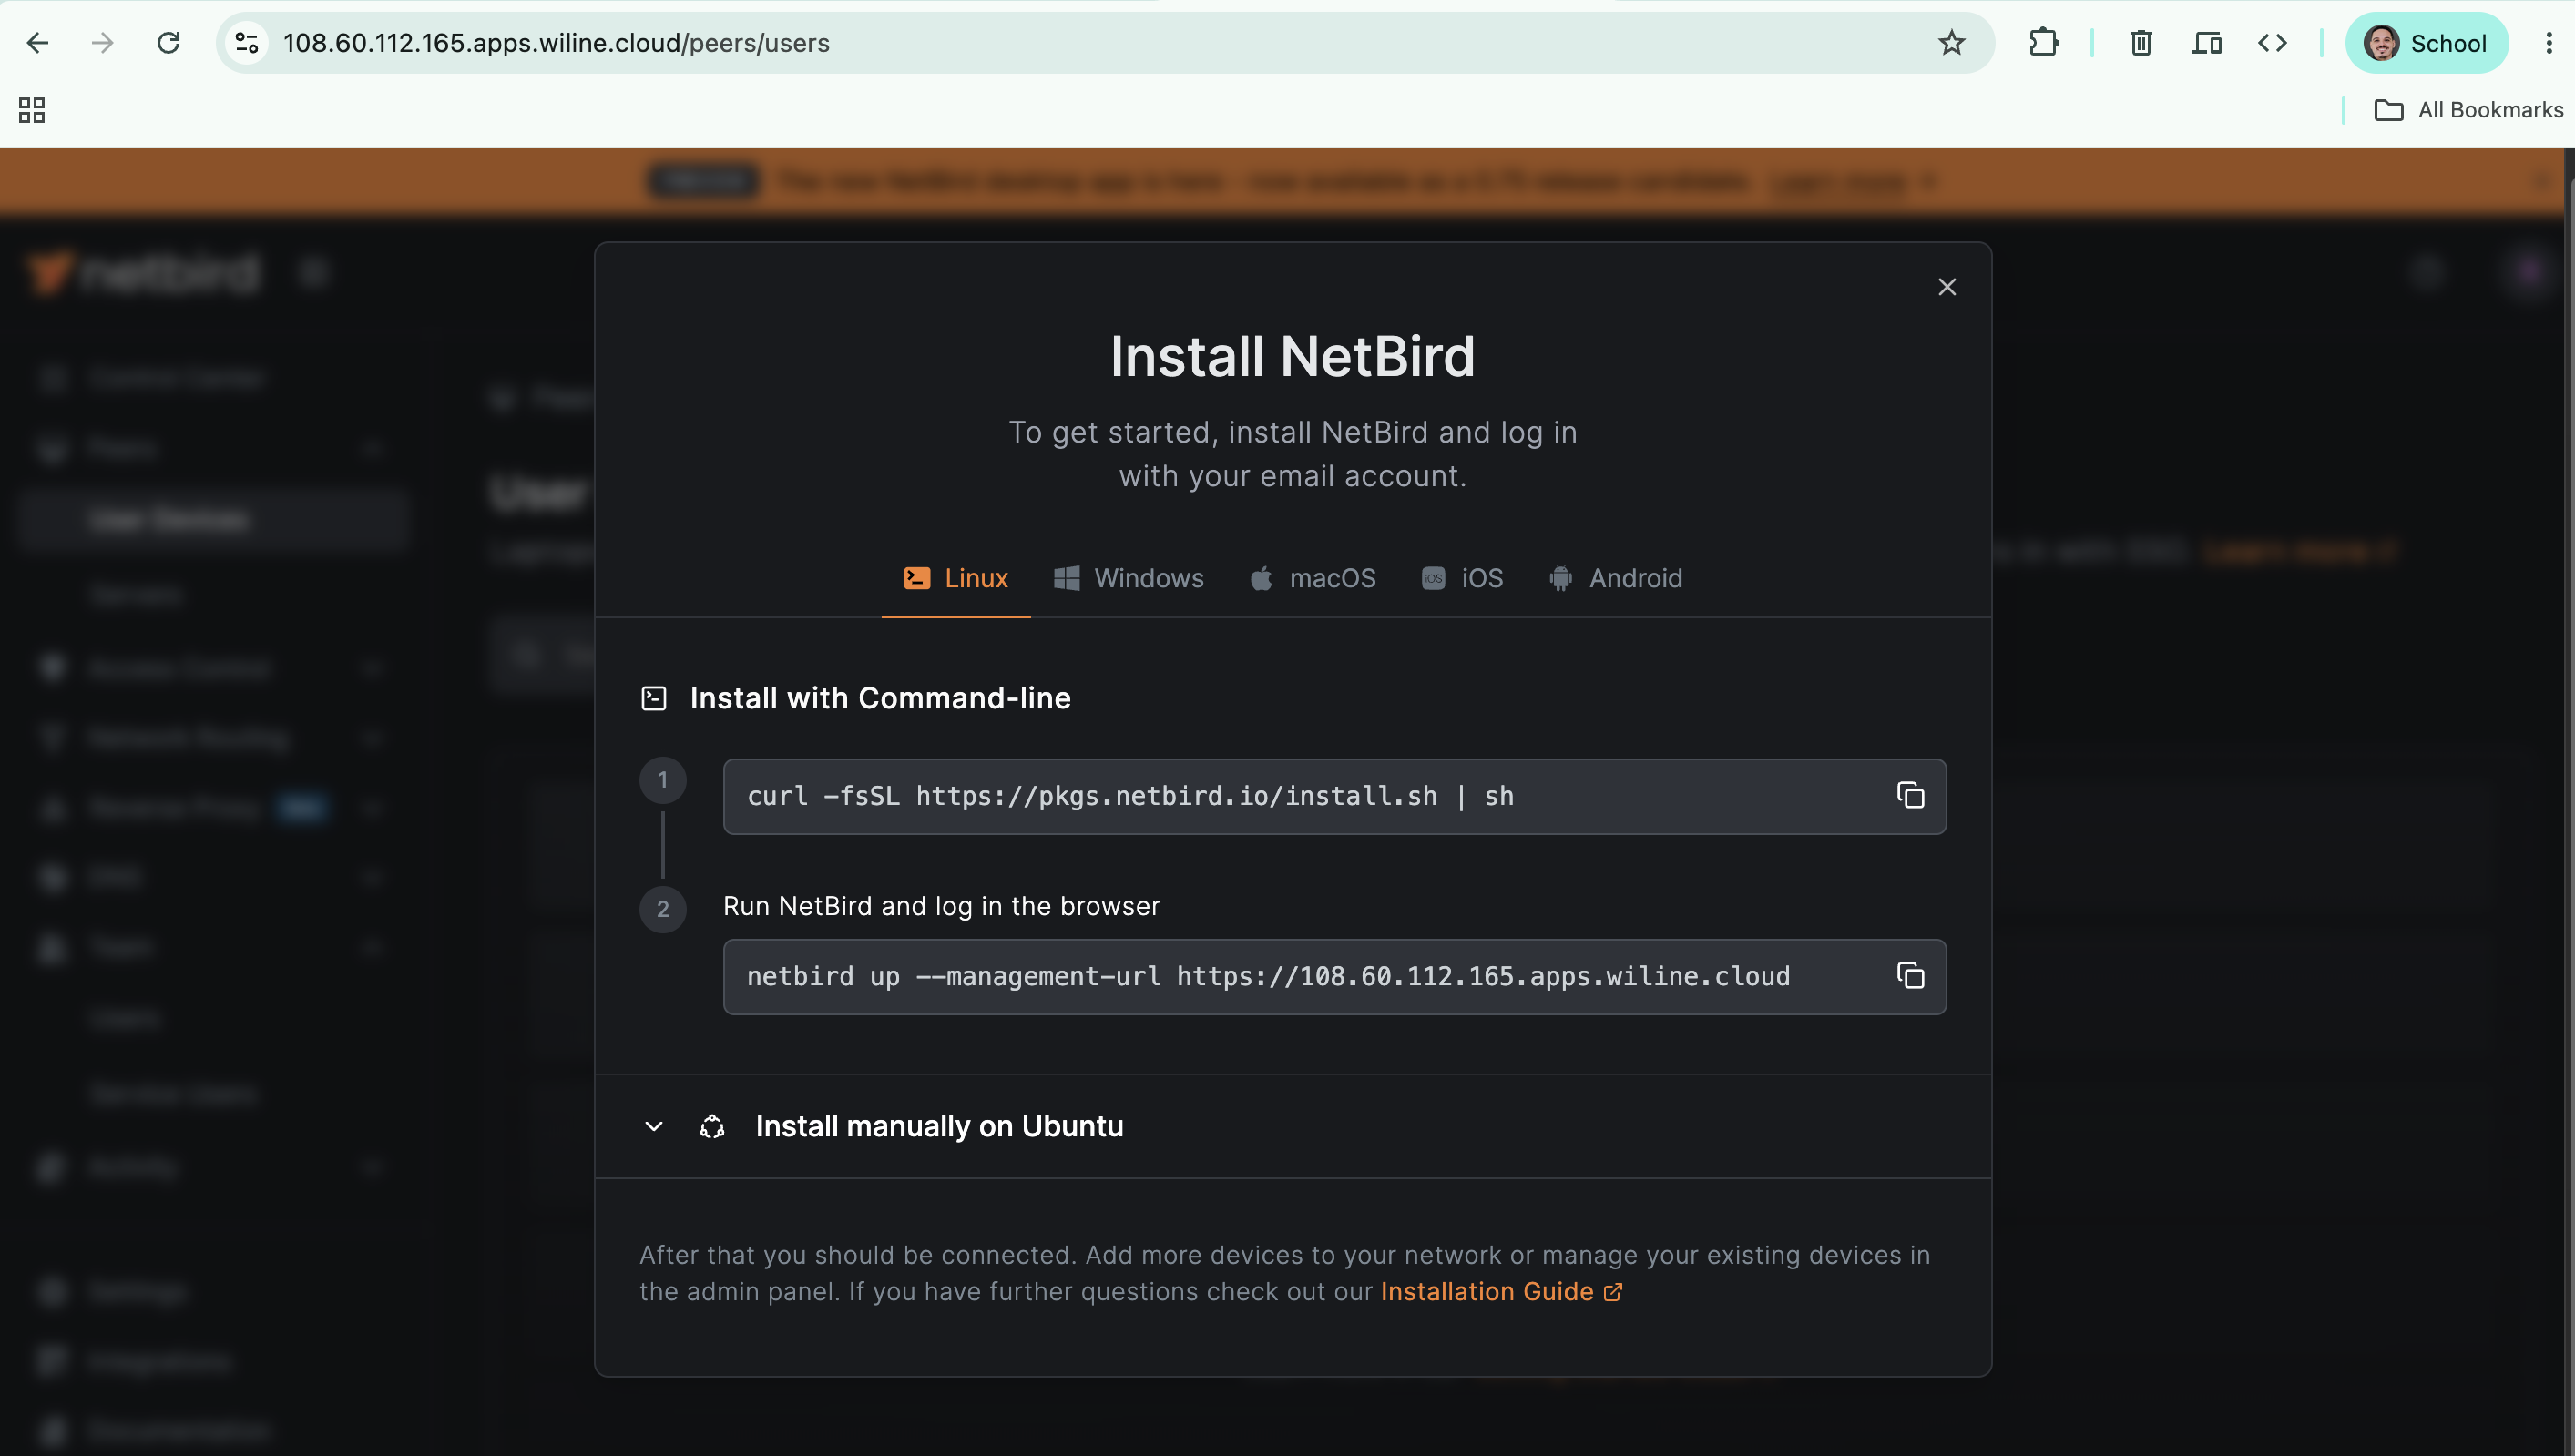
curl -fsSL https://pkgs.netbird.io/install.sh | sh
netbird up --management-url https://<your-ip>.apps.wiline.cloud
(That second command opens a browser SSO login. For a headless server, add
--setup-key <KEY> from your dashboard's Setup Keys page instead — same as the
managed flow, just with --management-url added.)
This is the dashboard where you create the setup keys that enroll machines — which is exactly what we do next.
Now enroll your machines
You have a control plane (your own template dashboard, or managed NetBird). Now put the two machines on the mesh — the OpenClaw box from Parts 1–3 and your laptop — and then close the box's public ports. These steps are the same no matter which control plane you picked.
The commands below use managed NetBird (app.netbird.io) as the example. If you
deployed the WEC template instead, it's identical except: create the setup key
in your own dashboard (https://<your-ip>.apps.wiline.cloud) and add
--management-url https://<your-ip>.apps.wiline.cloud to netbird up, so the
agent points at your server instead of the managed cloud.
Prerequisites: OpenClaw running behind Caddy from
Articles 1–3 (reachable at
https://openclaw.local), a control plane from the step above, and shell access to
the box plus admin on your laptop.
Step 1 — Install the NetBird agent on the OpenClaw box
This is the box from Parts 1–3 (a WEC Instance) — we're enrolling it as a peer, which is separate from any control-plane server. NetBird ships a one-line installer:
curl -fsSL https://pkgs.netbird.io/install.sh | sh
Gotcha (real one): on Ubuntu the install triggers the needrestart dialog —
a blue "Which services should be restarted?" box. Tab between buttons can get
swallowed by some SSH/terminal setups; use arrow keys to move, Space to
toggle, Enter to confirm (<Ok> is the default). The package is already in
place by the time this box appears, so even if you Ctrl+C out of it, the agent
is installed — re-running the installer just tells you so:
NetBird seems to be installed already, please remove it before proceeding
(If you re-run the installer after this tutorial, you'll instead see
NetBird service is running, please stop it before proceeding — the agent's
already up, so there's nothing to reinstall.)
Confirm the version:
netbird version
# 0.73.2
Step 2 — Create a setup key and join the OpenClaw box
A setup key is the token that enrolls a device into your mesh — ideal for a headless server (no browser SSO needed).
A few things will try to send you the wrong way on a fresh account — here's the straight line:
- No account yet? Create one first (sign in with Google/GitHub/email). You can't generate a key until you're in.
- The onboarding wizard ("Add your first resource" — Single IP / Entire Subnet / Domain) pops up immediately. Skip it. Resources are for exposing subnets/domains; we just need two plain peers, so it's not needed.
- The orange "Add Peer" button opens the SSO install flow (download the app, sign up with email, connect from the tray). That's meant for a desktop with a browser — not a headless server. Don't follow it.
- Instead, go straight to the Setup Keys page:
https://app.netbird.io/setup-keys.
- Open
https://app.netbird.io/setup-keys. - Create Setup Key → name
openclaw-tutorial, toggle Reusable (so it works for the laptop too), defaults otherwise. - Copy the key.
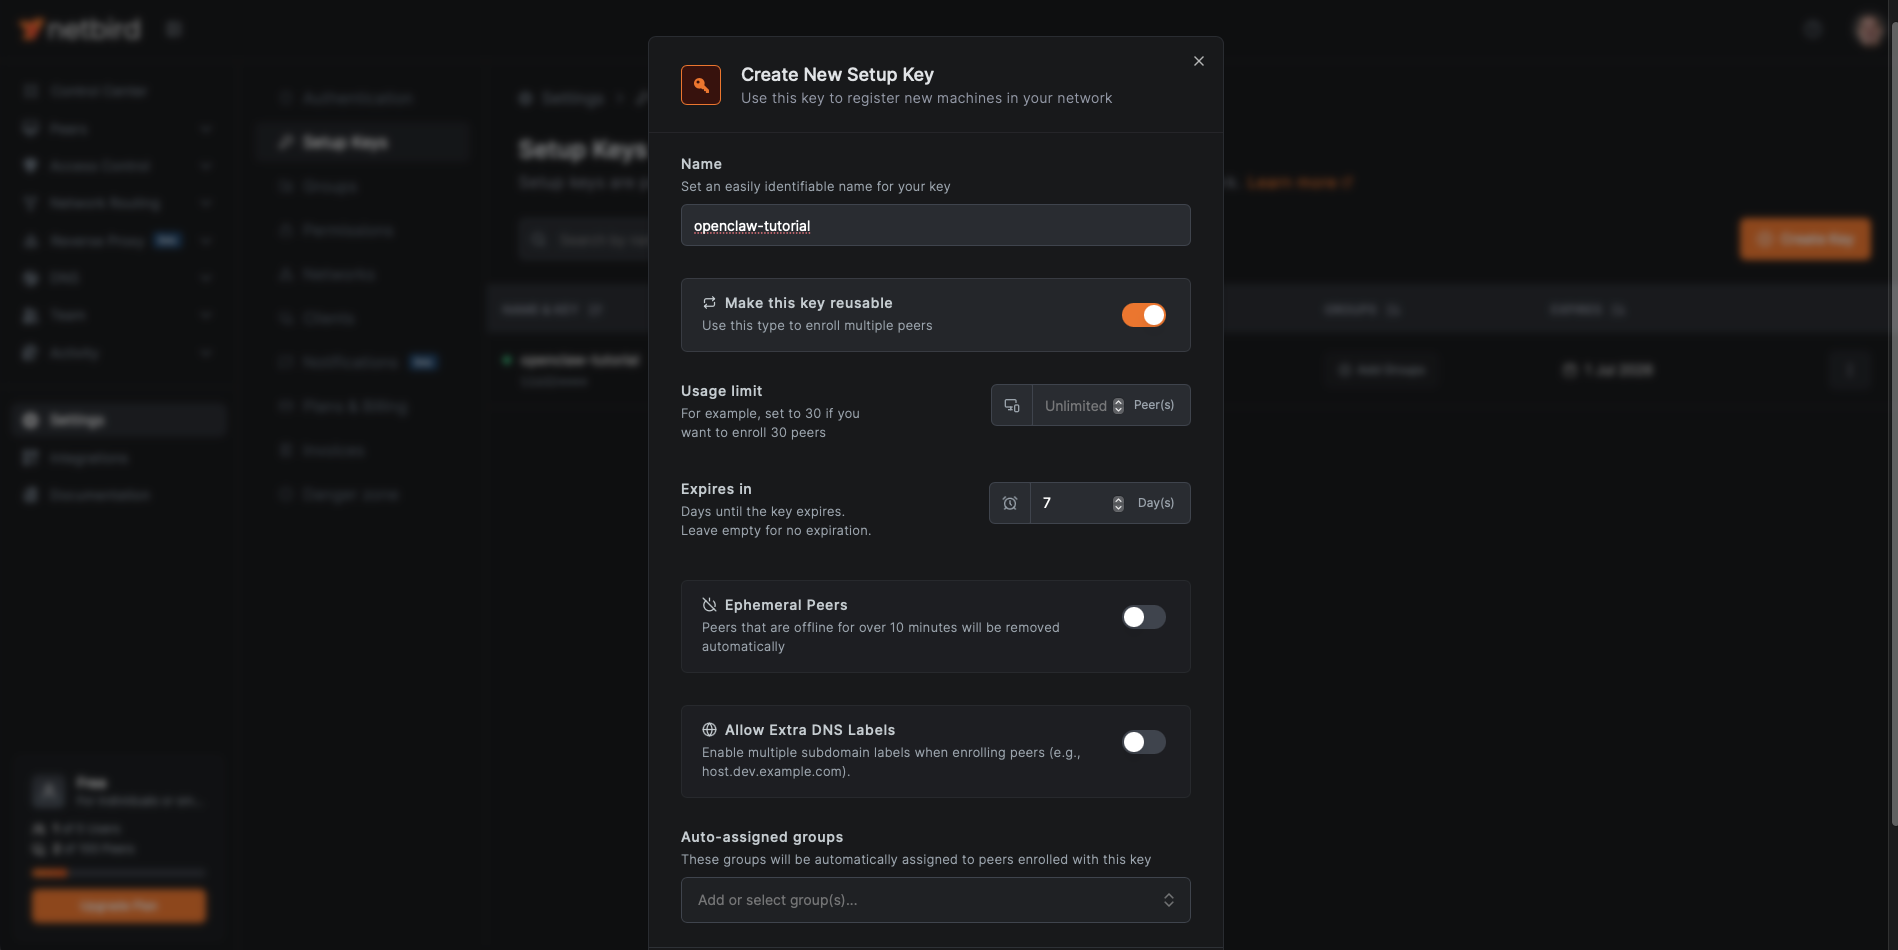
Connect the VM (replace with your key):
sudo netbird up --setup-key <YOUR_SETUP_KEY>
Anyone with a reusable key can add devices to your network. Don't paste it into chats or commits, and delete it from the dashboard once your devices are enrolled (the existing peers stay connected).
Check the connection:
netbird status
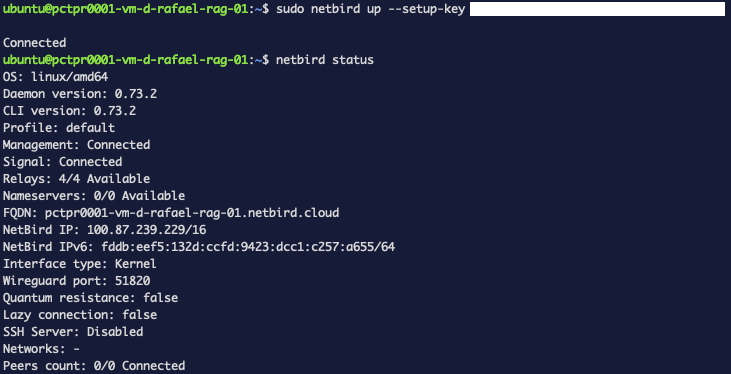
That NetBird IP (100.87.239.229) is the address everything below points
at. Peers count: 0/0 is expected — nothing else has joined yet.
Step 3 — Join your laptop
Install the NetBird client on whatever you're using, then connect with the
same reusable setup key. The connect command (netbird up --setup-key …) is
identical on every OS — only the install differs.
The captured output below is from a Mac. The Windows and Linux tabs give the
equivalent install; the netbird up, netbird status, and ping steps are the
same everywhere (Windows uses ping -n instead of -c).
- macOS
- Windows
- Linux
Install via Homebrew, then start the service and connect:
brew install netbirdio/tap/netbird
sudo netbird service install
sudo netbird service start
netbird up --setup-key <YOUR_SETUP_KEY>
You may see a one-off gRPC warning as the daemon's socket comes up a beat after
the client calls it — it ends in Connected, so it's harmless:
WARNING: ... dial unix /var/run/netbird.sock: connect: no such file or directory
Connected
Download and run the NetBird Windows installer from
app.netbird.io (Add Peer → Windows) or
pkgs.netbird.io. It installs a system-tray app and the
netbird CLI. Then, in PowerShell as Administrator, connect with your key:
netbird up --setup-key <YOUR_SETUP_KEY>
(You can also click Connect from the tray icon and authenticate via SSO, but the setup key is the same one-shot flow as the other platforms.)
Same one-line installer as the VM, then connect:
curl -fsSL https://pkgs.netbird.io/install.sh | sh
sudo netbird up --setup-key <YOUR_SETUP_KEY>
Verify the two nodes see each other, and that the tunnel carries traffic:
netbird status
ping -c 3 100.87.239.229   # Windows: ping -n 3 100.87.239.229
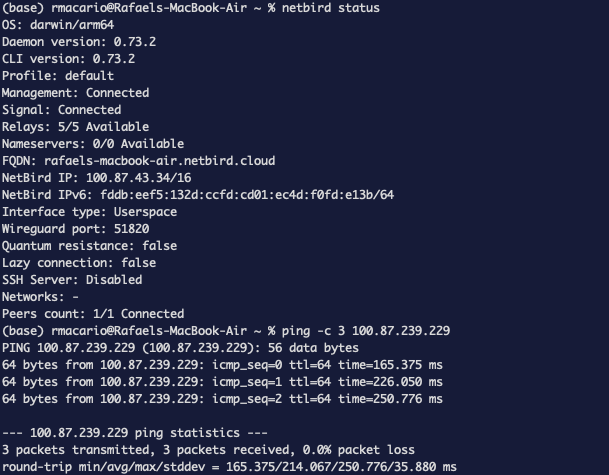
Peers count: 1/1 — that peer is the VM. In the dashboard, both machines now
show up under Peers (because we enrolled them with a setup key rather than an
SSO login, they appear under Servers rather than User Devices):
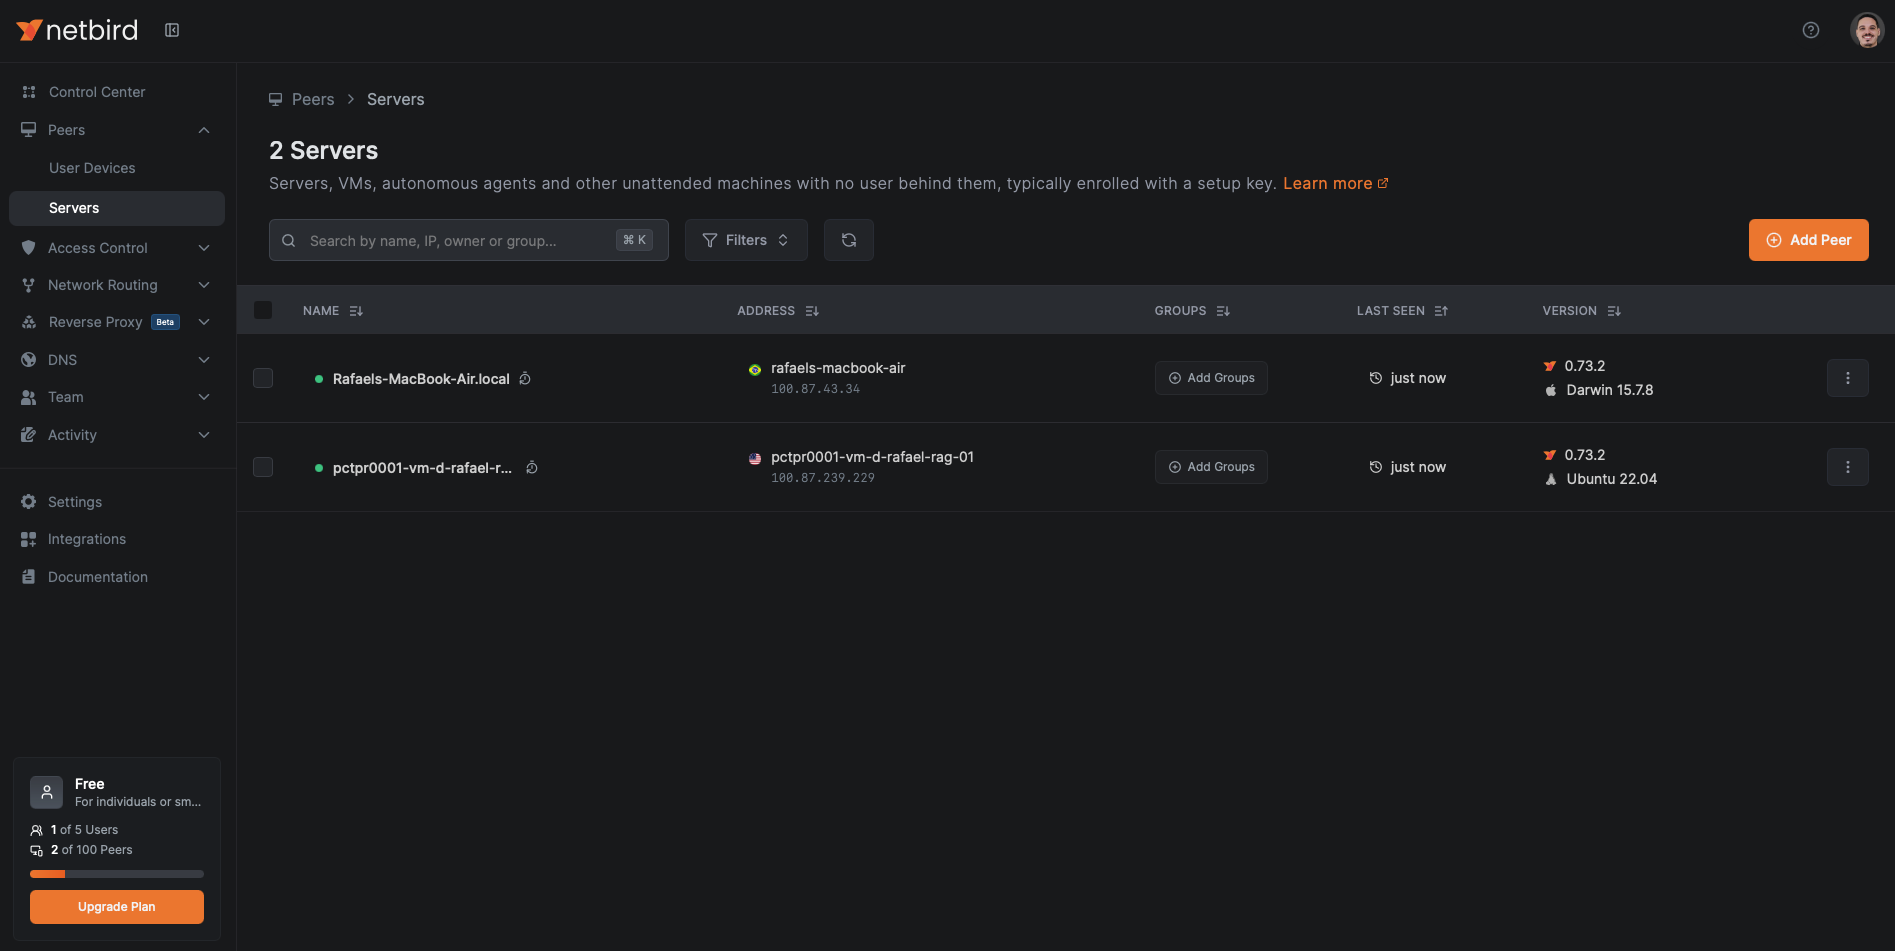
This path is going through a NetBird relay (note Interface type: Userspace
on the Mac). It's fine for a web UI, and NetBird will often upgrade to a direct
peer-to-peer link when the networks allow. Latency to a relayed peer is not a
red flag.
Step 4 — Repoint openclaw.local at the mesh IP
From Article 2, your hosts file maps
openclaw.local to the VM's LAN IP (10.80.4.212). Swap it for the mesh IP
(100.87.239.229). The file path and edit command differ by OS:
- macOS
- Linux
- Windows
sed on macOS needs the empty -i '':
grep openclaw /etc/hosts
# 10.80.4.212 openclaw.local
sudo sed -i '' 's/^10\.80\.4\.212 openclaw\.local/100.87.239.229 openclaw.local/' /etc/hosts
grep openclaw /etc/hosts
# 100.87.239.229 openclaw.local
GNU sed takes -i with no argument:
grep openclaw /etc/hosts
sudo sed -i 's/^10\.80\.4\.212 openclaw\.local/100.87.239.229 openclaw.local/' /etc/hosts
grep openclaw /etc/hosts
# 100.87.239.229 openclaw.local
The hosts file is at C:\Windows\System32\drivers\etc\hosts and needs admin.
In PowerShell as Administrator:
$h = "$env:WINDIR\System32\drivers\etc\hosts"
(Get-Content $h) -replace '^10\.80\.4\.212 openclaw\.local','100.87.239.229 openclaw.local' | Set-Content $h
Select-String openclaw $h
(Or open that file in Notepad run as Administrator and change the IP by hand.)
Test over the mesh — before touching any ports:
curl -kI https://openclaw.local/
HTTP/2 200
...
via: 1.1 Caddy
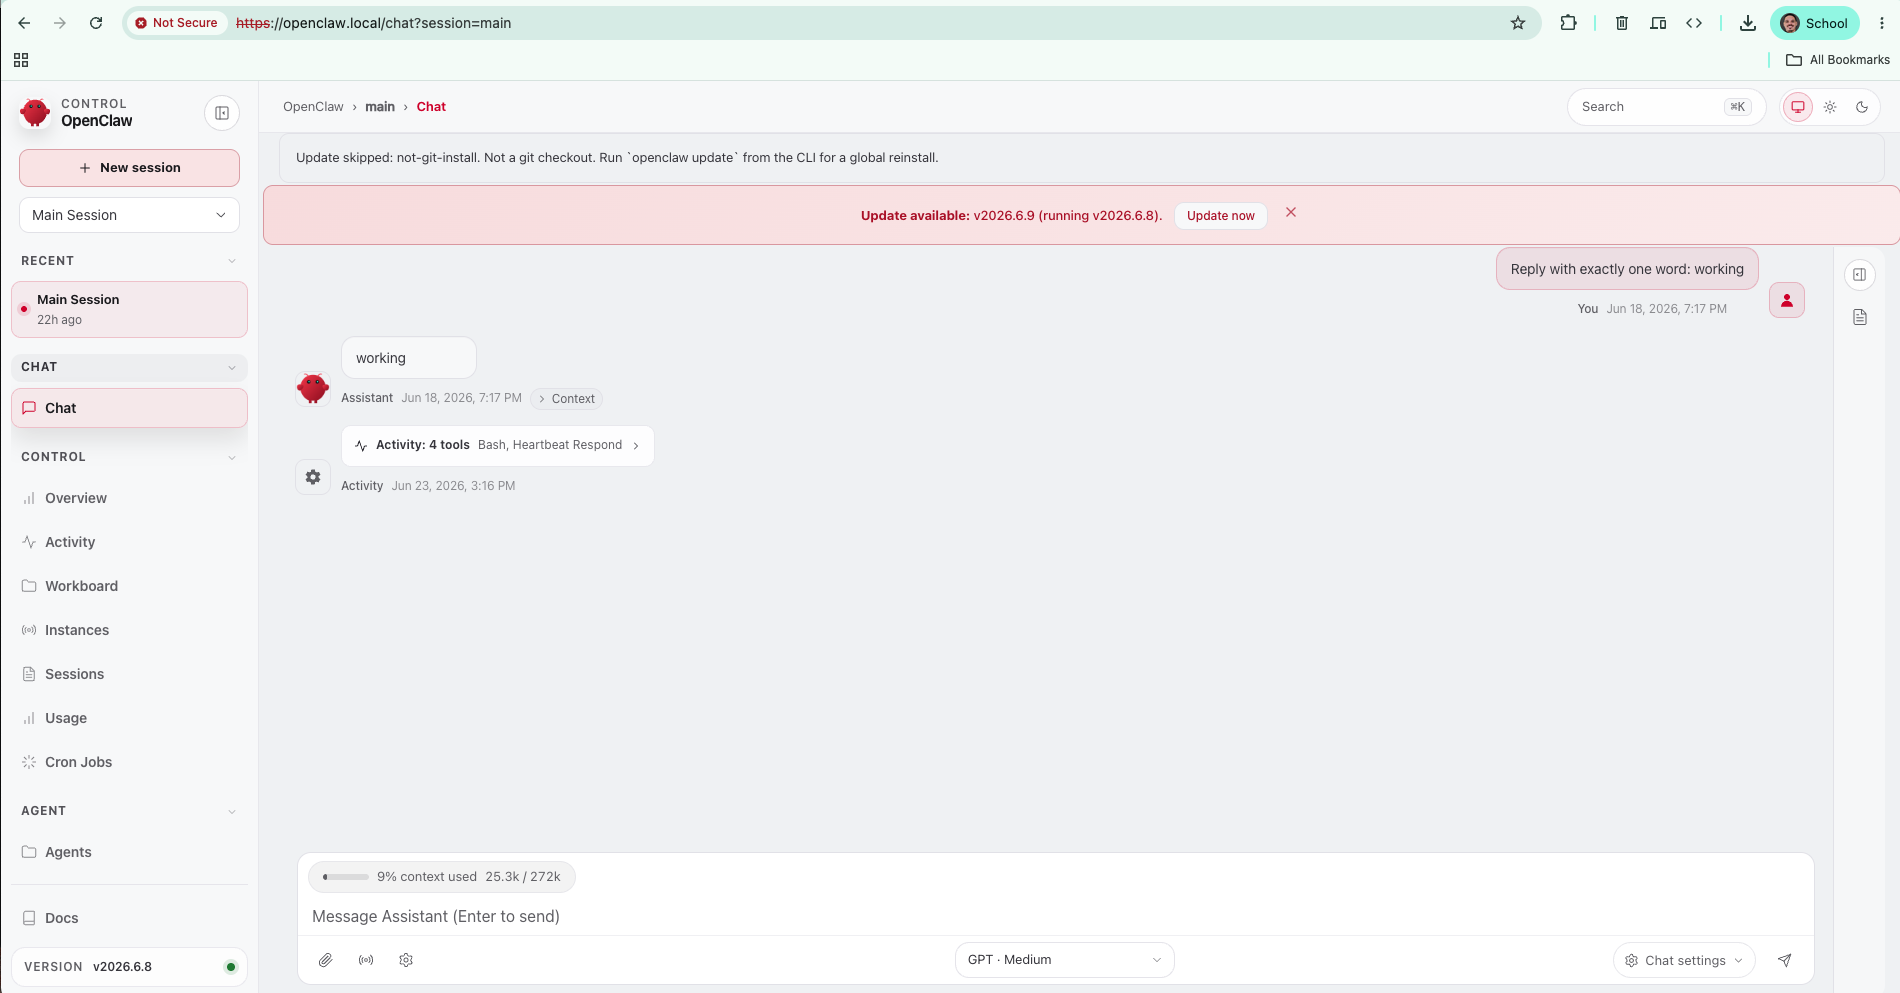
via: 1.1 Caddy over the mesh IP — the chat now flows through NetBird. Load
https://openclaw.local/chat?session=main in the browser to confirm it behaves
exactly as before. The TLS cert still matches because the hostname is unchanged;
only the IP behind it moved.
Step 5 — Close the public ports
Here's the state we're fixing. On the VM:
sudo ss -tlnp | grep -E ':(80|443)'
LISTEN 0 4096  0.0.0.0:443  ...  docker-proxy
LISTEN 0 4096  0.0.0.0:80   ...  docker-proxy
Caddy listens on 0.0.0.0 — every interface, including the LAN (and any NAT
in front of it).
Your first instinct is ufw deny 443. It won't work. Caddy's ports are
published by Docker, which writes its own iptables rules that bypass ufw's
INPUT chain. You'd add ufw rules, feel safe, and 443 would stay wide open. On
this box ufw was even inactive — and enabling it would have changed nothing
for the Docker-published ports.
The reliable fix is to bind the published ports to the mesh IP instead of
0.0.0.0, so Caddy only ever listens on wt0. Edit the Caddy service in
docker-compose.override.yml (the override from Article 2):
cd /home/ubuntu/openclaw
cp docker-compose.override.yml docker-compose.override.yml.bak
Change the ports block from:
    ports:
      - "80:80"
      - "443:443"
to bind to the mesh IP:
    ports:
      - "100.87.239.229:80:80"
      - "100.87.239.229:443:443"
Recreate just Caddy and re-check:
docker compose up -d caddy
sudo ss -tlnp | grep -E ':(80|443)'

The ports are gone from 0.0.0.0 — they live on the mesh interface only.
Because the bind targets the mesh IP, NetBird must be up before Caddy starts
(e.g. after a reboot, wt0 needs its IP before Docker binds to it). The
restart: unless-stopped policy already covers this — Caddy retries until the
interface exists — but it's worth knowing if you ever see Caddy crash-looping
right after boot.
Step 6 — Prove the lockdown
Both directions, from the actual run.
Still reachable over the mesh (laptop):
curl -kI https://openclaw.local/
# HTTP/2 200 ... via: 1.1 Caddy
No longer reachable on the LAN (VM, hitting its own LAN IP):
curl -kI --connect-timeout 5 --resolve openclaw.local:443:10.80.4.212 https://openclaw.local/

That's the result: same URL, reachable only through your mesh, refused everywhere else.
You can now take any self-hosted service off the public internet without breaking how you use it.
Cleanup
Delete the reusable setup key now that both devices are enrolled —
Setup Keys → delete in the dashboard. Your peers stay connected; you're just
closing the door you used to add them. To remove a device later, delete it under
Peers → User Devices and run netbird down on that machine.
Troubleshooting (real)
needrestartdialog won't takeTab. Use arrow keys / Space / Enter. The package is already installed by the time the box shows.- gRPC
netbird.sockwarning on firstup. The daemon's socket lags the client by a beat. If it ends inConnected, ignore it. ufwrules don't block the gateway. Docker-published ports bypass ufw — bind the port to a specific IP (as above) or use Docker's ownDOCKER-USERchain.- Caddy crash-loops after reboot. It started before
wt0had the mesh IP.restart: unless-stoppedrecovers it; or order Docker afternetbird.service. - High ping to a peer. You're relayed, not direct — functional, just slower. Check
Interface typeand NetBird's peer detail for the connection type.
What's next
That closes the Self-hosting OpenClaw series:
- Deploy OpenClaw on a WEC Instance via Docker Compose
- Secure OpenClaw with a Caddy reverse proxy + HTTPS
- Add a Telegram channel to OpenClaw
- Make OpenClaw private with a NetBird mesh VPN ← you are here
You now have a self-hosted agent that's encrypted in transit, paired to your devices, reachable from your phone, and invisible to the public internet — all on one small WEC Instance.
Continue the journey
Ready for an agent that remembers? Start the Self-hosting Hermes series — Self-host the Hermes Agent with persistent memory — deployed on this same WEC Instance, with context that survives restarts.