Deploy OpenClaw on a WEC Instance via Docker Compose
 ++
++- 1Deploy your own AI assistant
- 2Real HTTPS + auth
- 3Chat from Telegram
- 4Private mesh access
- 5Run it on WEC models
- 🏆Chat from WhatsApp
Your AI assistant doesn't have to live in someone else's cloud.
Deploy a self-hosted OpenClaw AI agent on a WEC Instance with Docker Compose — from spinning up the VM to an agent that actually answers, using your own model API key. Every command, version, and error below was captured from a real deployment on a WEC Instance.
You bring your own model API key (OpenAI in this guide); WiLine handles the
hosting. This was reproduced on a WEC Instance — Ubuntu 22.04.5 LTS, 8 vCPU,
15 GiB RAM, 25 GB free disk. OpenClaw version 2026.6.8, image
ghcr.io/openclaw/openclaw:latest.
What you'll build
A single OpenClaw gateway container, configured with your model provider, reachable through its web Control UI and CLI.
Prerequisites
- A WiLine Edge Cloud account
- A model API key — this guide uses OpenAI; Anthropic and local models work too
- An SSH key pair on your machine (
~/.ssh/id_ed25519or similar) - About 20 minutes
Step 1 — Provision the VM on WiLine
Spin up a WiLine VM that meets these requirements:
| Requirement | Value |
|---|---|
| OS | Ubuntu 22.04 LTS (or 24.04 LTS) |
| Compute | ≥ 2 vCPU / 4 GB RAM — OpenClaw needs ≥ 2 GB; the first run can be OOM-killed (exit 137) on 1 GB hosts |
| Disk | 30 GB NVMe — 10 GB fills up fast once Docker images and logs land |
| Access | Your SSH public key added at deploy time, so you can log in without a password |
The portal walkthrough is already documented — follow these and come back:
Once it's running, SSH in:
ssh ubuntu@<your-vm-ip>
Step 2 — Verify the box
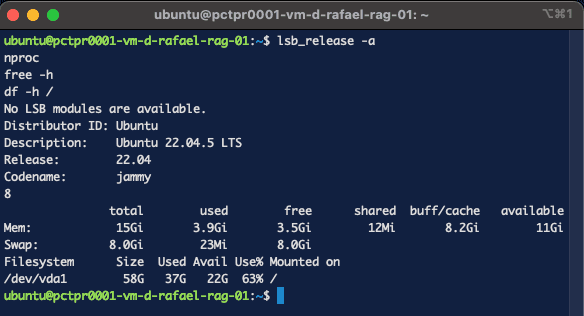
Before installing anything, confirm what you're working with — the OS version and the resources available. Note these numbers; they're useful when you later compare performance or open a support ticket.
lsb_release -a
nproc
free -h
df -h /
On our WEC Instance: Ubuntu 22.04.5 LTS, 8 vCPU, ~15 GiB RAM, 25 GB free disk.
Step 3 — Install Docker + Compose
Check whether Docker is already present:
docker --version
docker compose version
If it's not installed, follow Docker's official guide for your distro —
Install Docker Engine on Ubuntu.
The quickest path is Docker's
convenience script,
followed by adding your user to the docker group so you can run it without
sudo:
curl -fsSL https://get.docker.com | sh
sudo usermod -aG docker $USER
newgrp docker
You need Docker Compose v2 (the docker compose subcommand, not the legacy
docker-compose binary).
If Docker is already present, the get.docker.com script detects it and warns
rather than reinstalling — don't force it on a box with running containers. On a
clean VM it installs from scratch. This deploy ran on a host where Docker
29.1.3 / Compose v5.0.2 was already installed.

Step 4 — Get the Compose file
Create a project directory and pull OpenClaw's official docker-compose.yml:
mkdir openclaw && cd openclaw
curl -fsSL https://raw.githubusercontent.com/openclaw/openclaw/main/docker-compose.yml -o docker-compose.yml
The file defines two services — openclaw-gateway (the long-running agent
gateway) and openclaw-cli (a one-shot CLI that shares the gateway's network).
By default it builds from source; we'll point it at the prebuilt image
instead.
Step 5 — Configure .env
Create a .env next to the compose file. Pin the prebuilt image and set a
dashboard token:
OPENCLAW_IMAGE=ghcr.io/openclaw/openclaw:latest
OPENCLAW_GATEWAY_TOKEN=<paste output of: openssl rand -hex 32>
.env out of gitIt holds your gateway token (and any keys). Add it to .gitignore. Commit a
.env.example with placeholder values instead.
Pull the image:
docker compose pull

Step 6 — Pre-create the config directory
OpenClaw bind-mounts ~/.openclaw into the container. Create it as your own
user first — otherwise Docker creates it as root and the container (which
runs as user node, uid 1000) can't write to it:
mkdir -p ~/.openclaw ~/.openclaw-auth-profile-secrets
If you skip this, you'll hit a permission error on first run — see Troubleshooting.
Step 7 — Onboard
This is where you bring your own model — onboarding prompts for your provider and API key. This guide uses OpenAI, but Anthropic and local models work the same way.
Run OpenClaw's onboarding through the gateway container. It's interactive — it asks for your provider and API key and writes the config:
docker compose run --rm --no-deps --entrypoint node openclaw-gateway \
  dist/index.js onboard --mode local --no-install-daemon
Walk through the prompts:
- Continue past the personal-use security notice → Yes
- Setup mode → QuickStart
- Provider → OpenAI (or your provider), then paste your API key
- Default model → keep the suggested one (
openai/gpt-5.5) - Channel → search
skip→ Skip for now (messaging channels are a later guide) - Skills / Hooks → No / Skip for now (configure later with
openclaw configure) - Hatch your agent → Hatch later (we start the gateway as a service next)
It ends with Onboarding complete.


Step 8 — Apply gateway config and start
Onboarding wrote your provider and model. Now set the gateway's runtime options — run mode, network bind, and the Control UI origins it will accept — then start it as a background service.
docker compose run --rm --no-deps --entrypoint node openclaw-gateway \
  dist/index.js config set --batch-json '[{"path":"gateway.mode","value":"local"},{"path":"gateway.bind","value":"lan"},{"path":"gateway.controlUi.allowedOrigins","value":["http://localhost:18789","http://127.0.0.1:18789"]}]'

docker compose up -d openclaw-gateway

Step 9 — Sanity check
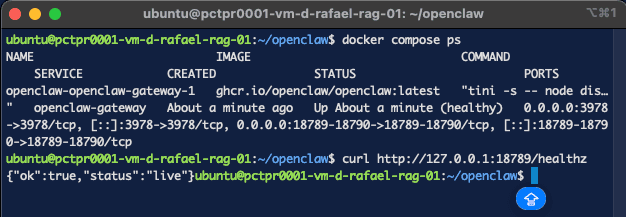
Container health:
docker compose ps
You want Up ... (healthy). Then hit the health endpoint:
curl http://127.0.0.1:18789/healthz
# {"ok":true,"status":"live"}
Confirm your provider key is usable:
docker compose run --rm openclaw-cli models status
# openai ... api_key=1 ... status=usable
models status prints a masked key prefix (sk-proj-…). Crop or blur it before
publishing the screenshot.
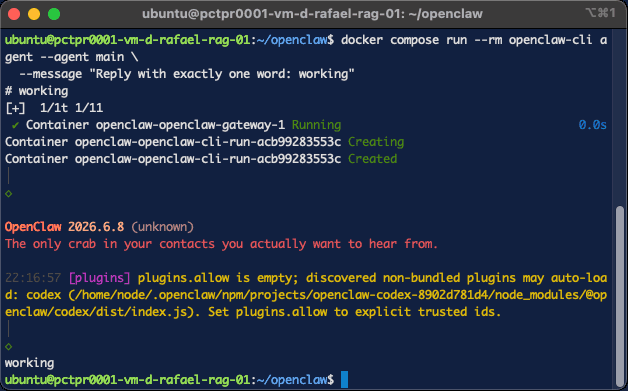
Now the real end-to-end test. The agent command needs a target, so list agents
first, then message the default one (main):
docker compose run --rm openclaw-cli agents list
# - main (default)

docker compose run --rm openclaw-cli agent --agent main \
  --message "Reply with exactly one word: working"
# working
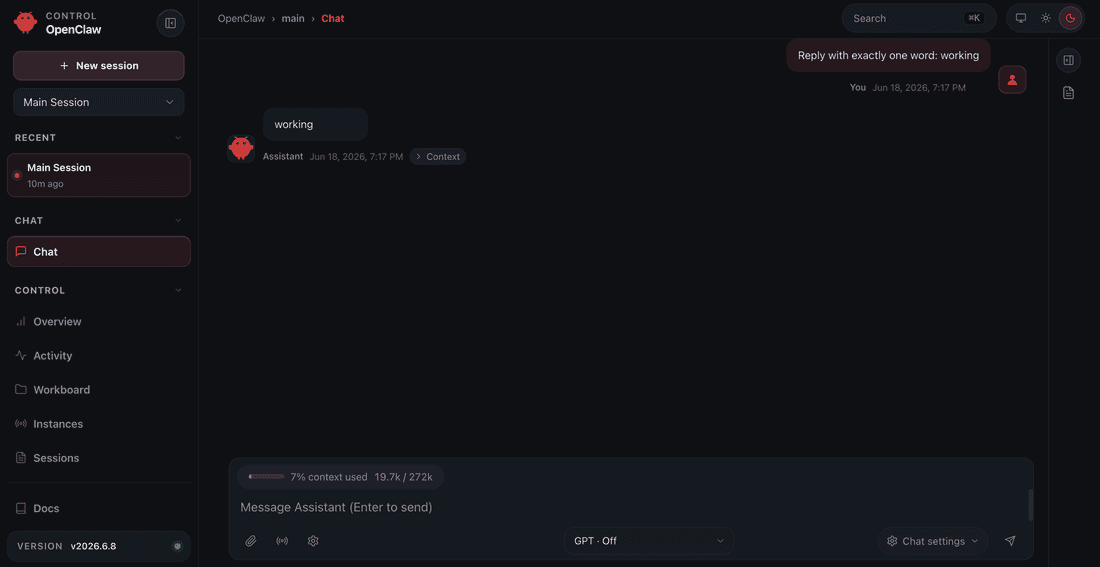
If it replies working, the full chain — gateway → OpenAI → response — is live.
The Control UI is at http://<your-instance-ip>:18789/; paste your
OPENCLAW_GATEWAY_TOKEN into Settings to log in.
Browsers block the Control UI over plain HTTP at a remote IP ("Secure browser
context required"). Reach it over an SSH tunnel so it loads as 127.0.0.1 — see
Troubleshooting #3.
Troubleshooting (real errors)
These are errors we actually hit during this deploy — not hypotheticals.
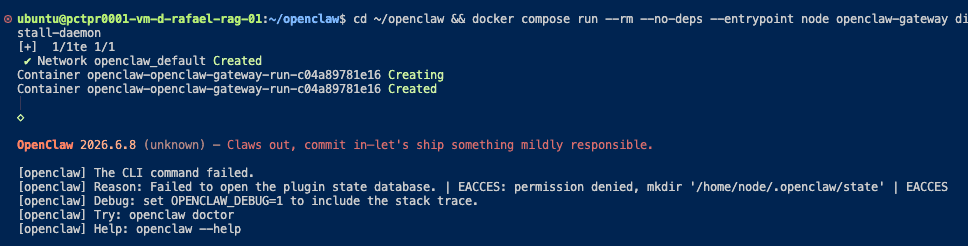
1. EACCES: permission denied, mkdir '/home/node/.openclaw/state'
Hit on the first onboarding run when ~/.openclaw didn't pre-exist:
[openclaw] The CLI command failed.
[openclaw] Reason: Failed to open the plugin state database.
| EACCES: permission denied, mkdir '/home/node/.openclaw/state' | EACCES
Cause: Docker auto-created the bind-mount source ~/.openclaw owned by
root (0:0). The container runs as user node (uid 1000), so it can't write
inside that root-owned directory.
Fix: give the directory to uid 1000 (which is also your ubuntu user):
sudo chown -R 1000:1000 ~/.openclaw
Pre-creating the directory yourself (Step 6) avoids this entirely.
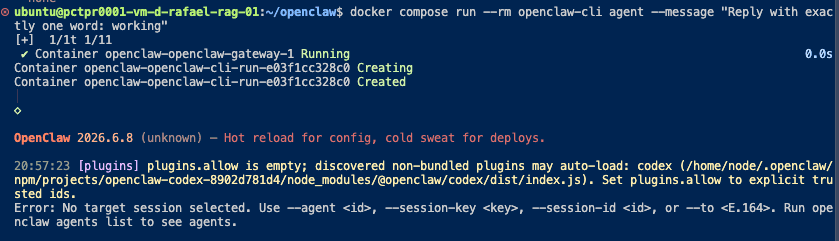
2. No target session selected
The first time we ran agent without specifying who to talk to:
Error: No target session selected. Use --agent <id>, --session-key <key>,
--session-id <id>, or --to <E.164>. Run openclaw agents list to see agents.
Cause: openclaw agent runs one turn against a specific agent/session; with
no channel configured there's no implicit target.
Fix: list agents and pass the id explicitly:
docker compose run --rm openclaw-cli agents list          # shows: main (default)
docker compose run --rm openclaw-cli agent --agent main --message "..."
3. Control UI: "Secure browser context required"
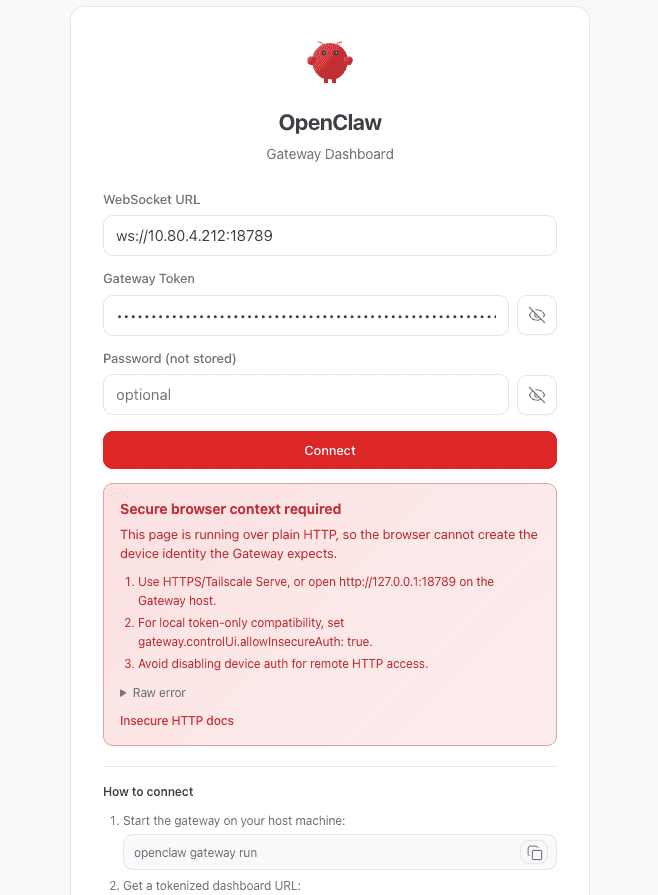
Opening the Control UI from another machine (e.g. macOS) at the VM's IP over plain HTTP, the page refuses to connect:
Secure browser context required
This page is running over plain HTTP, so the browser cannot create the
device identity the Gateway expects.
Cause: browsers only expose the crypto APIs OpenClaw needs in a secure
context — HTTPS, or localhost/127.0.0.1. A remote http://<ip>:18789 is
neither, so it's blocked in the browser, regardless of the server-side
gateway.controlUi.allowInsecureAuth flag.
Fix: tunnel the port over SSH so the browser talks to 127.0.0.1 (a secure
context). On your local machine:
ssh -L 18789:127.0.0.1:18789 ubuntu@<your-vm-ip>
Then open http://127.0.0.1:18789/#token=<your-token> locally. The proper
long-term fix is HTTPS via a reverse proxy — the next guide.
Security notes
On startup the gateway logged warnings worth acting on before any public exposure:
- Binding to a non-loopback address — the gateway listens on the LAN. Don't expose port 18789 to the public internet without auth in front of it.
gateway.controlUi.allowInsecureAuth=true— flagged dangerous. Rundocker compose run --rm openclaw-cli security audit.plugins.allowis empty — non-bundled plugins (e.g.codex) may auto-load. Set an explicit allowlist of trusted plugin ids.
Hardening this behind a reverse proxy with HTTPS is the subject of the next guide.
You can now deploy and operate your own AI agent on a box you control.
What you've accomplished
You went from a bare WEC Instance to a working, self-hosted AI agent:
- Provisioned and verified an Ubuntu VM on WEC
- Stood up the OpenClaw gateway with Docker Compose and the official prebuilt image
- Wired in your own model provider (OpenAI) and confirmed it end-to-end — the agent replied over the CLI and the Control UI
- Hit (and fixed) the real permission, session, and secure-context issues along the way
The agent is yours: your key, your box, your data. From here it's about making it secure, reachable, and useful.
What can you do with it?
OpenClaw isn't a chatbot — it's an autonomous agent that can act on your box. Now that it's running, here's what it unlocks (some features need extra configuration, and we cover the big ones later in this series):
- Run real work on the machine. It can execute shell commands and read/write files — "check what's using the disk," "tail the logs and summarize the errors" — with configurable sandboxing for how much you let it touch.
- Talk to it from your phone. OpenClaw connects to WhatsApp, Telegram, Discord, Slack, Signal, and iMessage, so you delegate tasks conversationally without SSH. (We wire up Telegram in the next guide.)
- Browse and act on the web. Built-in browser automation lets it navigate sites, fill forms, and extract data autonomously.
- Write and run code. It integrates with Claude Code for autonomous coding — writing and modifying code, running tests, and even opening PRs.
- Work in the background, proactively. It runs 24/7, can execute background tasks, and does "heartbeat" check-ins instead of only reacting when you message it.
- Grow with you. A community skill library (ClawHub), self-written tools, and multi-agent orchestration mean it gets more capable over time — backed by persistent memory that carries context across conversations.
Typical real uses people run: inbox and calendar management, document processing, infrastructure tasks on the box, content pipelines, and autonomous code testing.
What's next
This is Part 1 of the Self-hosting OpenClaw series on running production-grade AI infrastructure on a WEC Instance. Coming up:
- Part 2 — Secure OpenClaw with a Caddy reverse proxy + HTTPS (next) — put HTTPS in front of the gateway so you can drop the
allowInsecureAuthworkaround and reach the Control UI from anywhere, safely. - Part 3 — Add a Telegram channel — talk to your agent from your phone.
- Part 4 — Make OpenClaw private with a NetBird mesh VPN — put it on a private mesh and close the public ports.
Companion files for this guide — docker-compose.yml and .env.example — live in
the WiLine manifests repo (link coming with the repo).
Teardown
docker compose down              # stop + remove containers
docker compose down --rmi all -v # also remove the image and volumes
To remove config/state on the host:
rm -rf ~/.openclaw ~/.openclaw-auth-profile-secrets. To stop billing entirely,
delete the VM from the WiLine portal.