Get Started with WEC
Welcome to WiLine Edge Cloud (WEC). You can deploy virtual machines, monitor resource usage, track costs, and manage your cloud environment from a unified dashboard. The platform provides real-time insights into billing and infrastructure usage, along with guided workflows to help you get started quickly.
Log In
To sign in to WiLine Edge Cloud (WEC):
- Navigate to WiLine Edge Cloud
- Enter your Email
- Enter your Password
- Click Sign In
If you don’t have your credentials, please contact WiLine for support.
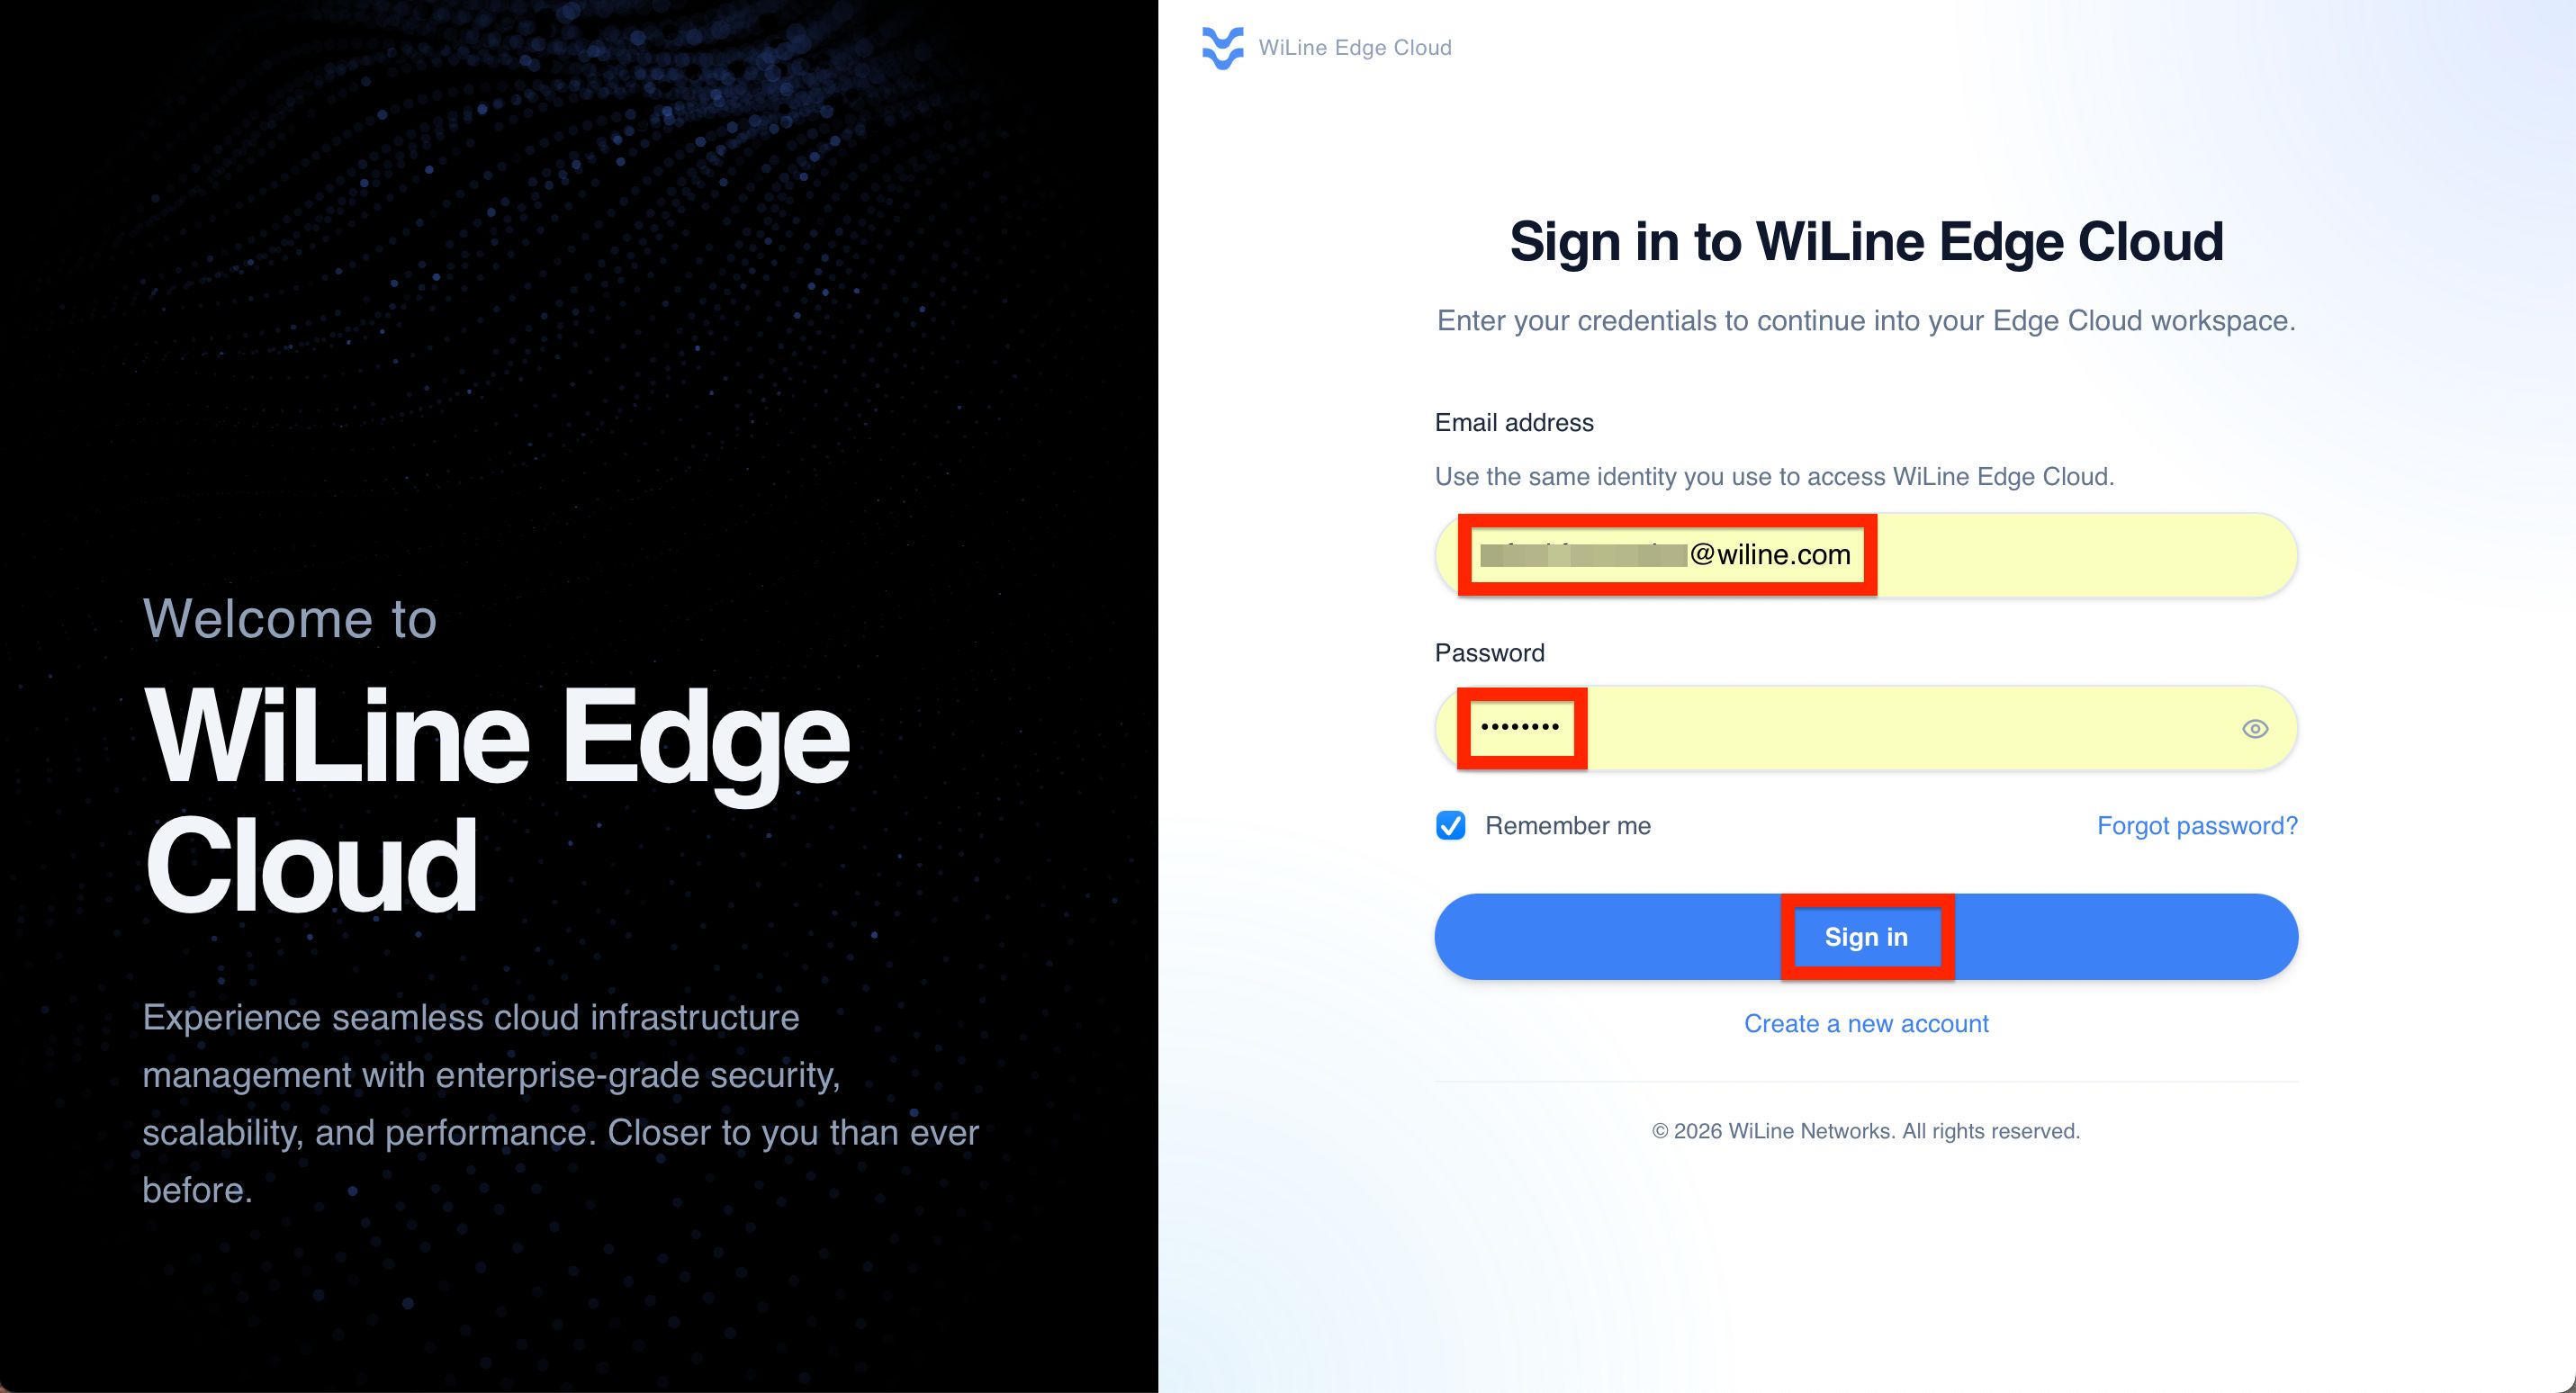
Figure 1. Signing into WEC.
The login process may include a silent ReCaptcha check for security purposes.
Once signed in, you can start managing your cloud resources immediately.
Forgot Password
If you have forgotten your password, follow these steps to reset it:
Step 1: Request a password reset
- Click Forgot Password on the login screen (see Figure 1)
- Enter your Email address associated with your account
- Click Send Reset Link
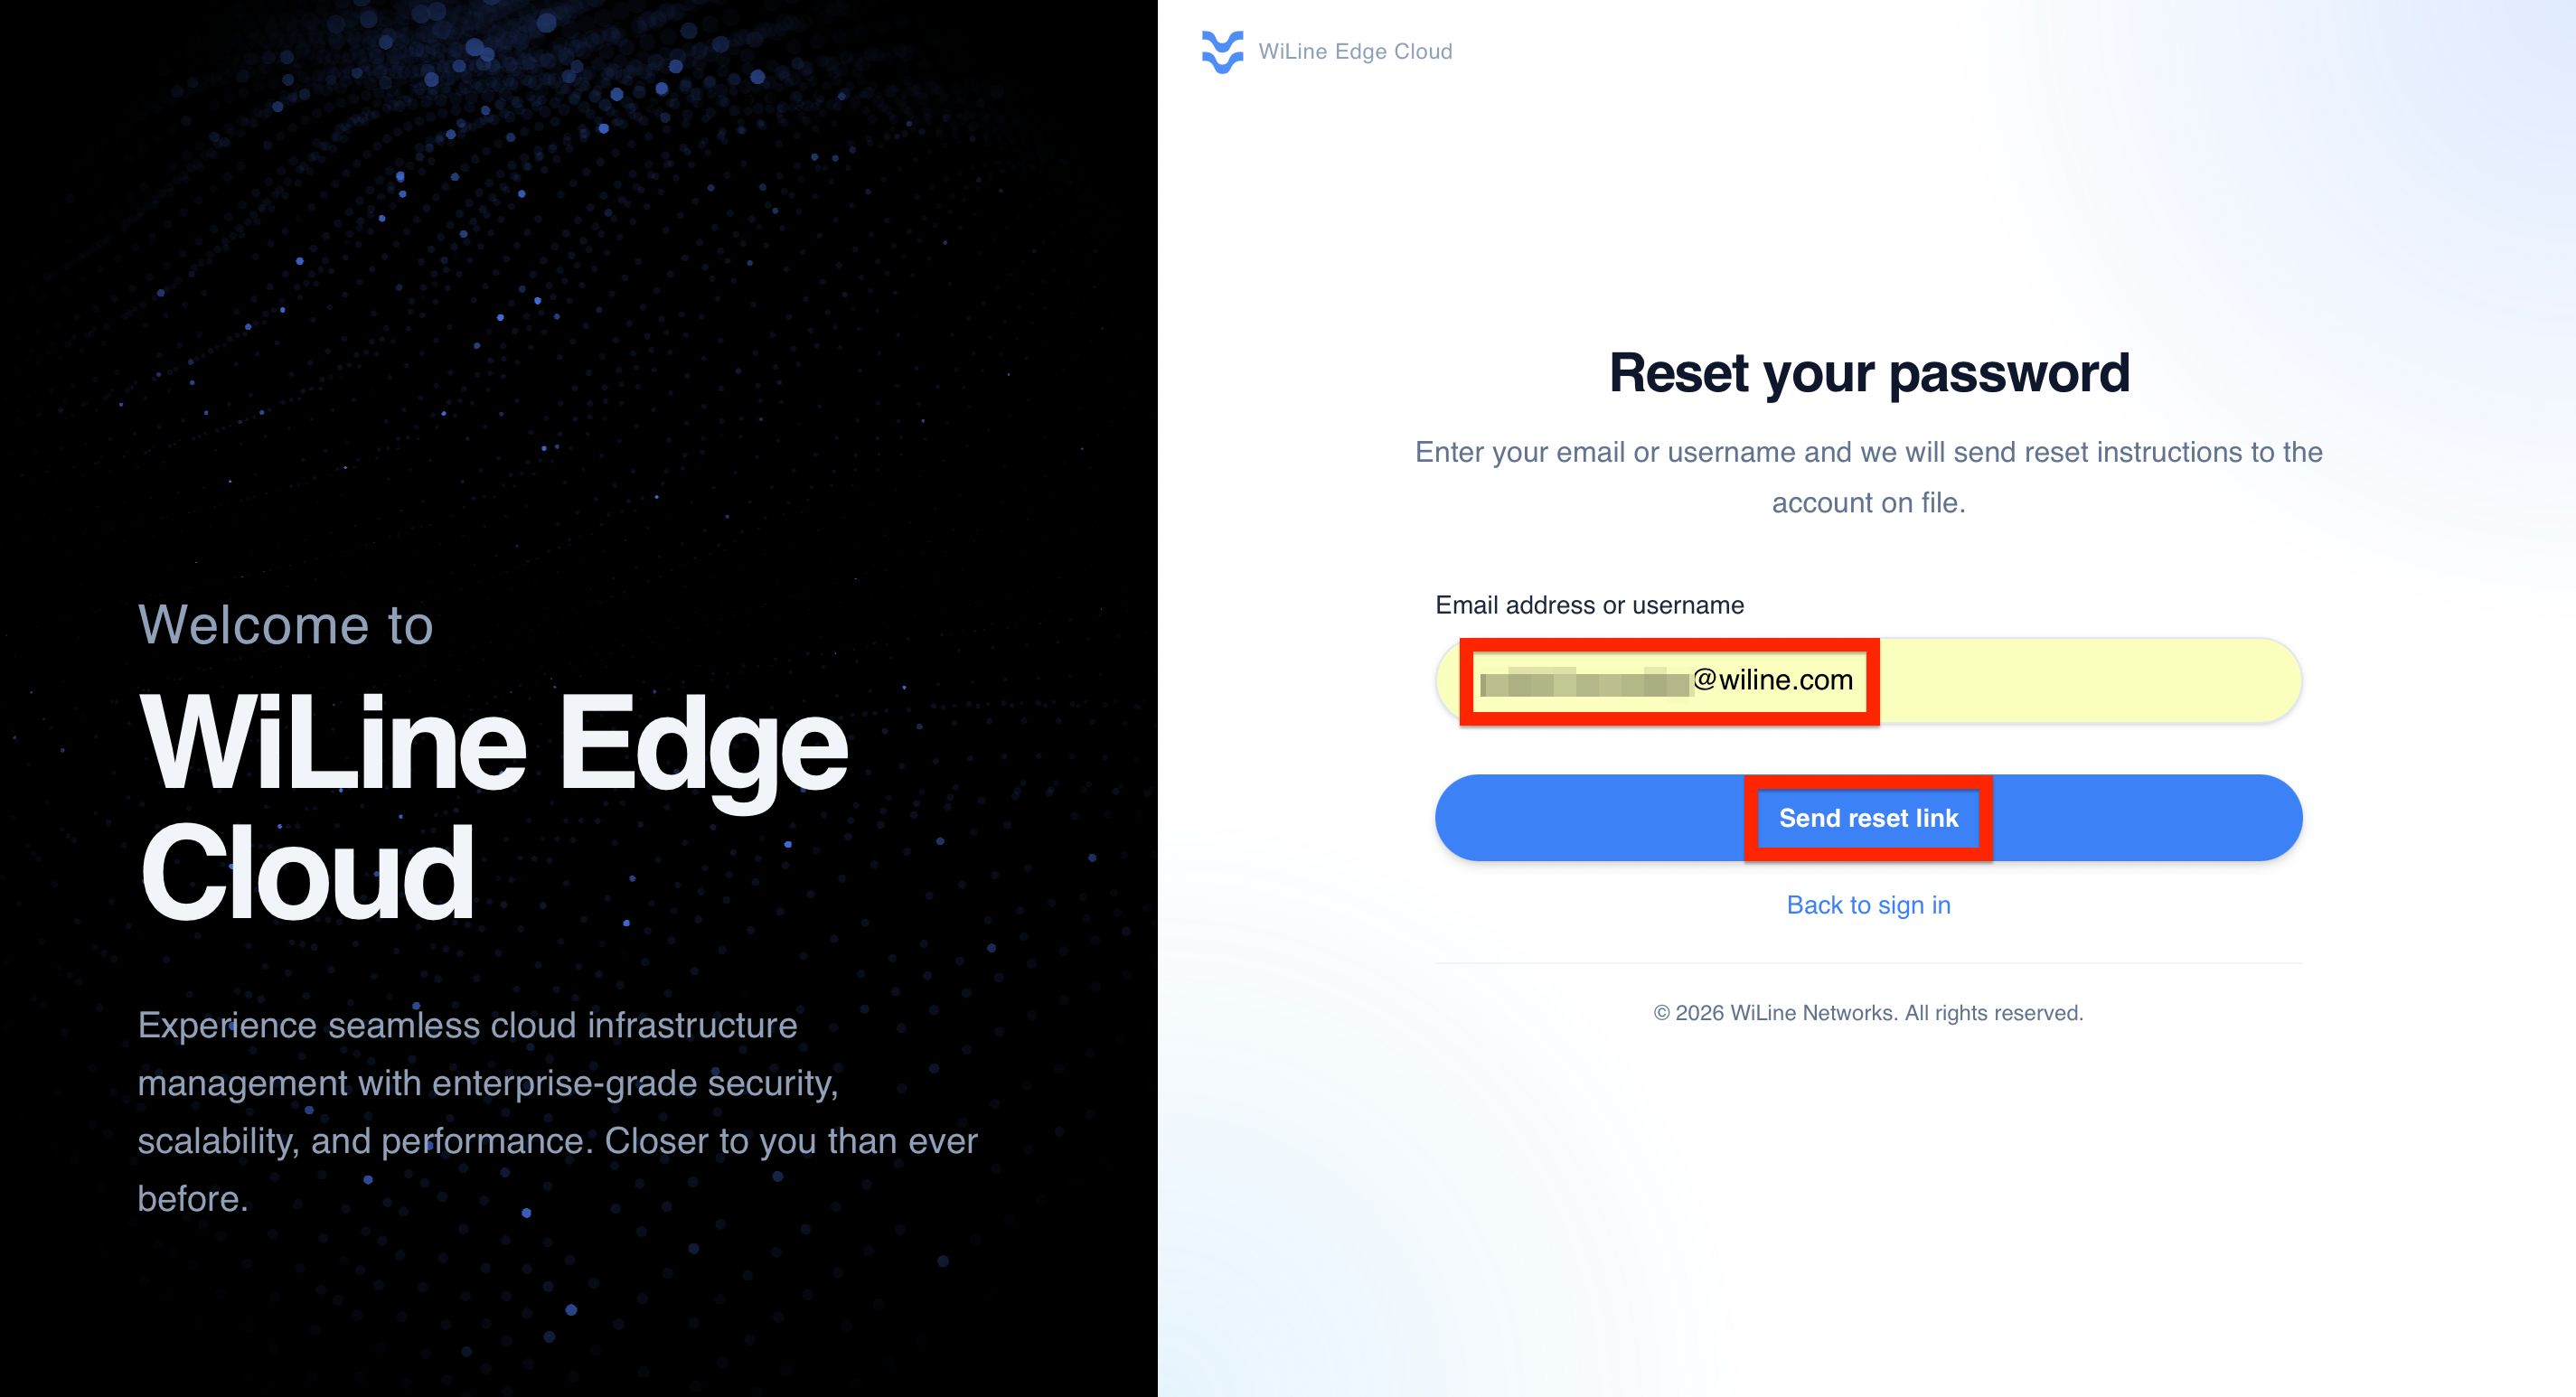
Figure 2. Enter your Email address to receive a password reset link.
Once the reset link is sent, proceed to check your email.
Step 2: Check your email
- Open the password reset email from WiLine
- Click the password reset link provided in the email
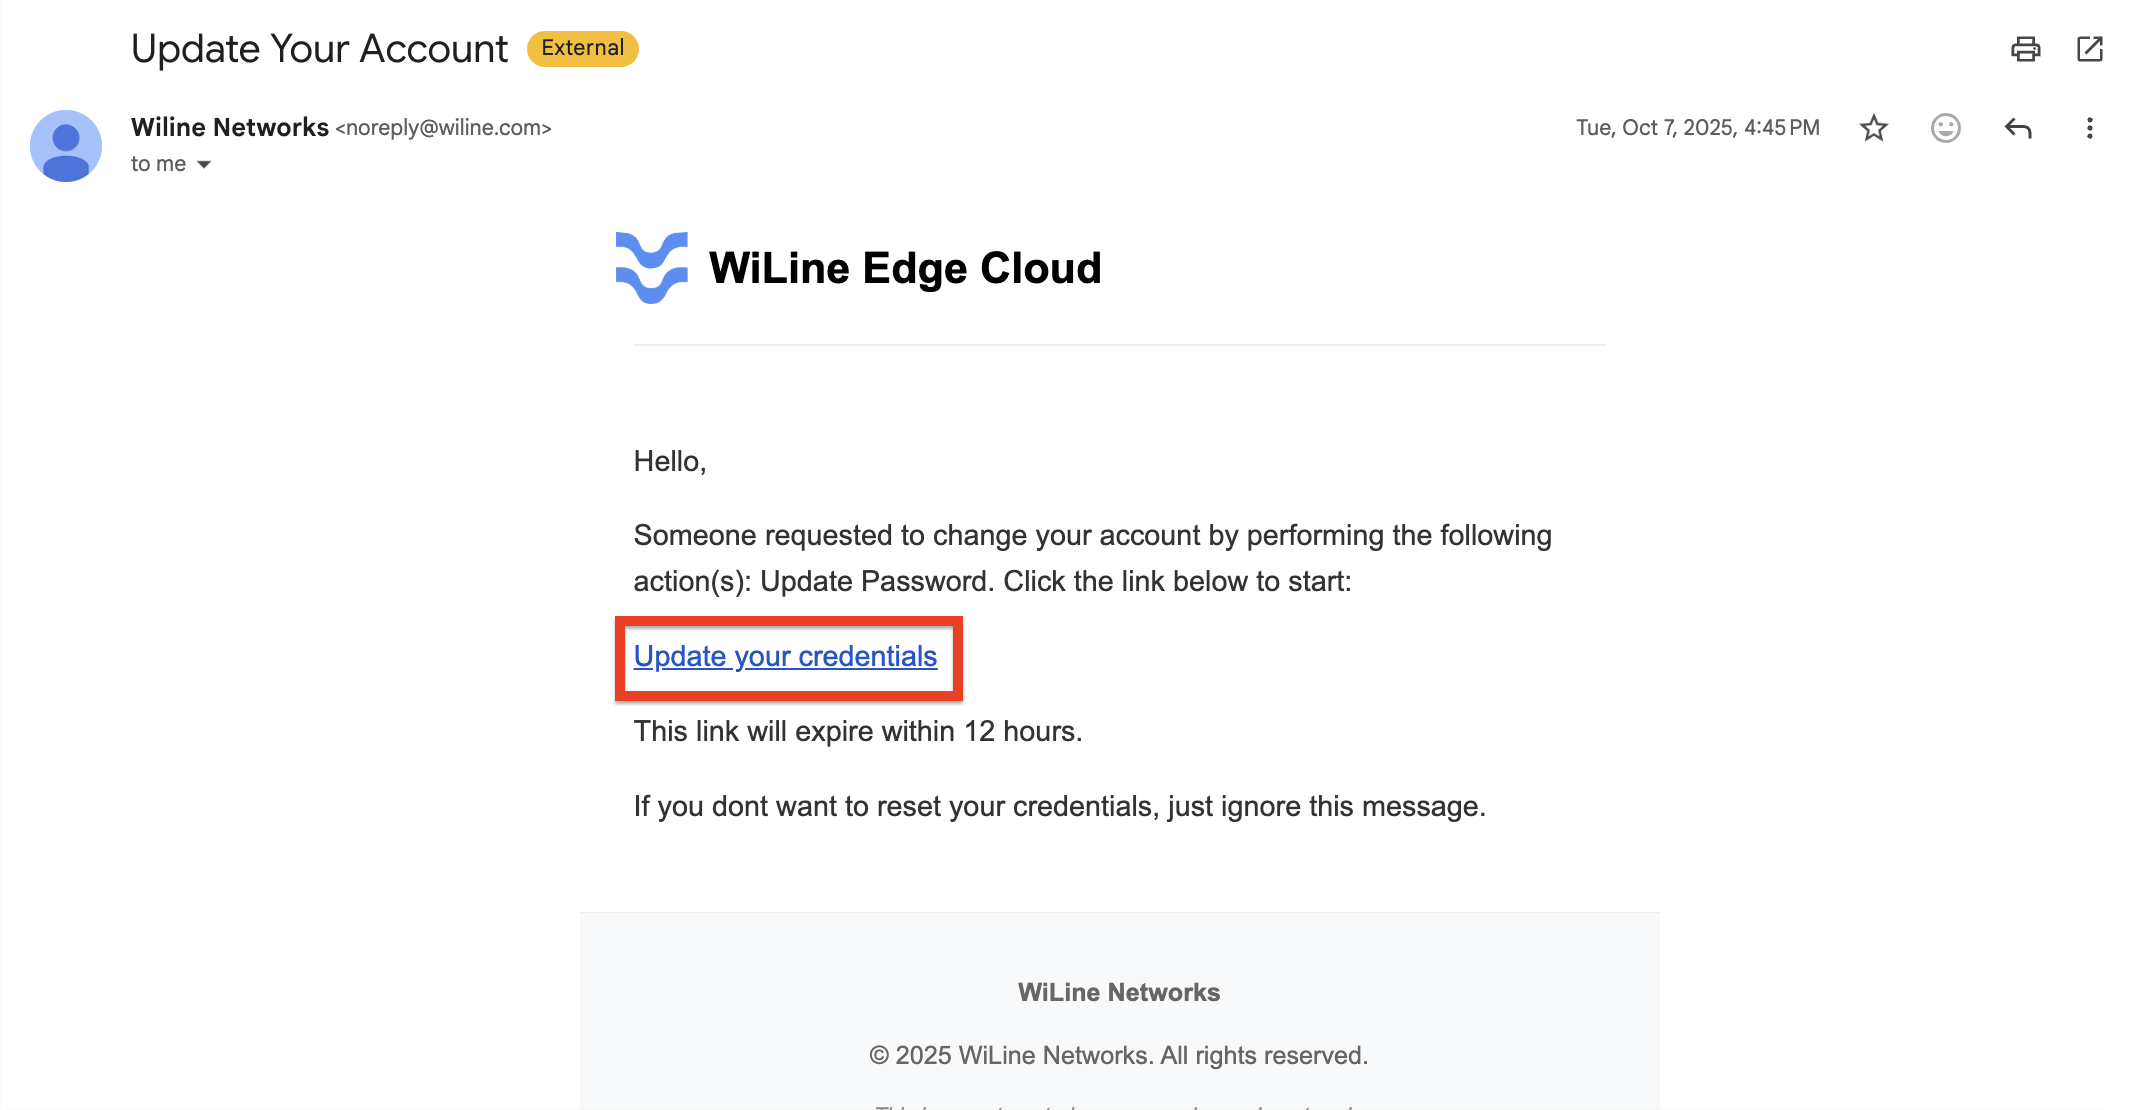
Figure 3. Open the password reset email and click the link to continue.
After clicking the reset link, you will be redirected to the password setup screen.
Step 3: Set a new password
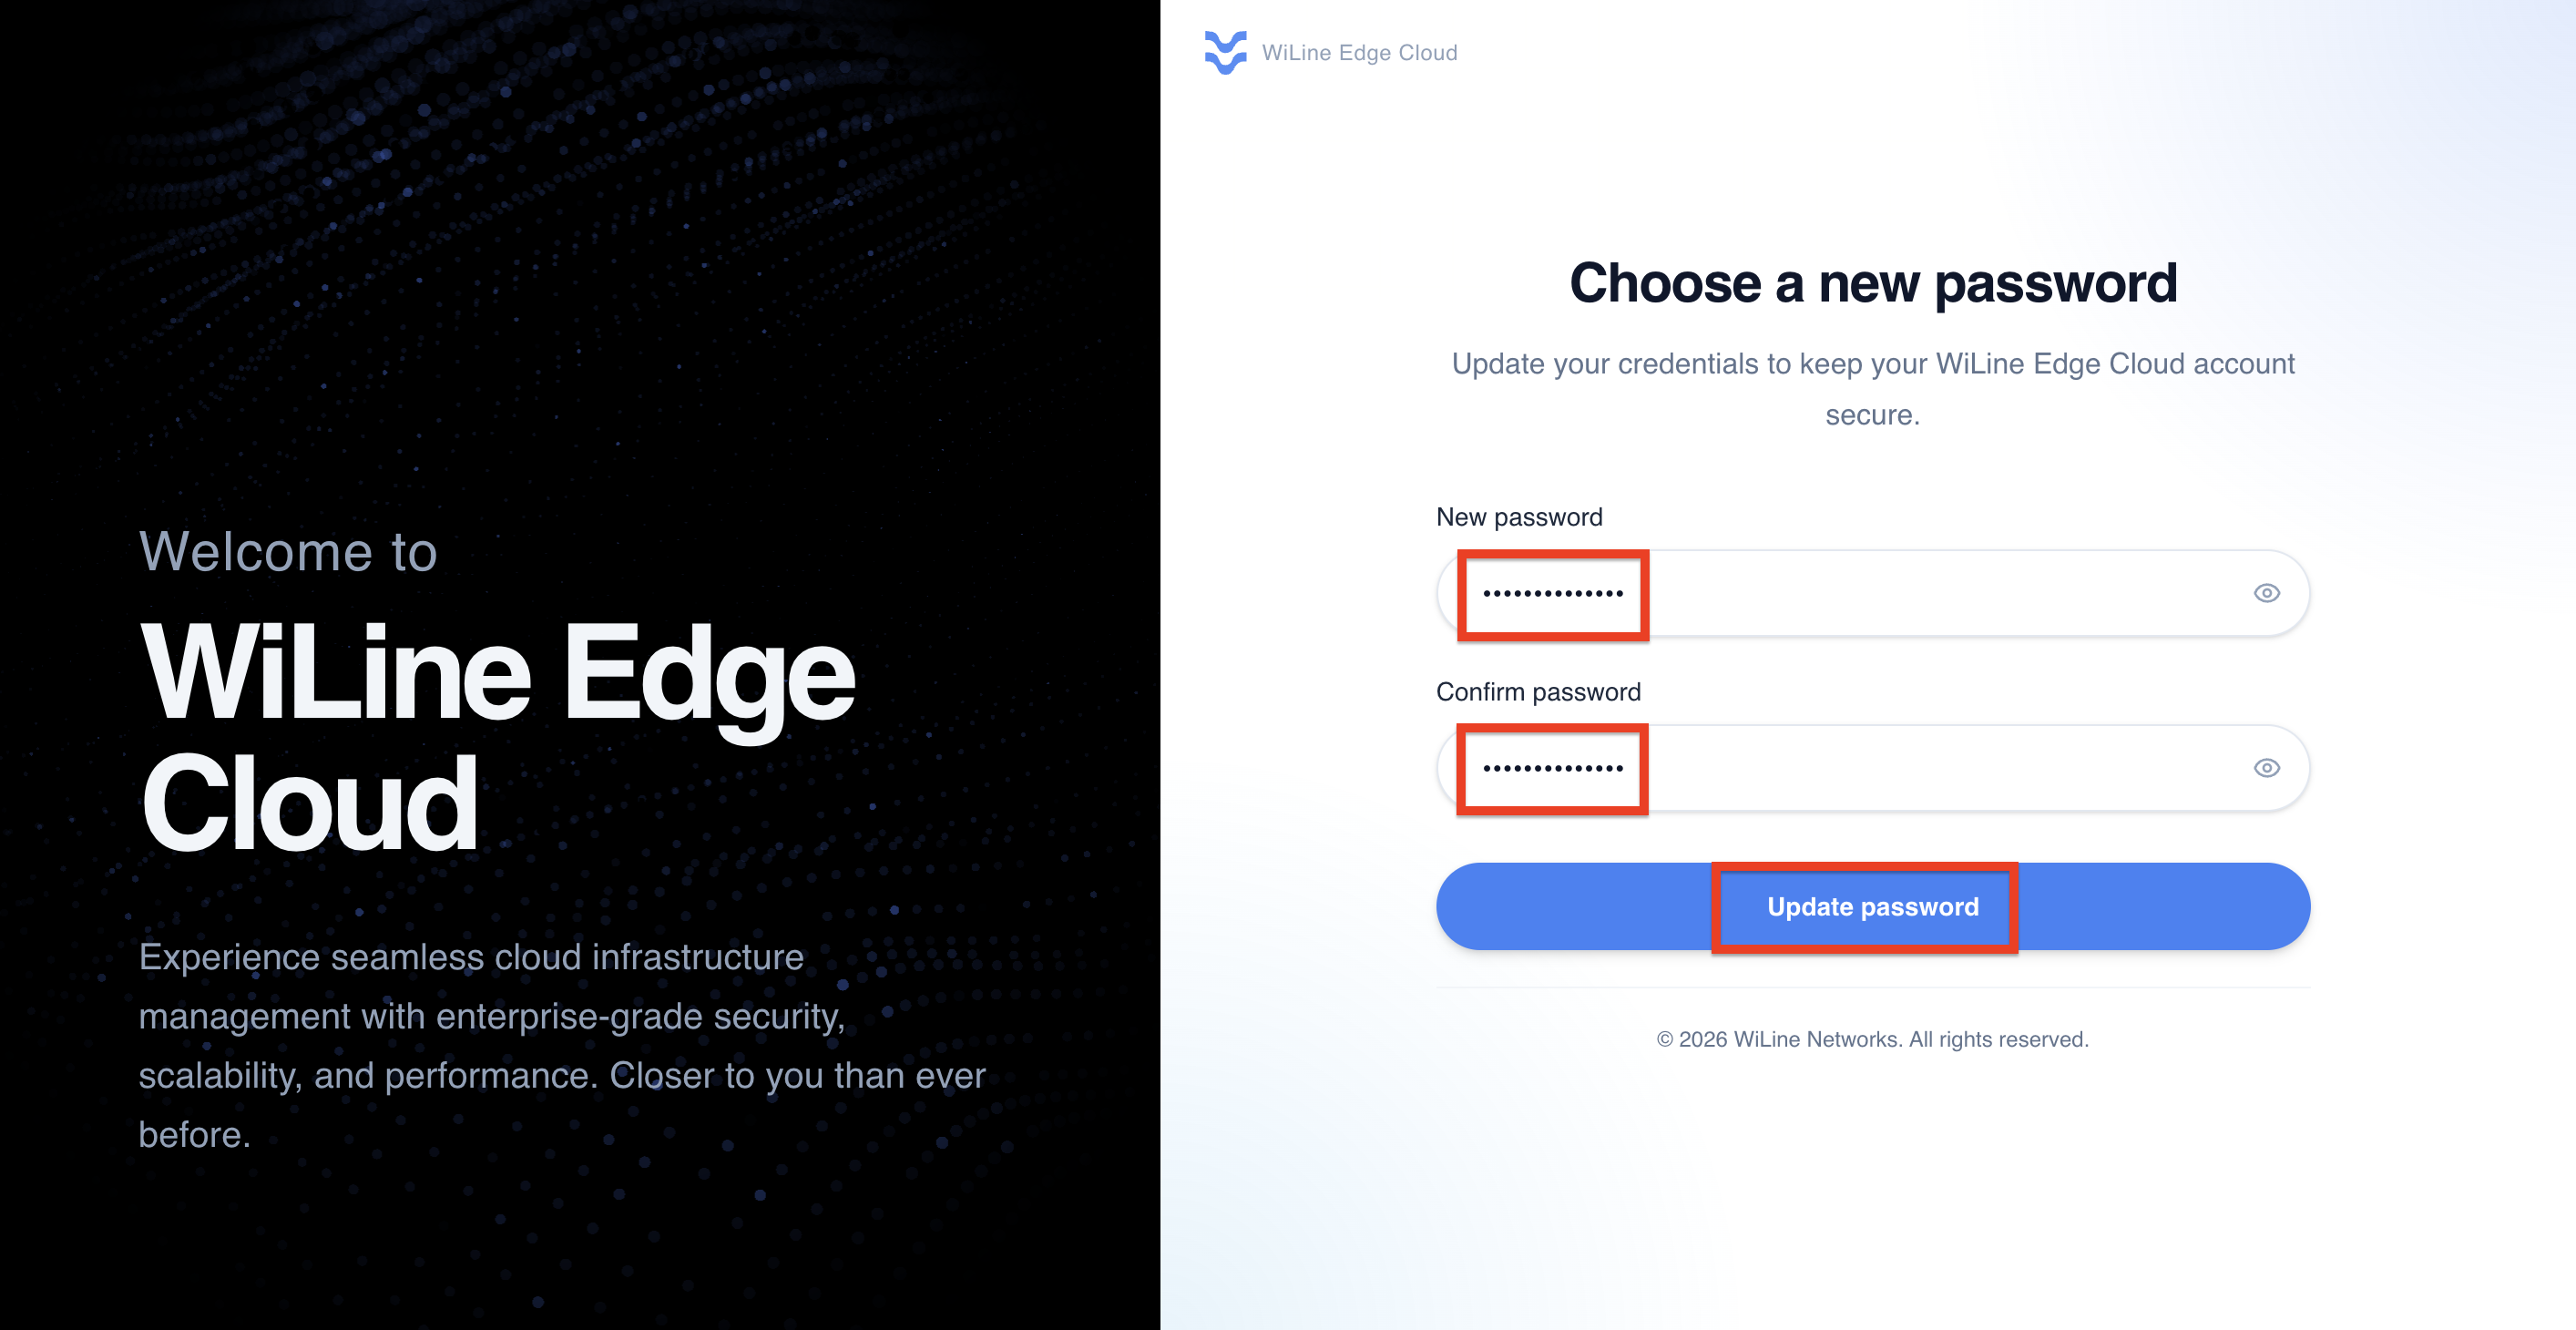
Figure 4. Choose a new password that meets all security requirements.
- Enter a New password (see the password requirements below)
- Confirm your password by re-entering it
- Click Update Password
After updating your password, return to the login page and sign in using your new credentials.
:::warning Password requirements
Make sure your new password meets the following criteria:
- At least 8 characters long
- At least one uppercase letter (A–Z)
- At least one lowercase letter (a–z)
- At least one number (0–9)
- At least one special character (!@#$%^&*)
- Cannot contain an asterisk (*)
Example of a valid password:
Cloud@1234
Note: Avoid using common or easily guessable passwords. :::
Create a New Account
Account creation consists of five steps, including email verification, user setup, and billing configuration.
To create a new WiLine Edge Cloud account, follow these steps:
- Navigate to WiLine Edge Cloud
- Click Create an account on the login page (See Figure 1)
Step 1: Email and Account Setup
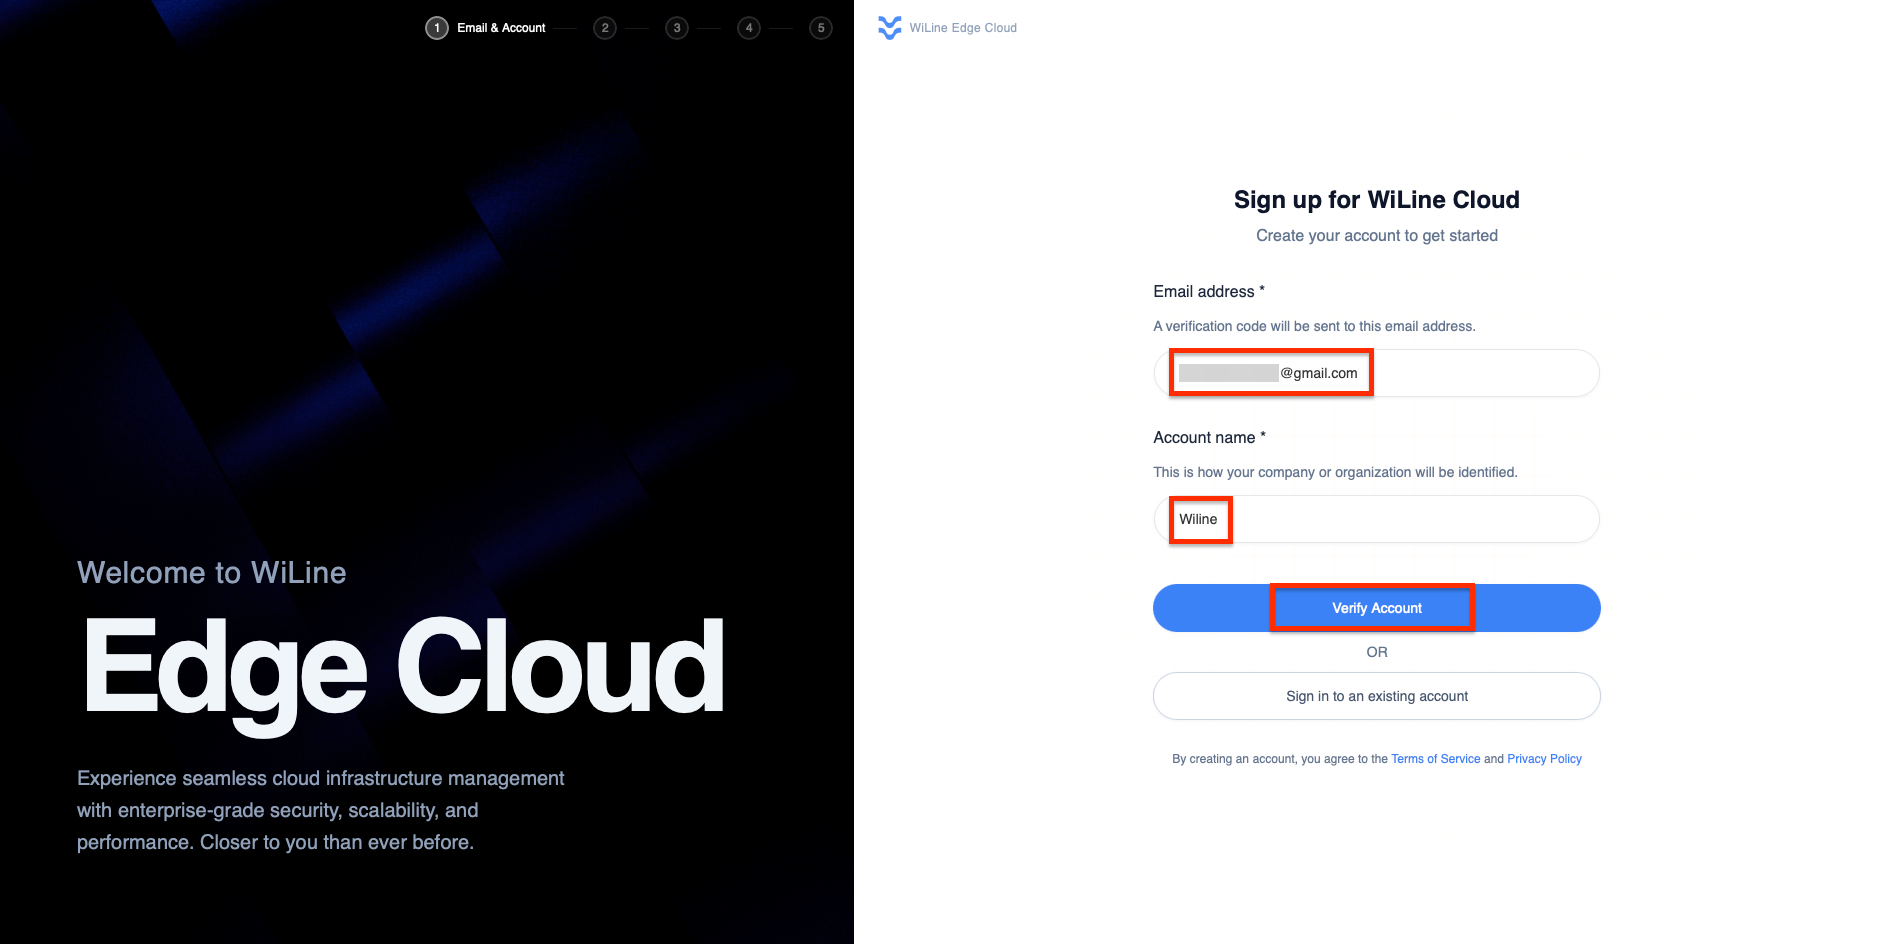 Figure 5. Enter your Email address and Account name.
- Email address – We will send a verification code to this address
- Account name – Your company or organization identifier (e.g.,
acme-corp,my_startup)
Click Verify Account to proceed.
After submitting your details, you will be prompted to verify your email. This ensures your account is securely linked to your email address.
Step 2: Email Verification
After submitting your email, you will receive a verification code that you must enter to continue.
1. Check your email
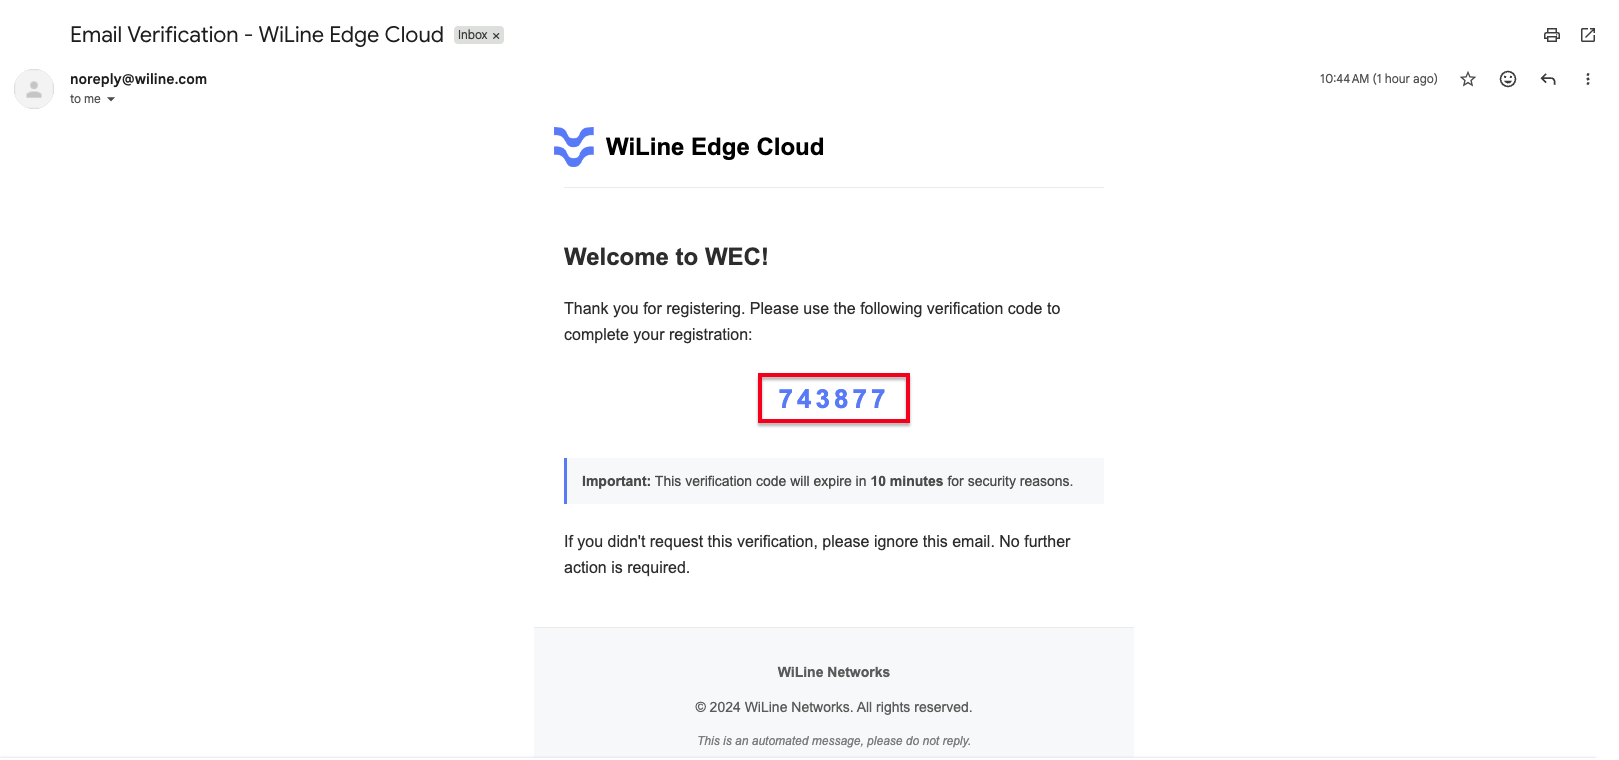
Figure 6. Verification email containing your 6-digit code.
- Open the verification email from WiLine
- Locate the 6-digit verification code
- Note that the code expires in 10 minutes
If you did not request this email, you can safely ignore it.
2. Enter the verification code
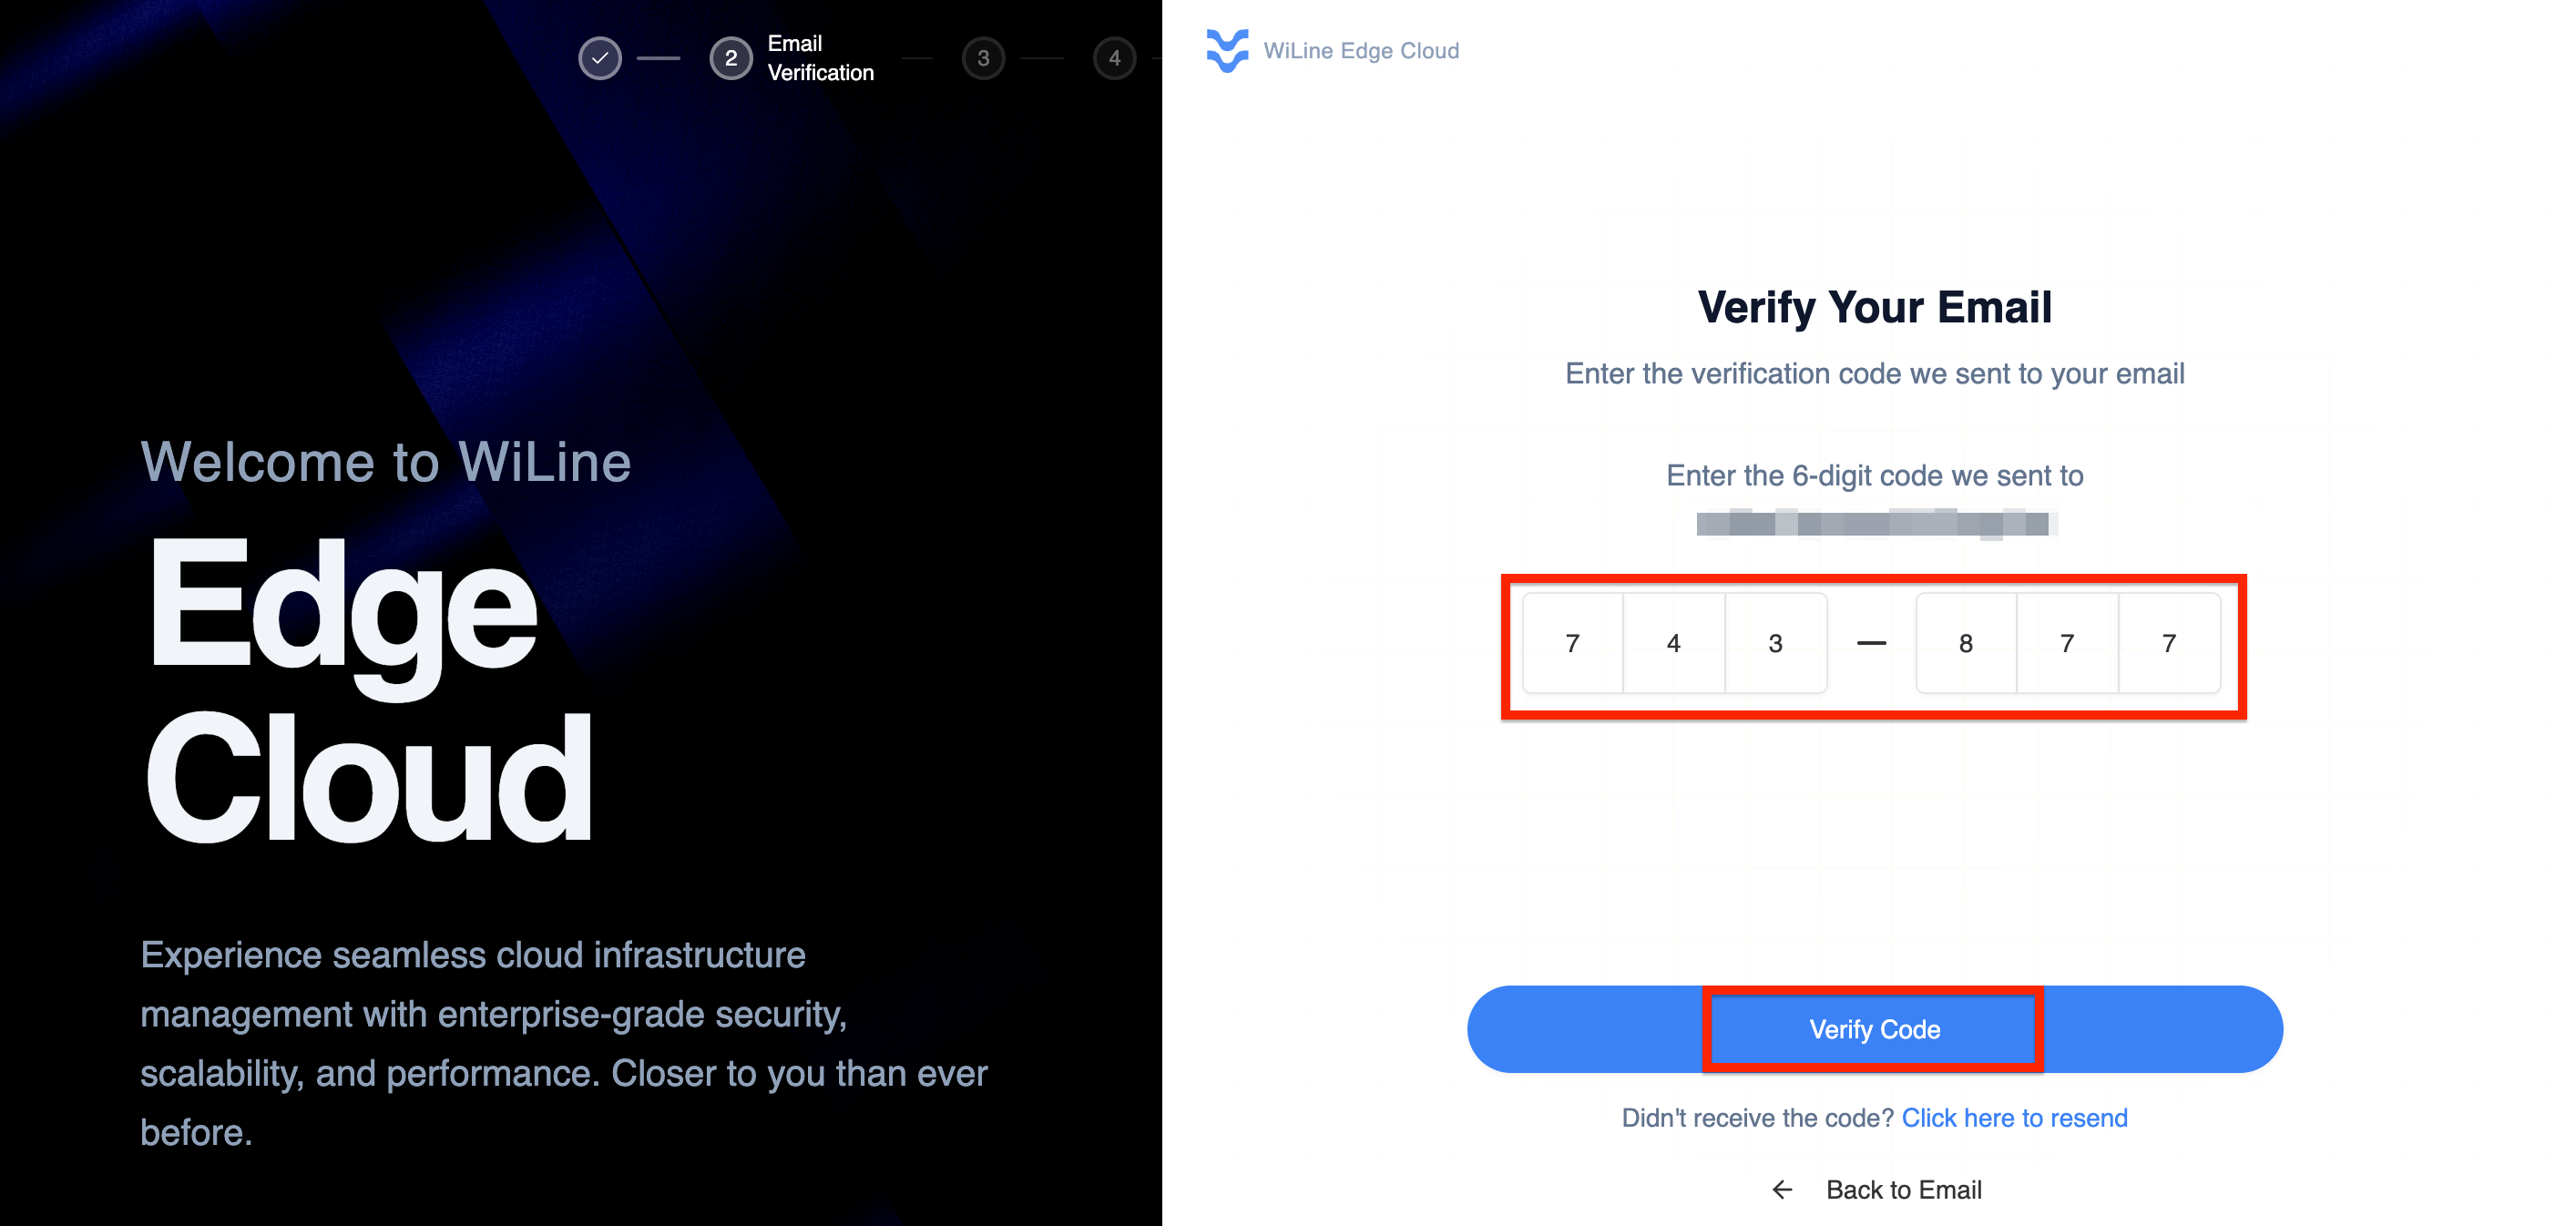
Figure 7. Enter the 6-digit verification code in the platform.
- Enter the 6-digit verification code in the verification screen
- Click Verify Code
3. If you encounter issues
- Click Resend to receive a new code
- Click Back to Email to correct your email address
If you do not see the email, check your spam folder before requesting a new code.
Once your email is verified, you will be automatically directed to the root account setup step.
Step 3: Root Account Owner Information
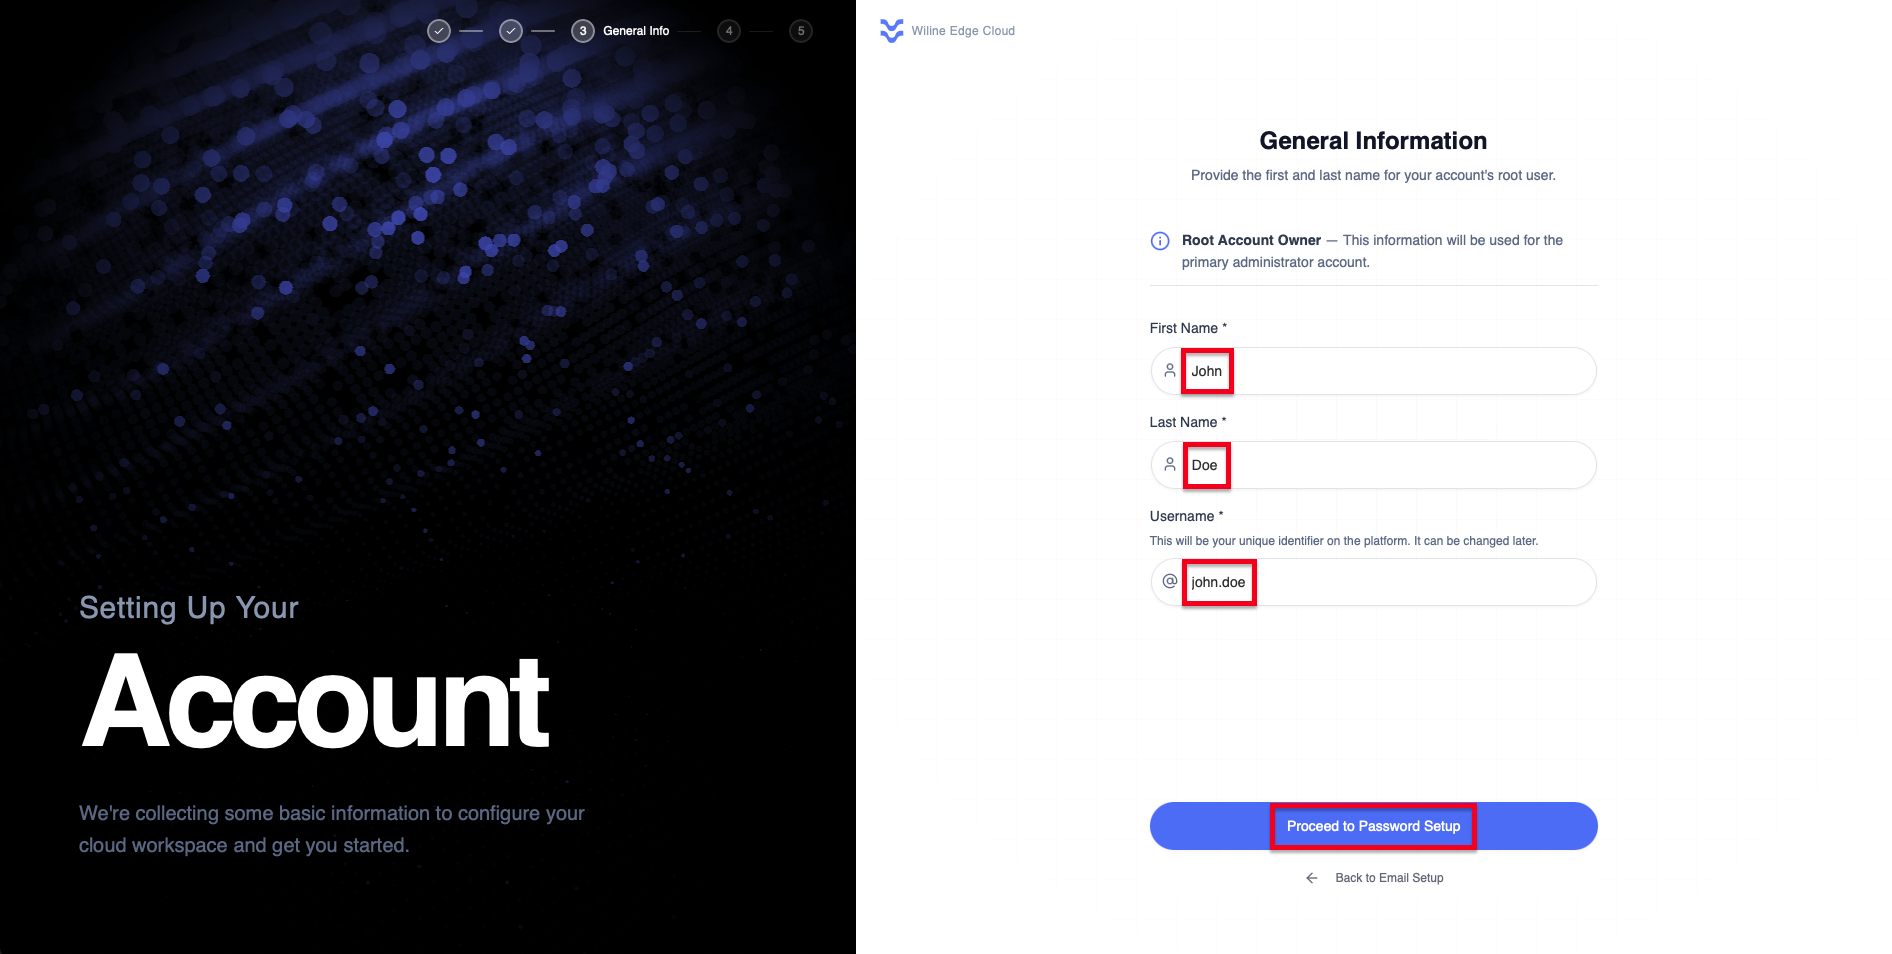 Figure 7. Provide the primary administrator account details.
Enter the following information for the root user:
| Field | Description |
|---|---|
| First Name | Root account owner's first name |
| Last Name | Root account owner's last name |
| Username | Unique platform identifier (can be changed later) |
Click Proceed to Password Setup to continue.
After submitting your details, you will be redirected to password setup. This step defines the primary administrator for your account.
Step 4: Set Your Password
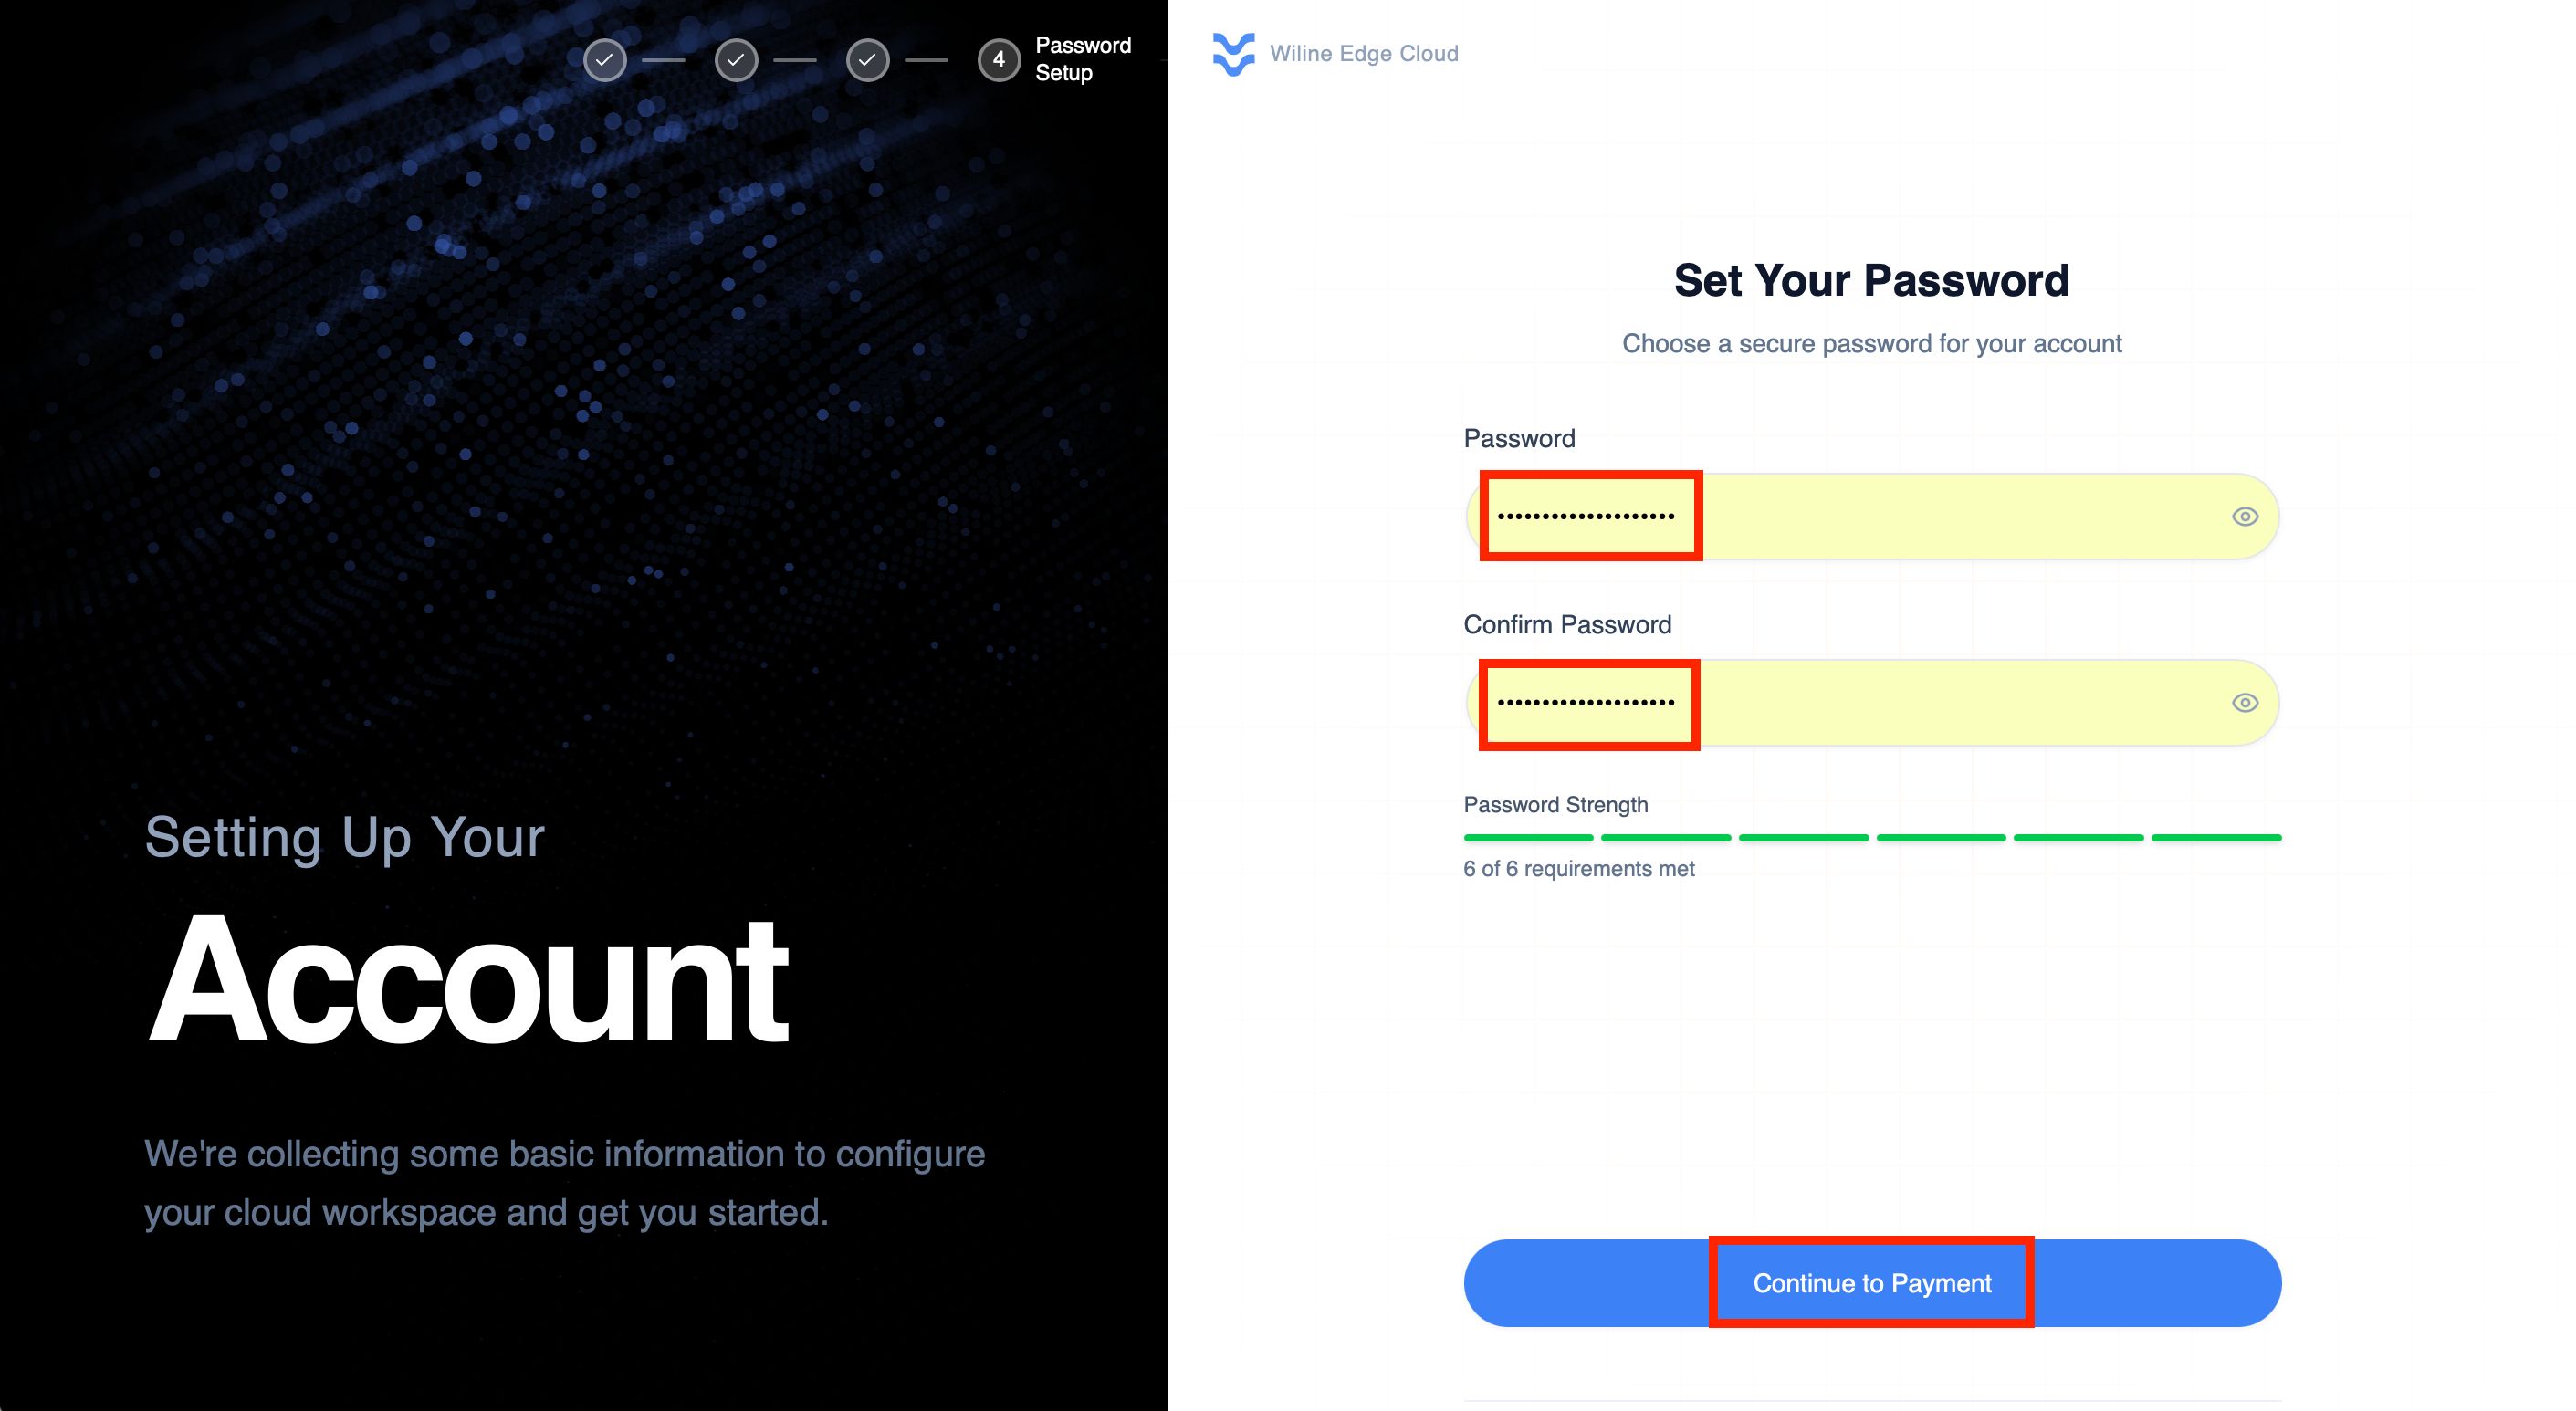 Figure 8. Choose a secure password for your account.
- Password – Create a strong password
- Confirm Password – Re-enter the same password
The password strength indicator shows requirements met (e.g., 6 of 6). Ensure your password meets all security requirements.
Click Continue to Payment after setting your password.
Once your password is configured, you will proceed to payment setup. Your password secures access to your account.
Step 5: Payment Information
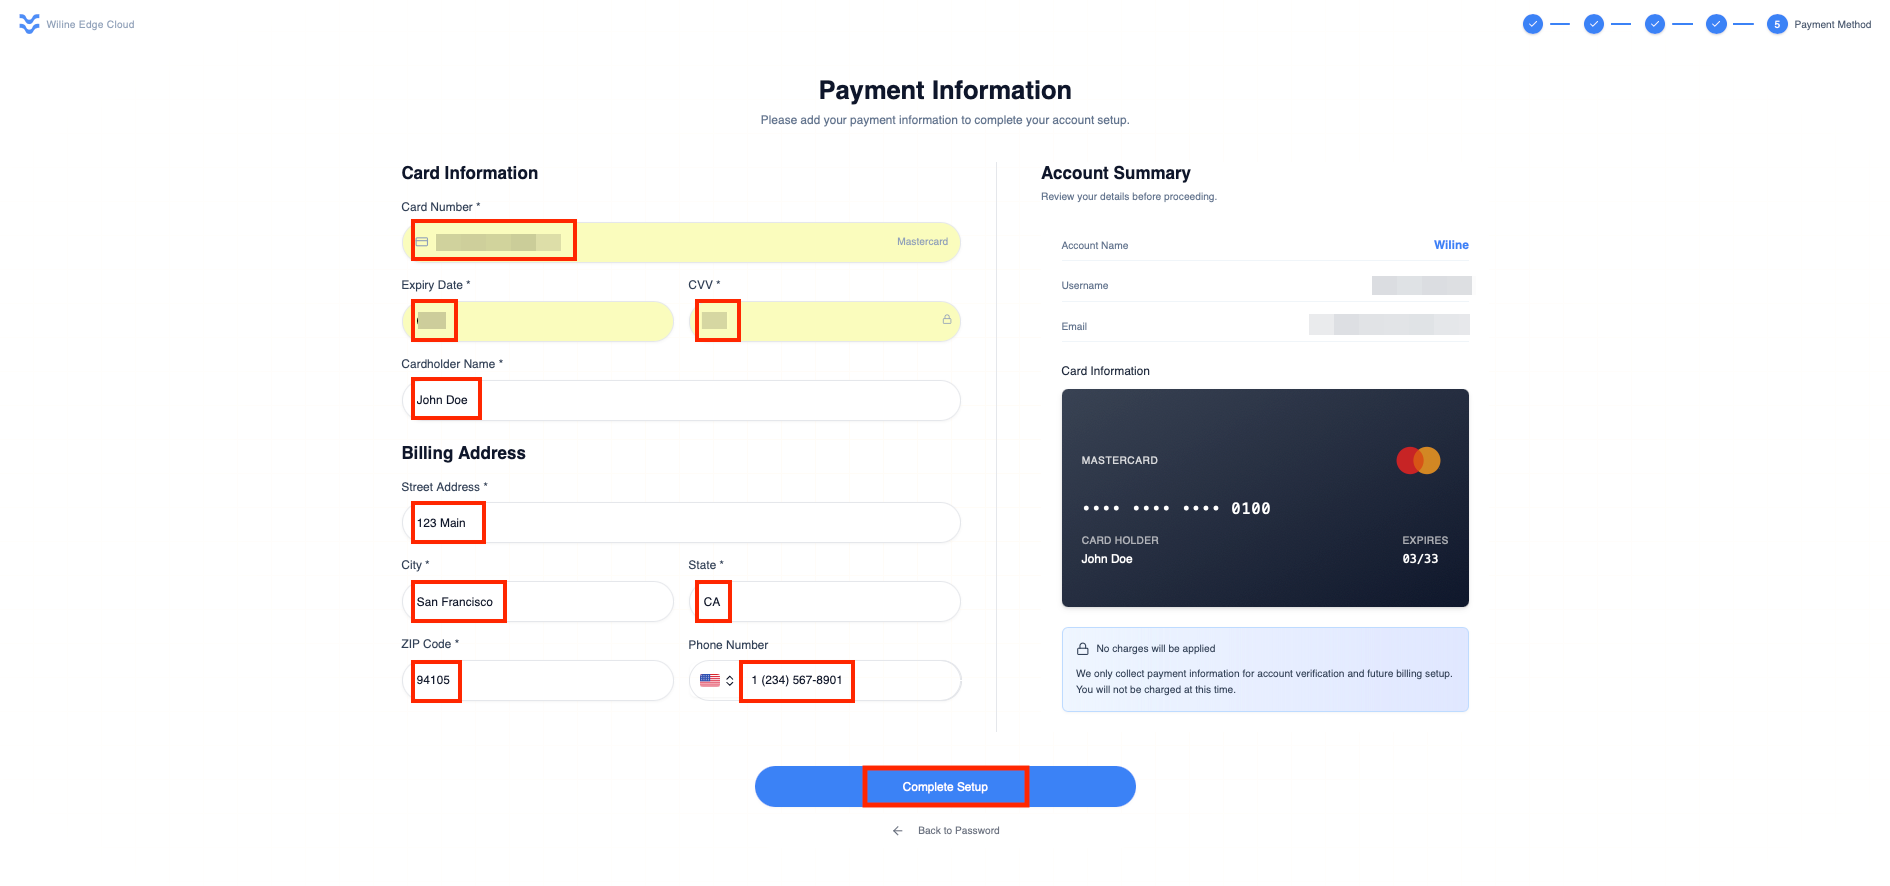 Figure 9. Add payment details to complete account setup.
Fill in your payment information:
| Field | Description |
|---|---|
| Card Number | Credit or debit card number |
| Expiry Date | MM/YY format |
| CVV | 3-digit security code |
| Cardholder Name | Name as it appears on the card |
| Billing Address | Street address, city, state, ZIP code |
| Phone Number | Contact phone number |
:::info No charges applied WiLine collects payment information for account verification and future billing setup only. You will not be charged at this time. :::
Review your account summary on the right, then click Complete Setup to finish creating your account.
After completing payment setup, your account will be fully created and ready to use. You can then access the platform and begin managing your resources.
What's Next?
Once your account is created and you have access to the dashboard, you can:
- Access the WiLine Edge Cloud dashboard
- Review your billing and account configuration
- Deploy your first virtual machine using the guided workflow
Navigate the WiLine Edge Cloud Dashboard
After logging in, you will land on the Dashboard, which provides a high-level overview of your environment. This includes current and projected costs, alerts, and a resource usage overview. You can also navigate manually via Home > Dashboard from the left-side menu.
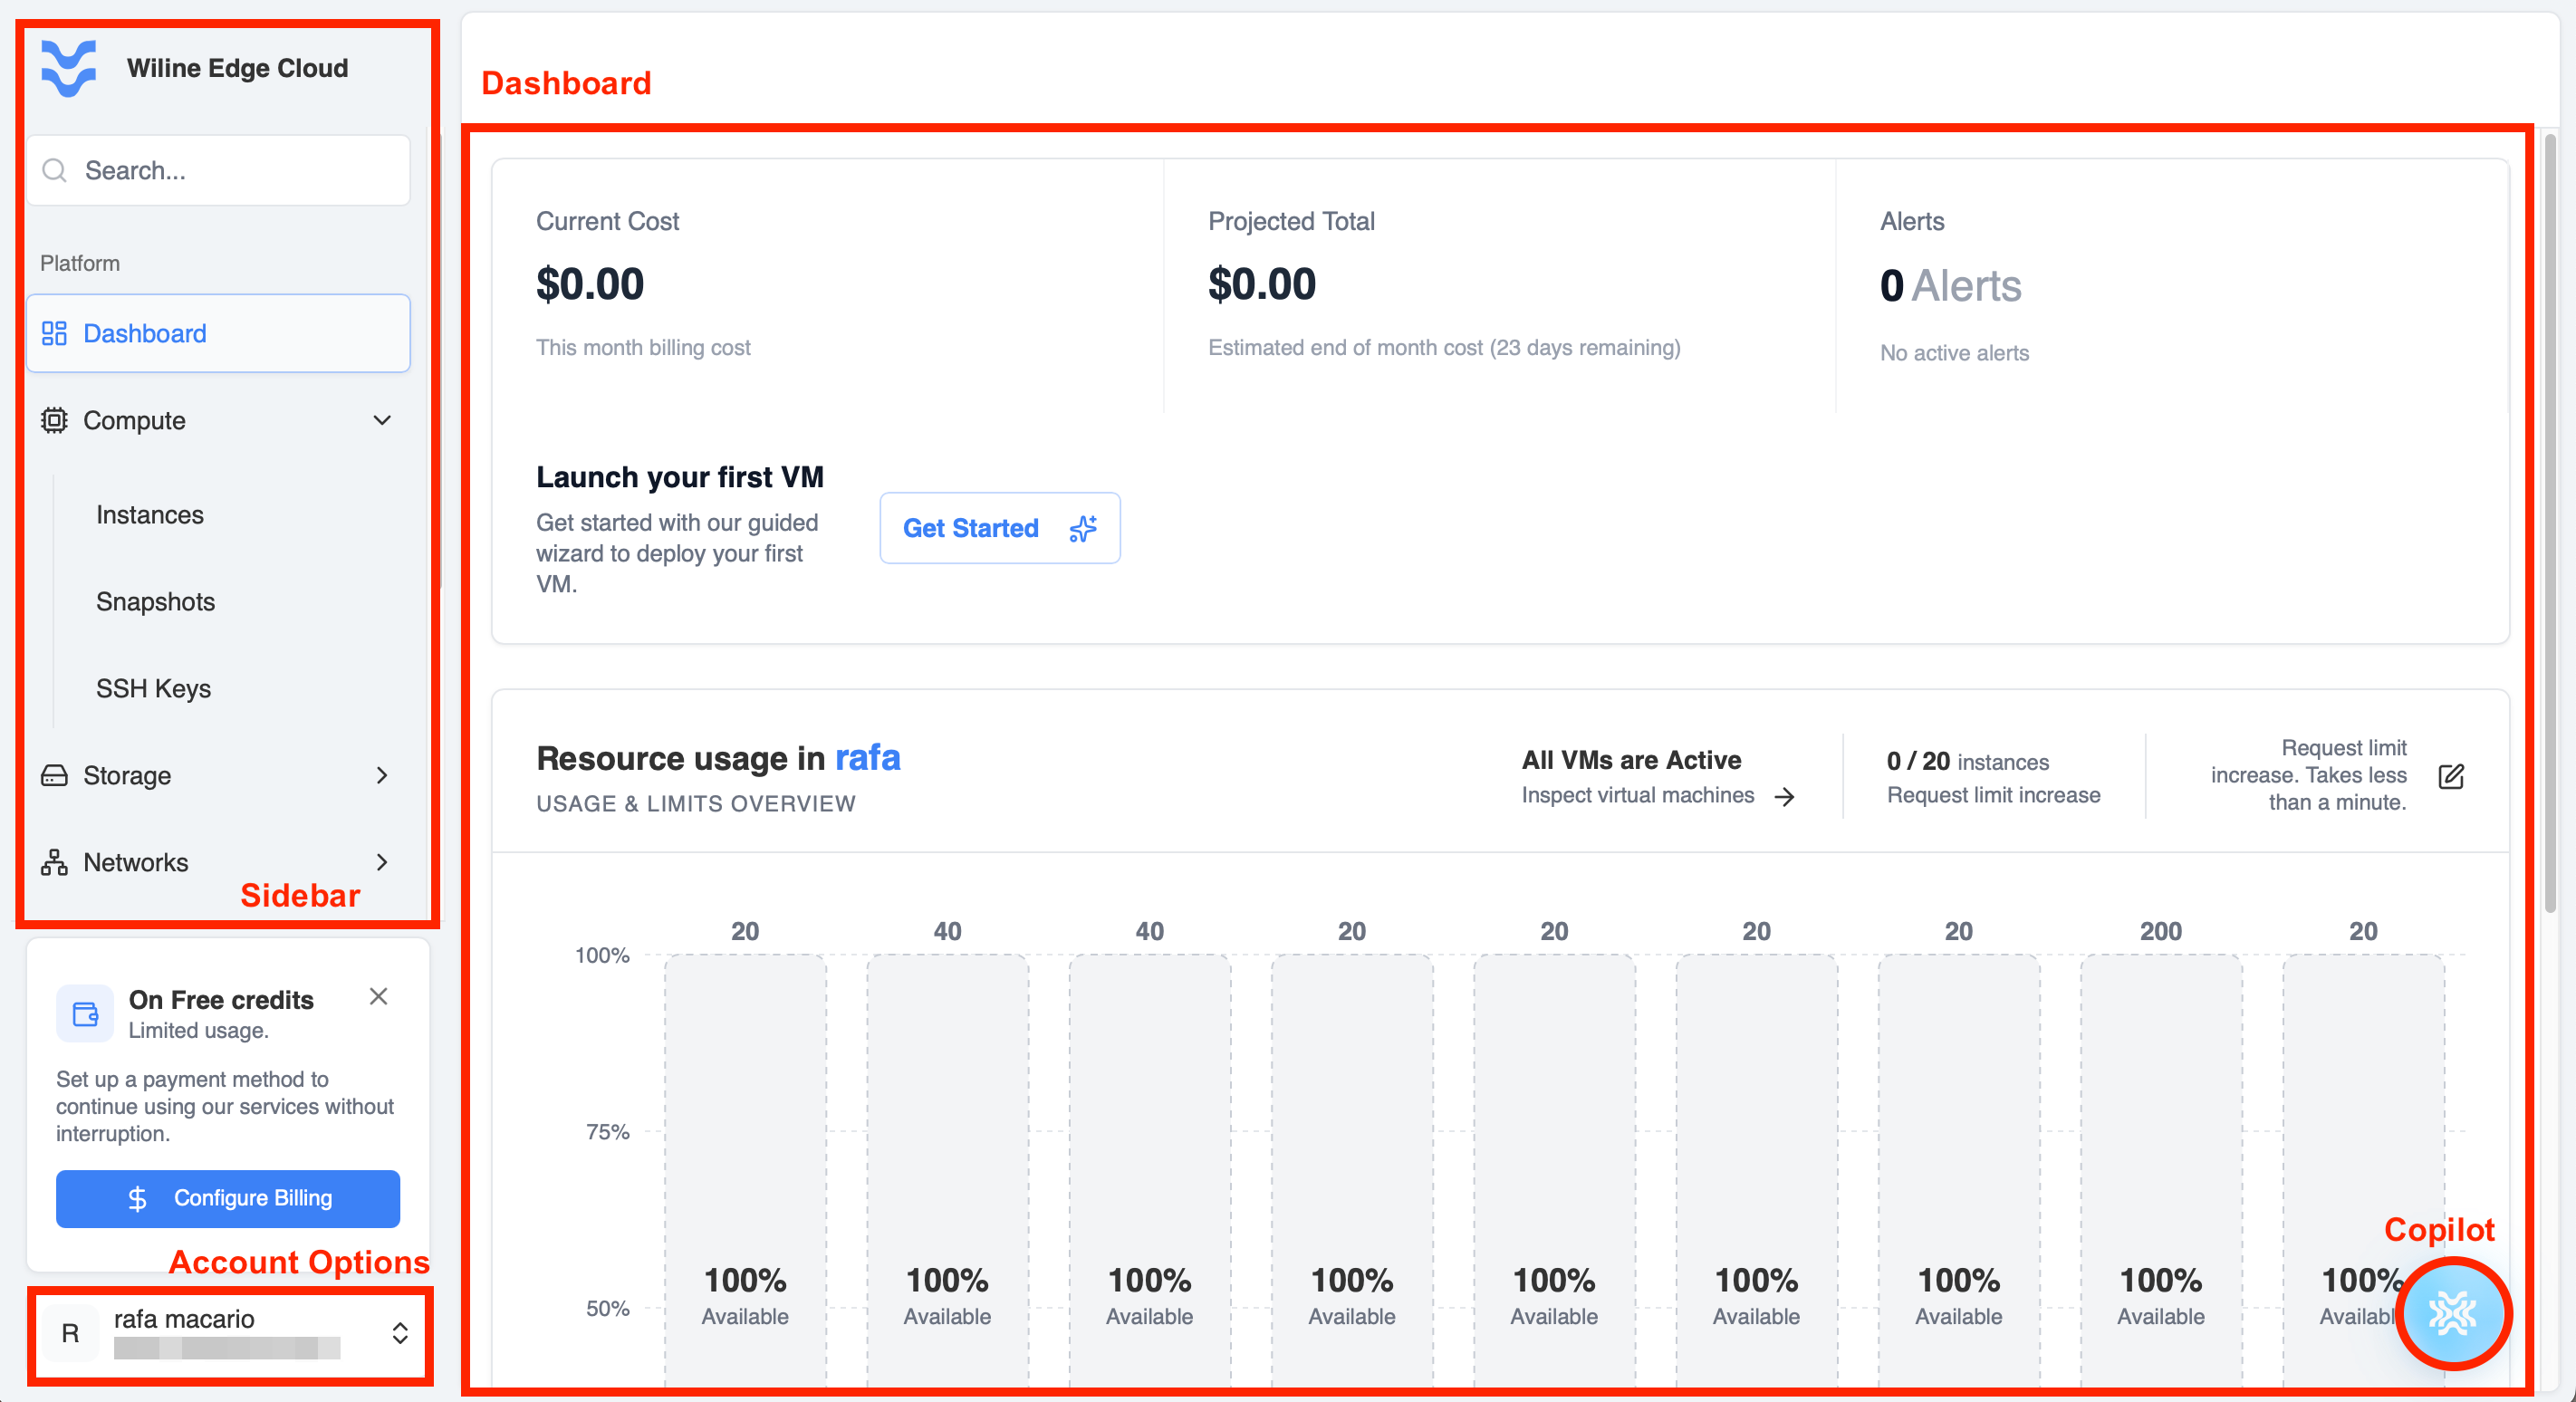
Figure 10. Exploring the WEC dashboard interface.
Dashboard Overview
The dashboard contains two main panels:
-
Cost Overview
- Current Cost: View your current billing for the month
- Projected Total: See estimated total by the end of the billing cycle
- Alerts: Check any active billing or usage alerts
-
Resource Usage
- View usage and limits for VMs, CPU, memory, networks, volumes, and storage
- Confirm your environment is within healthy limits
- Take quick actions like requesting limit increases
-
Click the button below the cost section to launch a guided workflow for creating your first VM. Instructions are described in the Deploy a VM section.
Sidebar Navigation
- Use the search bar to locate features quickly (e.g., type "Volumes")
- Navigate menus:
Platform Menu:
- Dashboard: View cost insights, alerts, and resource usage
- Compute: Manage virtual machines and related resources
- Storage: Manage volumes and storage
- Networks: Configure networking resources
Management Menu:
- Team Members: Manage user access and permissions
- Events: View system and activity logs
- Billing: Monitor usage and manage payments
- Tickets: Access support and submit requests
- Settings: Configure account and environment preferences
Account Options
Click your email in the sidebar to access your account menu:
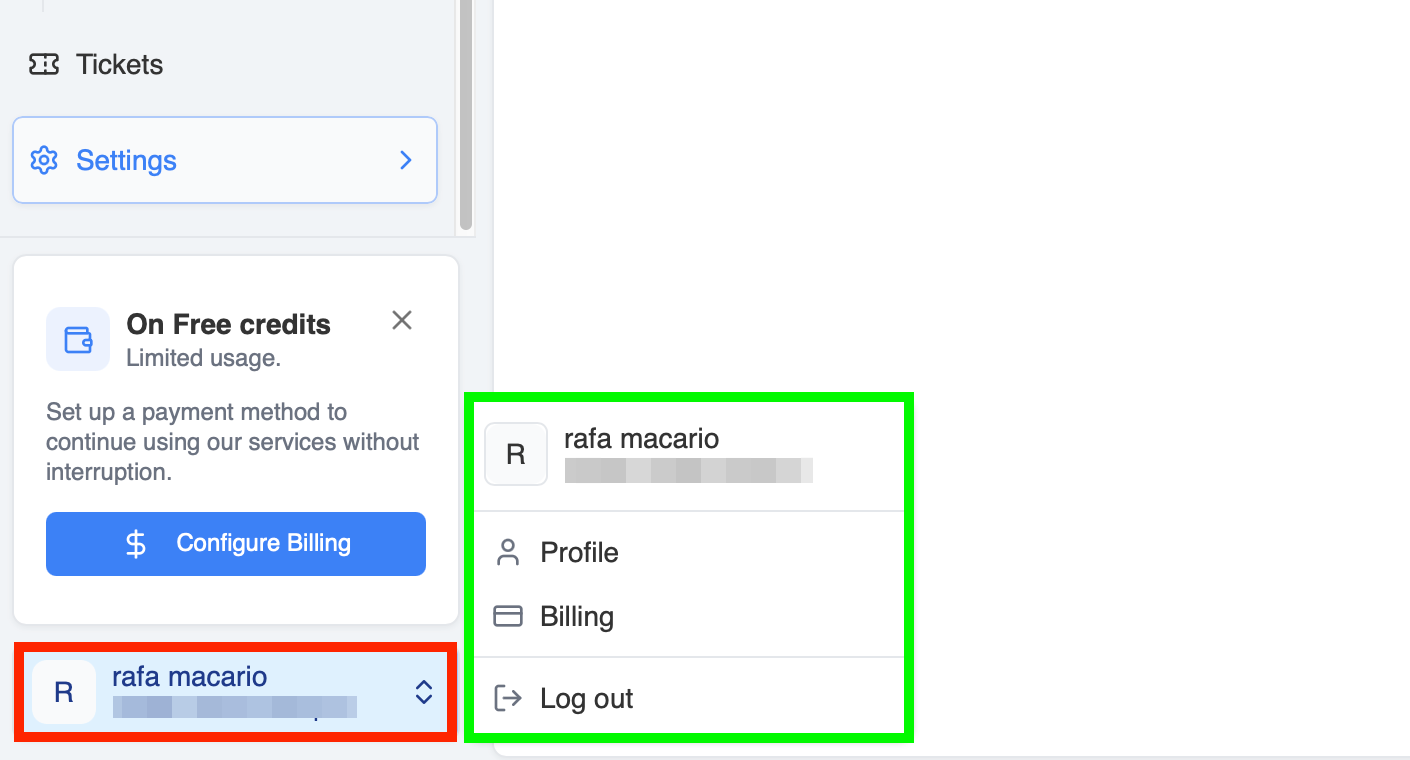
Figure 11. Exploring the account options.
- Profile: Manage personal information
- Billing: View and update billing details
- Logout: Sign out of your session
- If using free credits, follow the billing prompt to add a payment method
Profile Settings
When you click Profile, you will be redirected to your account settings page. By default, the General Information tab is selected.
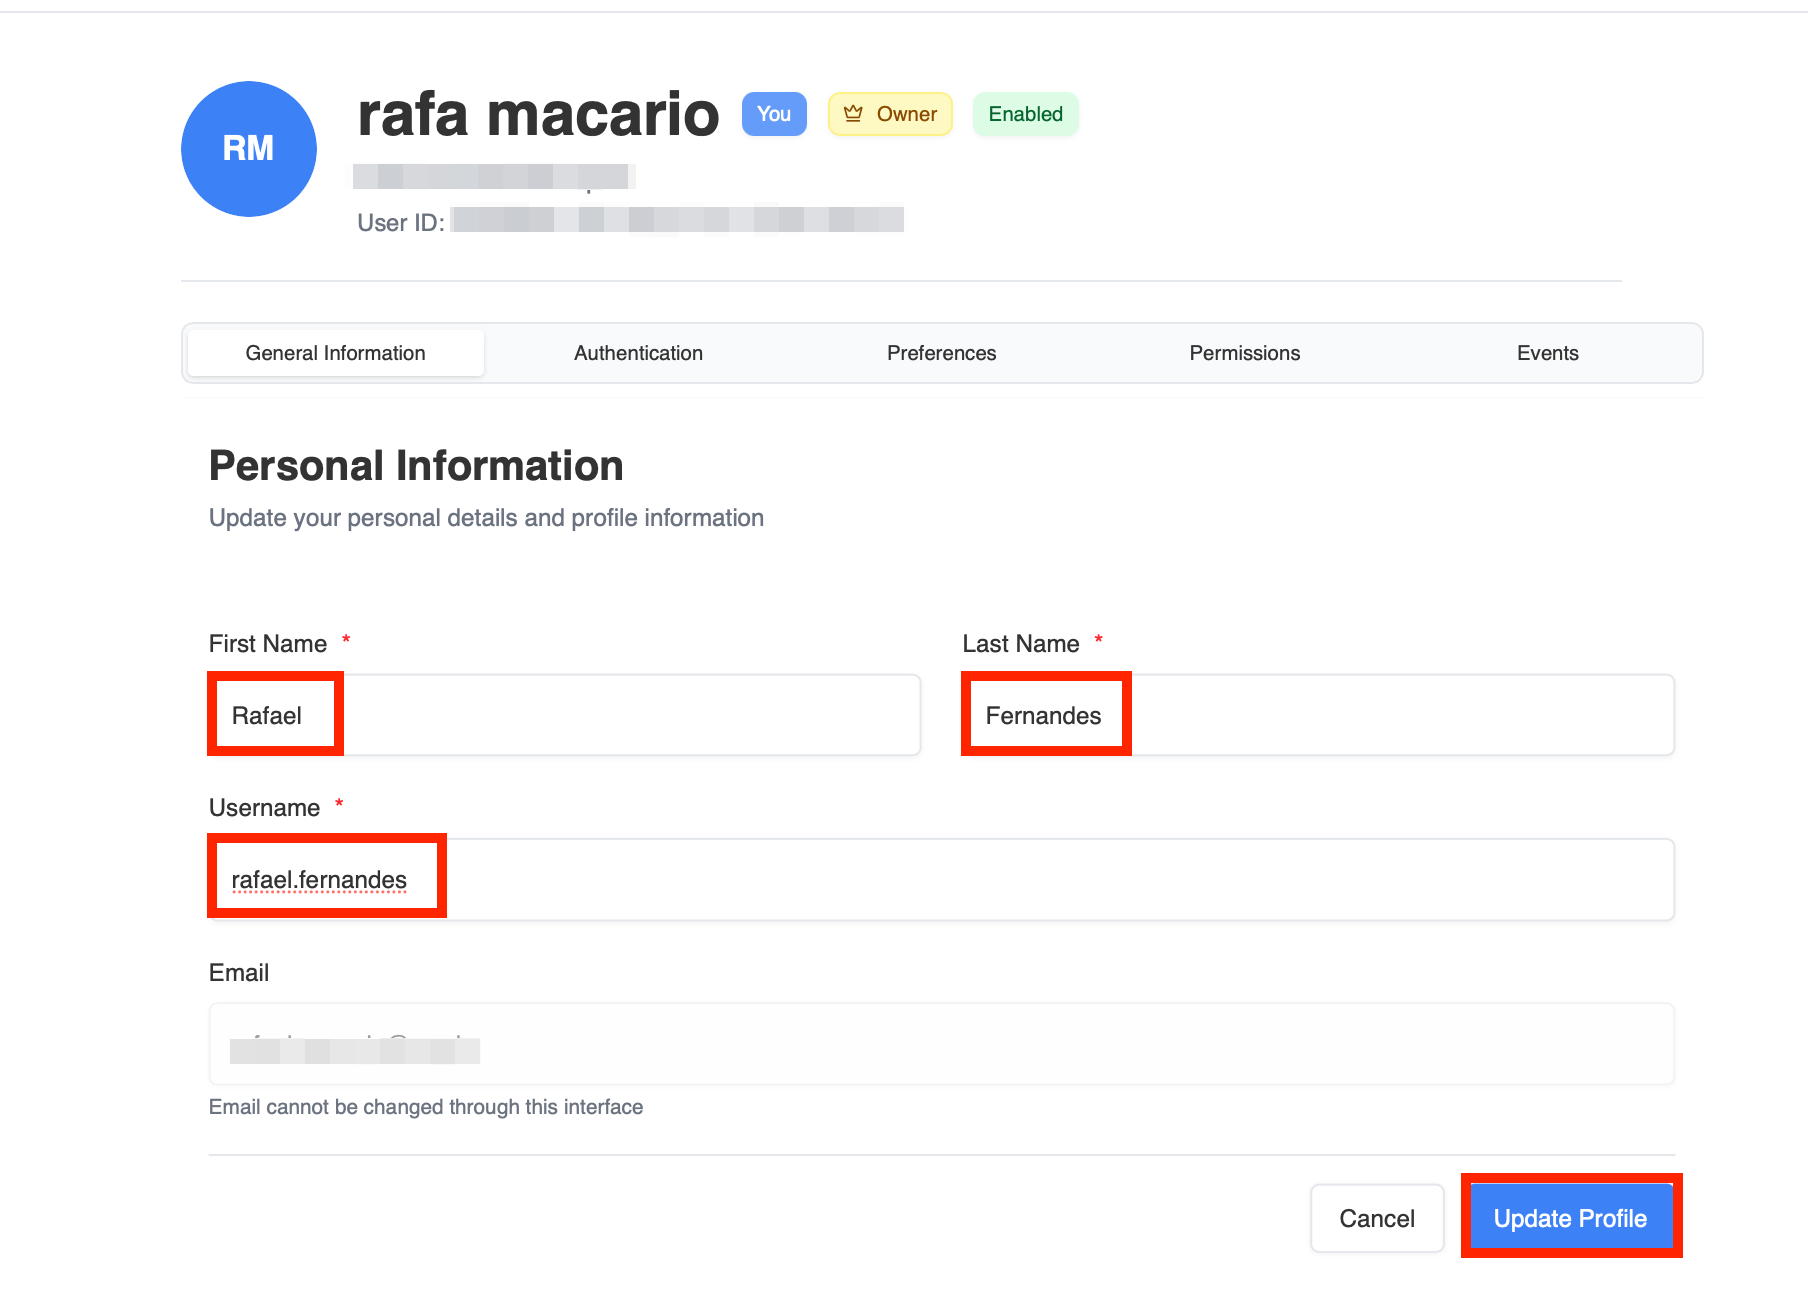
Figure 12. Profile settings overview (General Information tab).
General Information
- View and update your personal details
- Click Edit my profile to modify your information
- Email address cannot be changed from this interface
Authentication
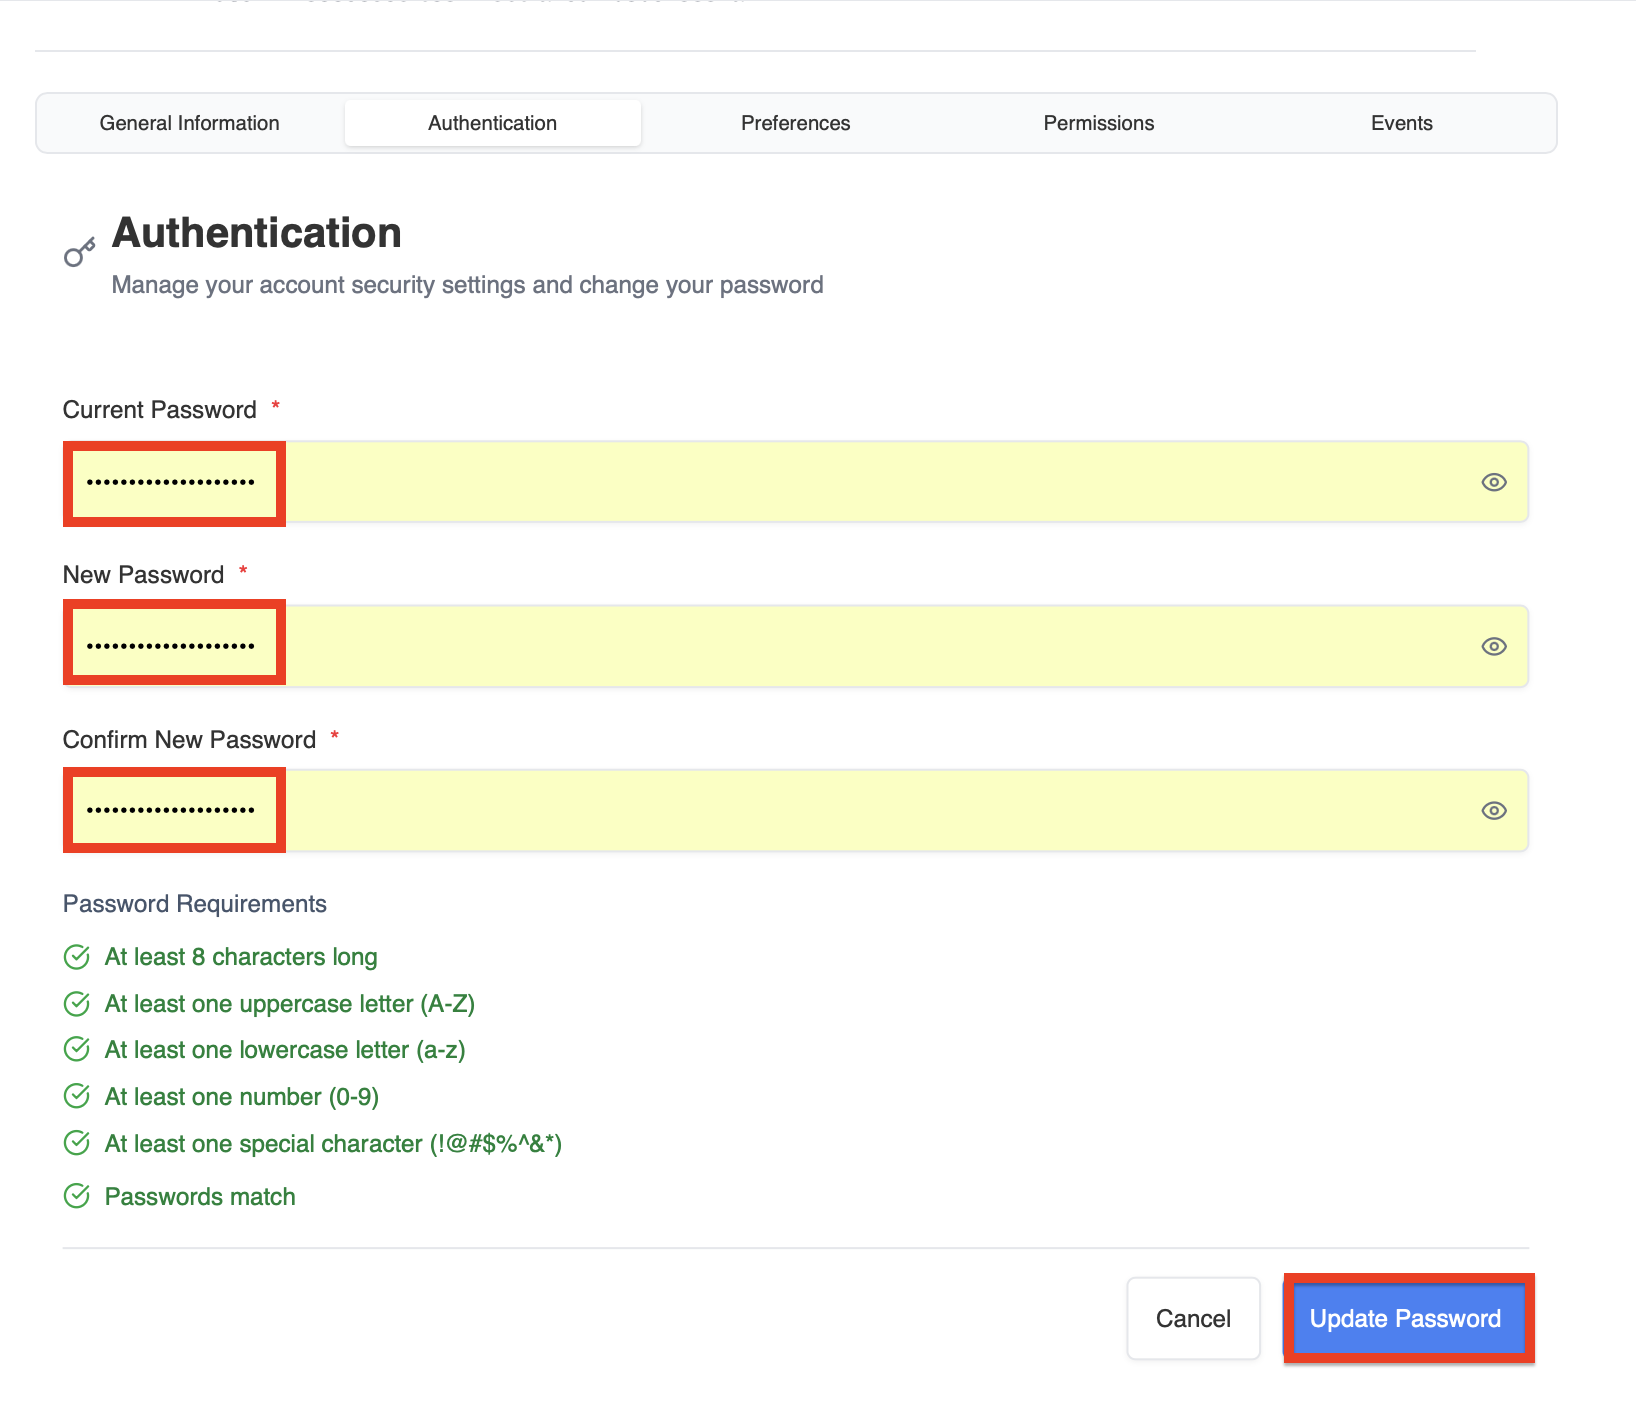
Figure 13. Change your account password.
- Manage your account security
- Update your password by providing:
- Current password
- New password
- Confirm new password
Preferences

Figure 14. Customize interface preferences.
Configure how the platform behaves and appears:
-
Theme Selection
- Light
- Dark
- System (matches your device settings)
-
Sidebar Preference
- Open (expanded navigation)
- Collapsed (icon-only view)
-
Copilot Display Mode
- Panel Mode (docked on the right)
- Bubble Mode (floating button)
Permissions

Figure 15. View access permissions across the platform.
-
Review your access level across different services:
- Compute
- Storage
- Network
- Billing
- User Management
- Support
-
Each service includes:
- View access
- Manage access
Account owner permissions cannot be modified.
Events
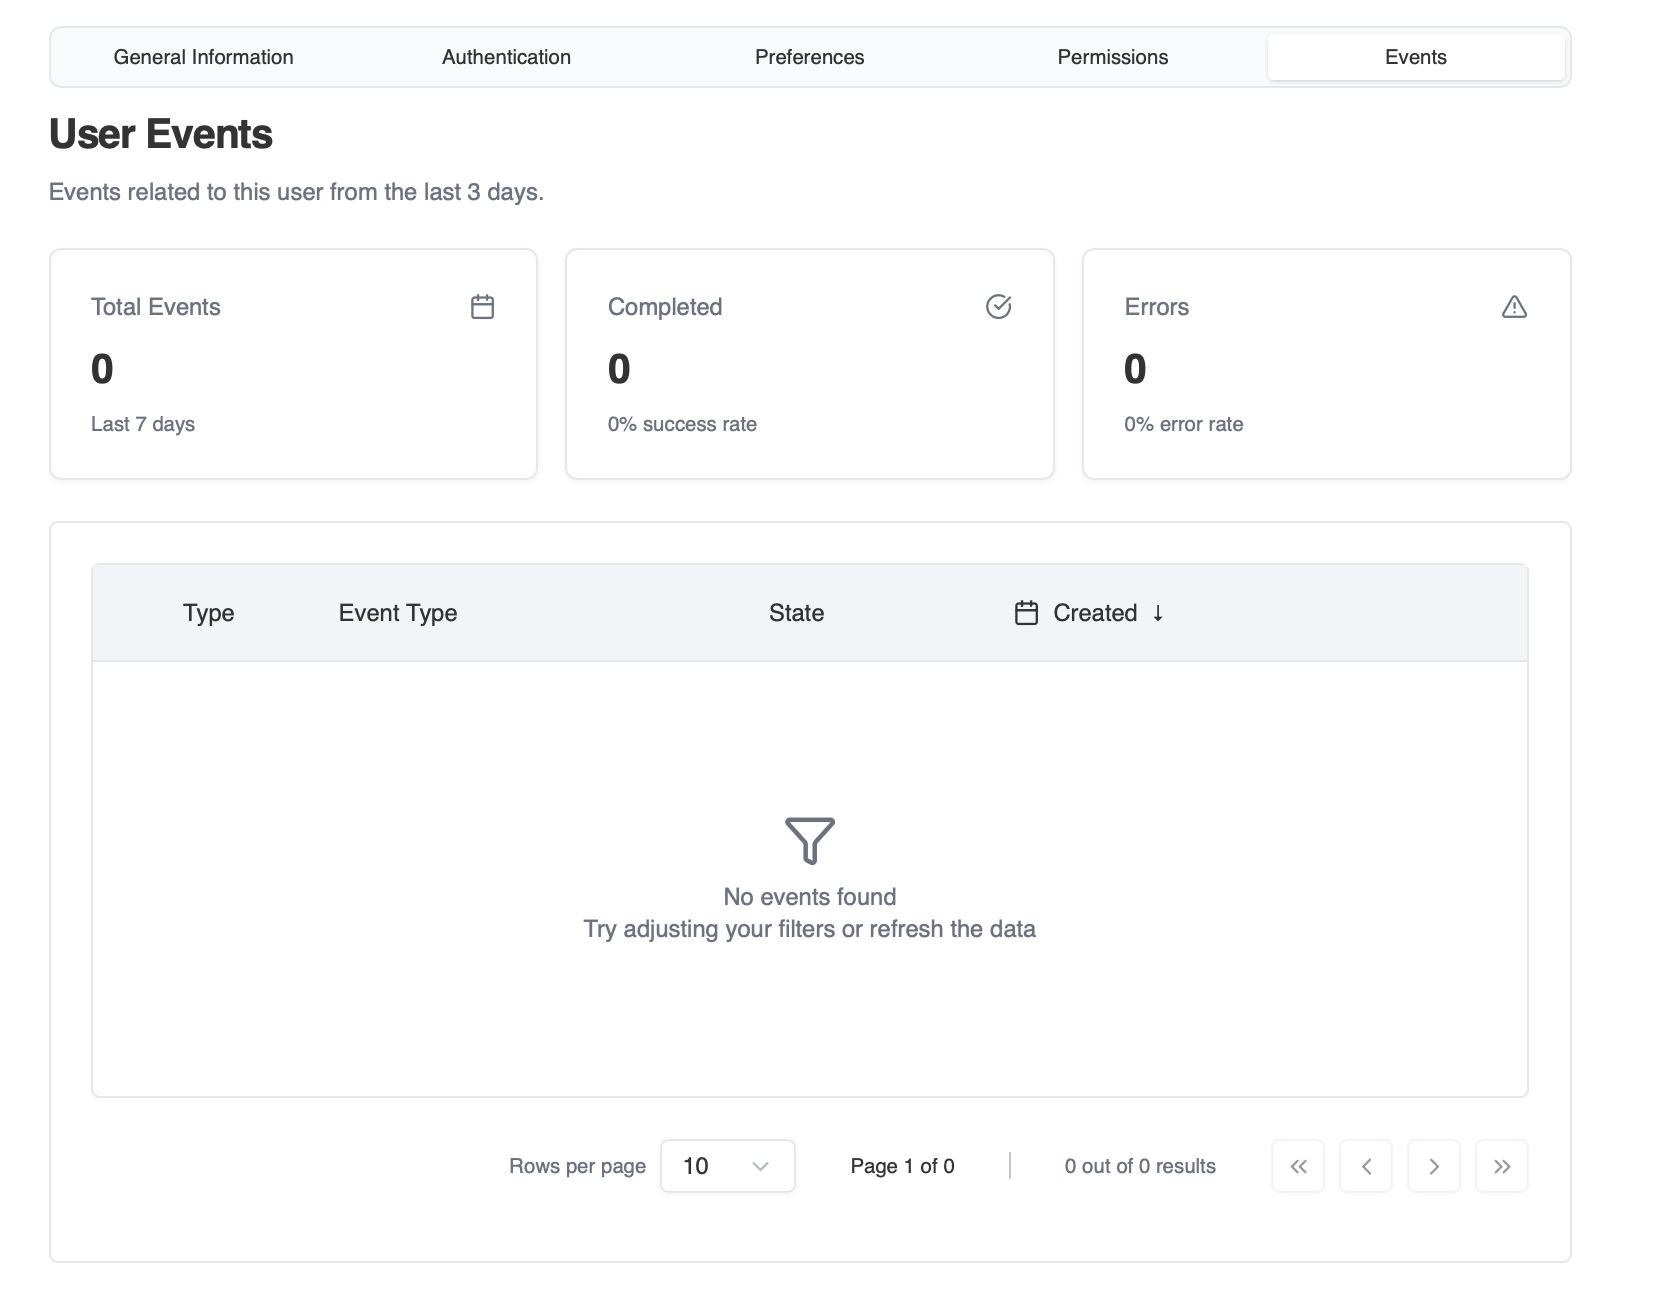
Figure 16. Activity and event history for the user.
-
View recent activity associated with your account
-
Monitor:
- Completed actions
- Errors
- System events
-
Use filters and pagination to explore historical data
Billing
When you click Billing, you will be redirected to your billing management section.
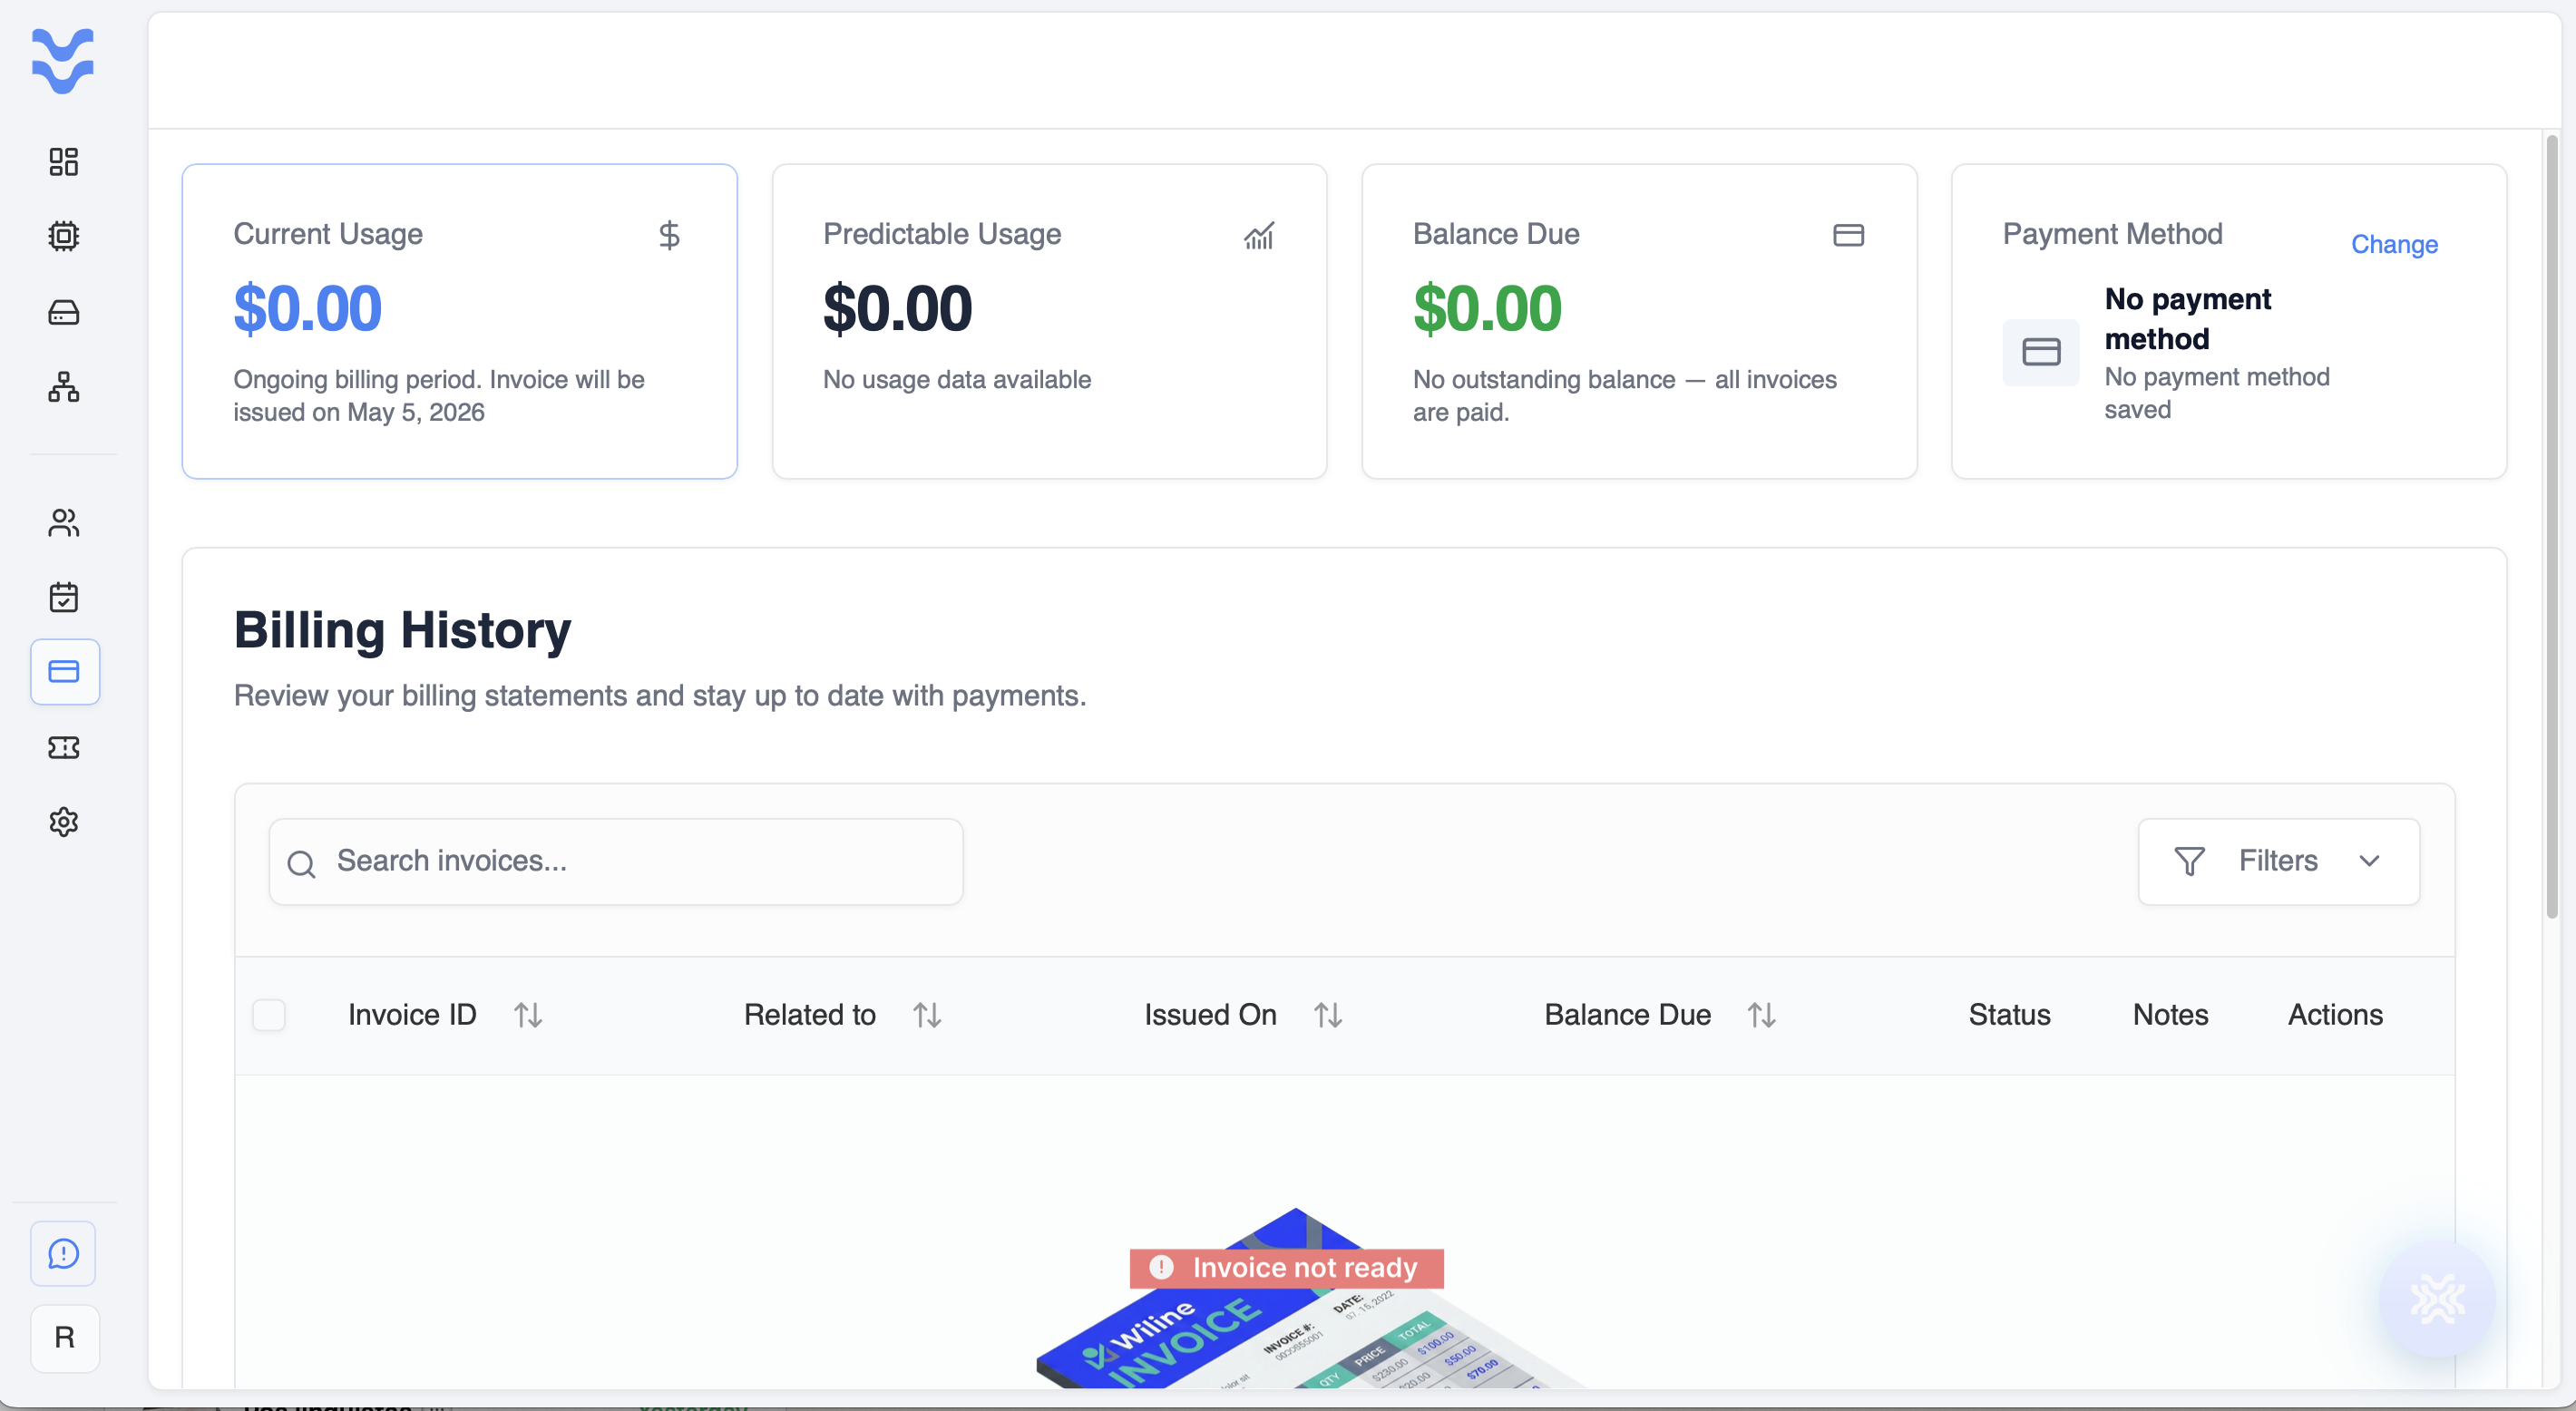
Figure 17. Billing and payment management.
The billing section provides a complete overview of your account’s financial activity and usage.
Overview
- Current Usage – Displays your current charges for the ongoing billing period
- Predictable Usage – Shows estimated future costs based on usage trends
- Balance Due – Indicates any outstanding balance (or confirms if all invoices are paid)
Payment Method
- View or update your payment method
- If no payment method is added, you will see a prompt to add one
- Click Change to add or update your payment details
Billing History
-
Review past invoices and billing records
-
Each entry includes:
- Invoice ID
- Issued date
- Balance due
- Status (e.g., Paid, Pending)
-
Use filters and pagination to navigate through invoices
If no invoices are available, a message will indicate that billing history will appear after your first billing cycle.
Logout
- Click Logout to securely end your session
- You will be redirected to the login page
WEC Copilot (AI Assistant)
The Copilot panel in the bottom-right corner provides an AI assistant for navigating and managing your cloud environment.
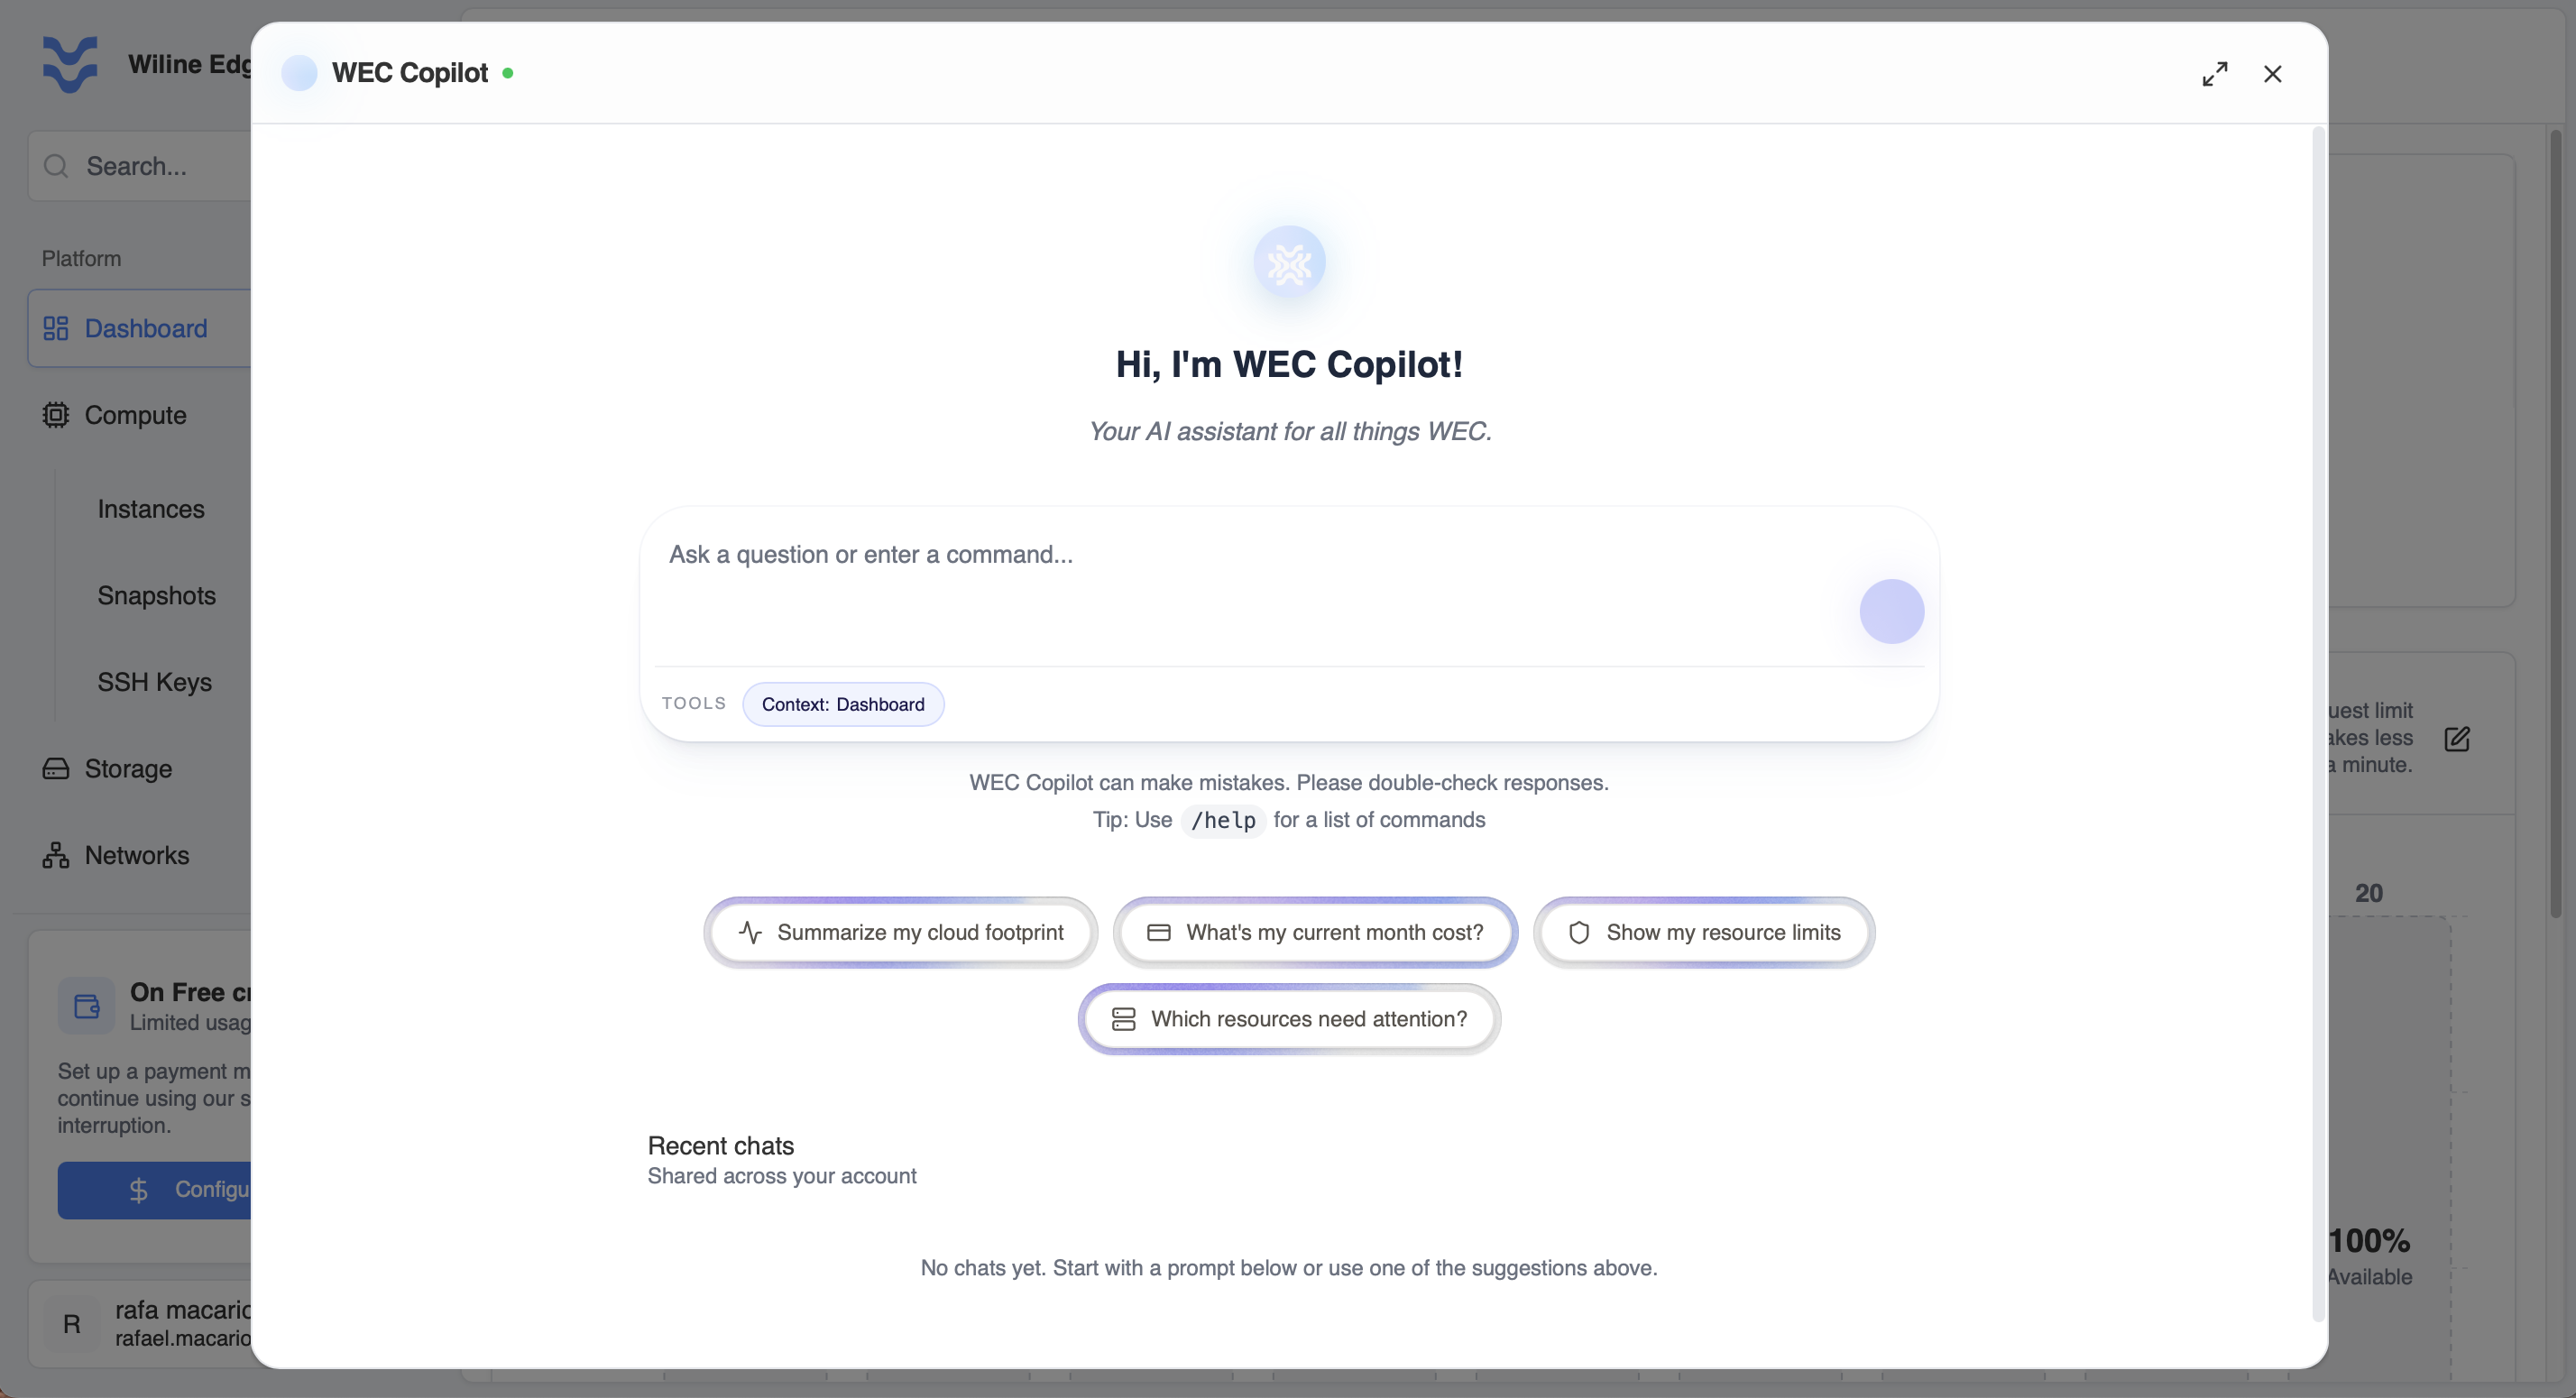
Figure 12. Interacting with the WEC Copilot panel.
- Ask questions in natural language (e.g., “What’s my current month cost?”)
- Use predefined slash commands for quick actions
- Summarize cloud usage, performance, and costs
- Check billing, events, and support tickets
- Identify potential issues or optimization opportunities
Example queries
You can interact with Copilot using simple questions:
- List my running VMs
- Summarize my VM performance
- What’s my current month cost?
- Show recent events
- List my open tickets
Slash commands
Use /help to see all available commands. Common commands include:
/vms– List virtual machines/billing– Show current billing summary/events– Show recent platform events/metrics– Show VM performance summary/tickets– List support tickets
Type a command and press Enter to run it.
Example response
If you run:
/tickets
Copilot will:
- Check your support tickets
- Return a list of open tickets
If no tickets are found, it will respond with:
“You currently have no open support tickets.”
Copilot responses may not always be accurate. Always verify critical information manually.
The WiLine Edge Cloud portal is designed for simple, efficient navigation. You can deploy VMs, configure networks, and manage storage all from a single platform. Start exploring today to maximize your cloud infrastructure experience.