Deploy a Virtual Machine
This guide walks you through the process of deploying your first virtual machine (VM) on the Wiline Edge Cloud platform. By the end of this tutorial, you will have a running instance that you can access using SSH.
The deployment workflow is designed to be simple and takes only a few minutes.
The Launch Virtual Machine wizard guides you through the full deployment process. Each step configures a different part of your infrastructure before the VM is launched.
Deployment Steps
The wizard includes the following steps:
Step 1 — Open the VM deployment wizard
After logging in to the WiLine Edge Cloud:
- In the sidebar, click Compute.
- Select Instances.
- Click Launch Virtual Machine.
This opens the deployment wizard where you will configure your virtual machine step‑by‑step.
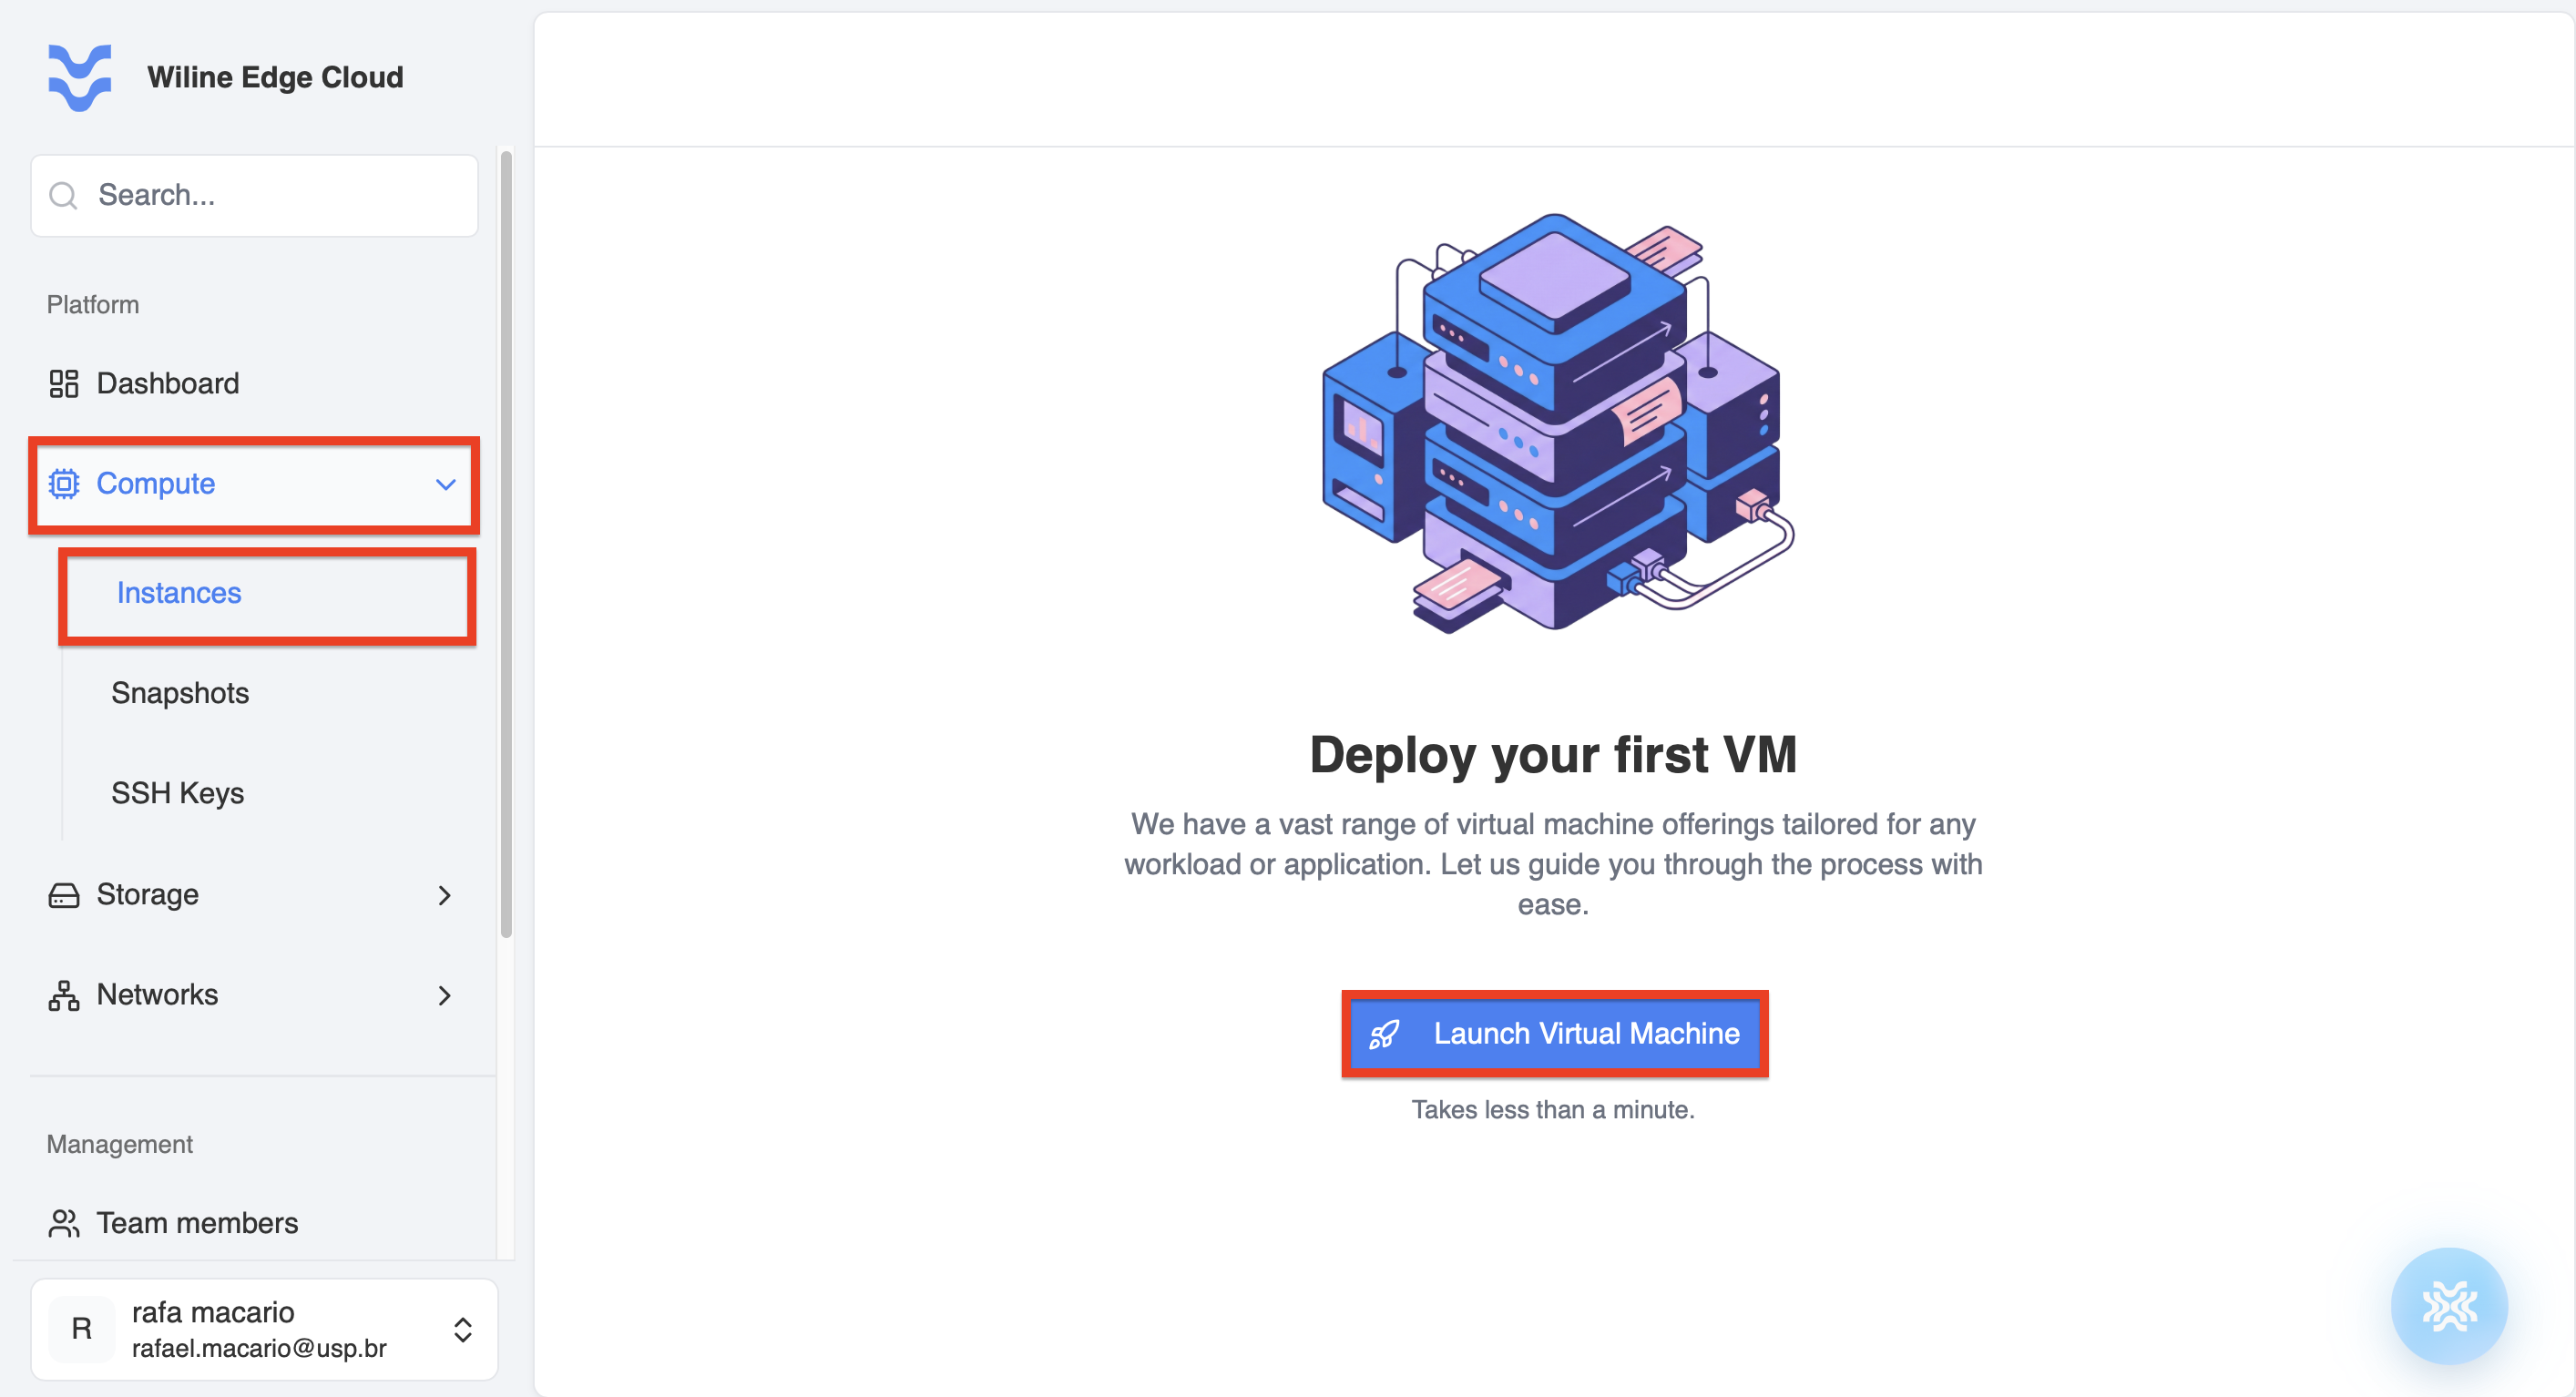 Figure 1 — Launch Virtual Machine button in the Instances panel.
Step 2 — Configure VM
In this step you define the basic metadata for your virtual machine.
VM Name
Use a clear naming convention to identify the VM’s role in your infrastructure.
Examples:
web-server-proddev-ubuntu-instancerag-vm
You can also add a description to provide additional context, such as:
VM for internal API testingRAG project backend node
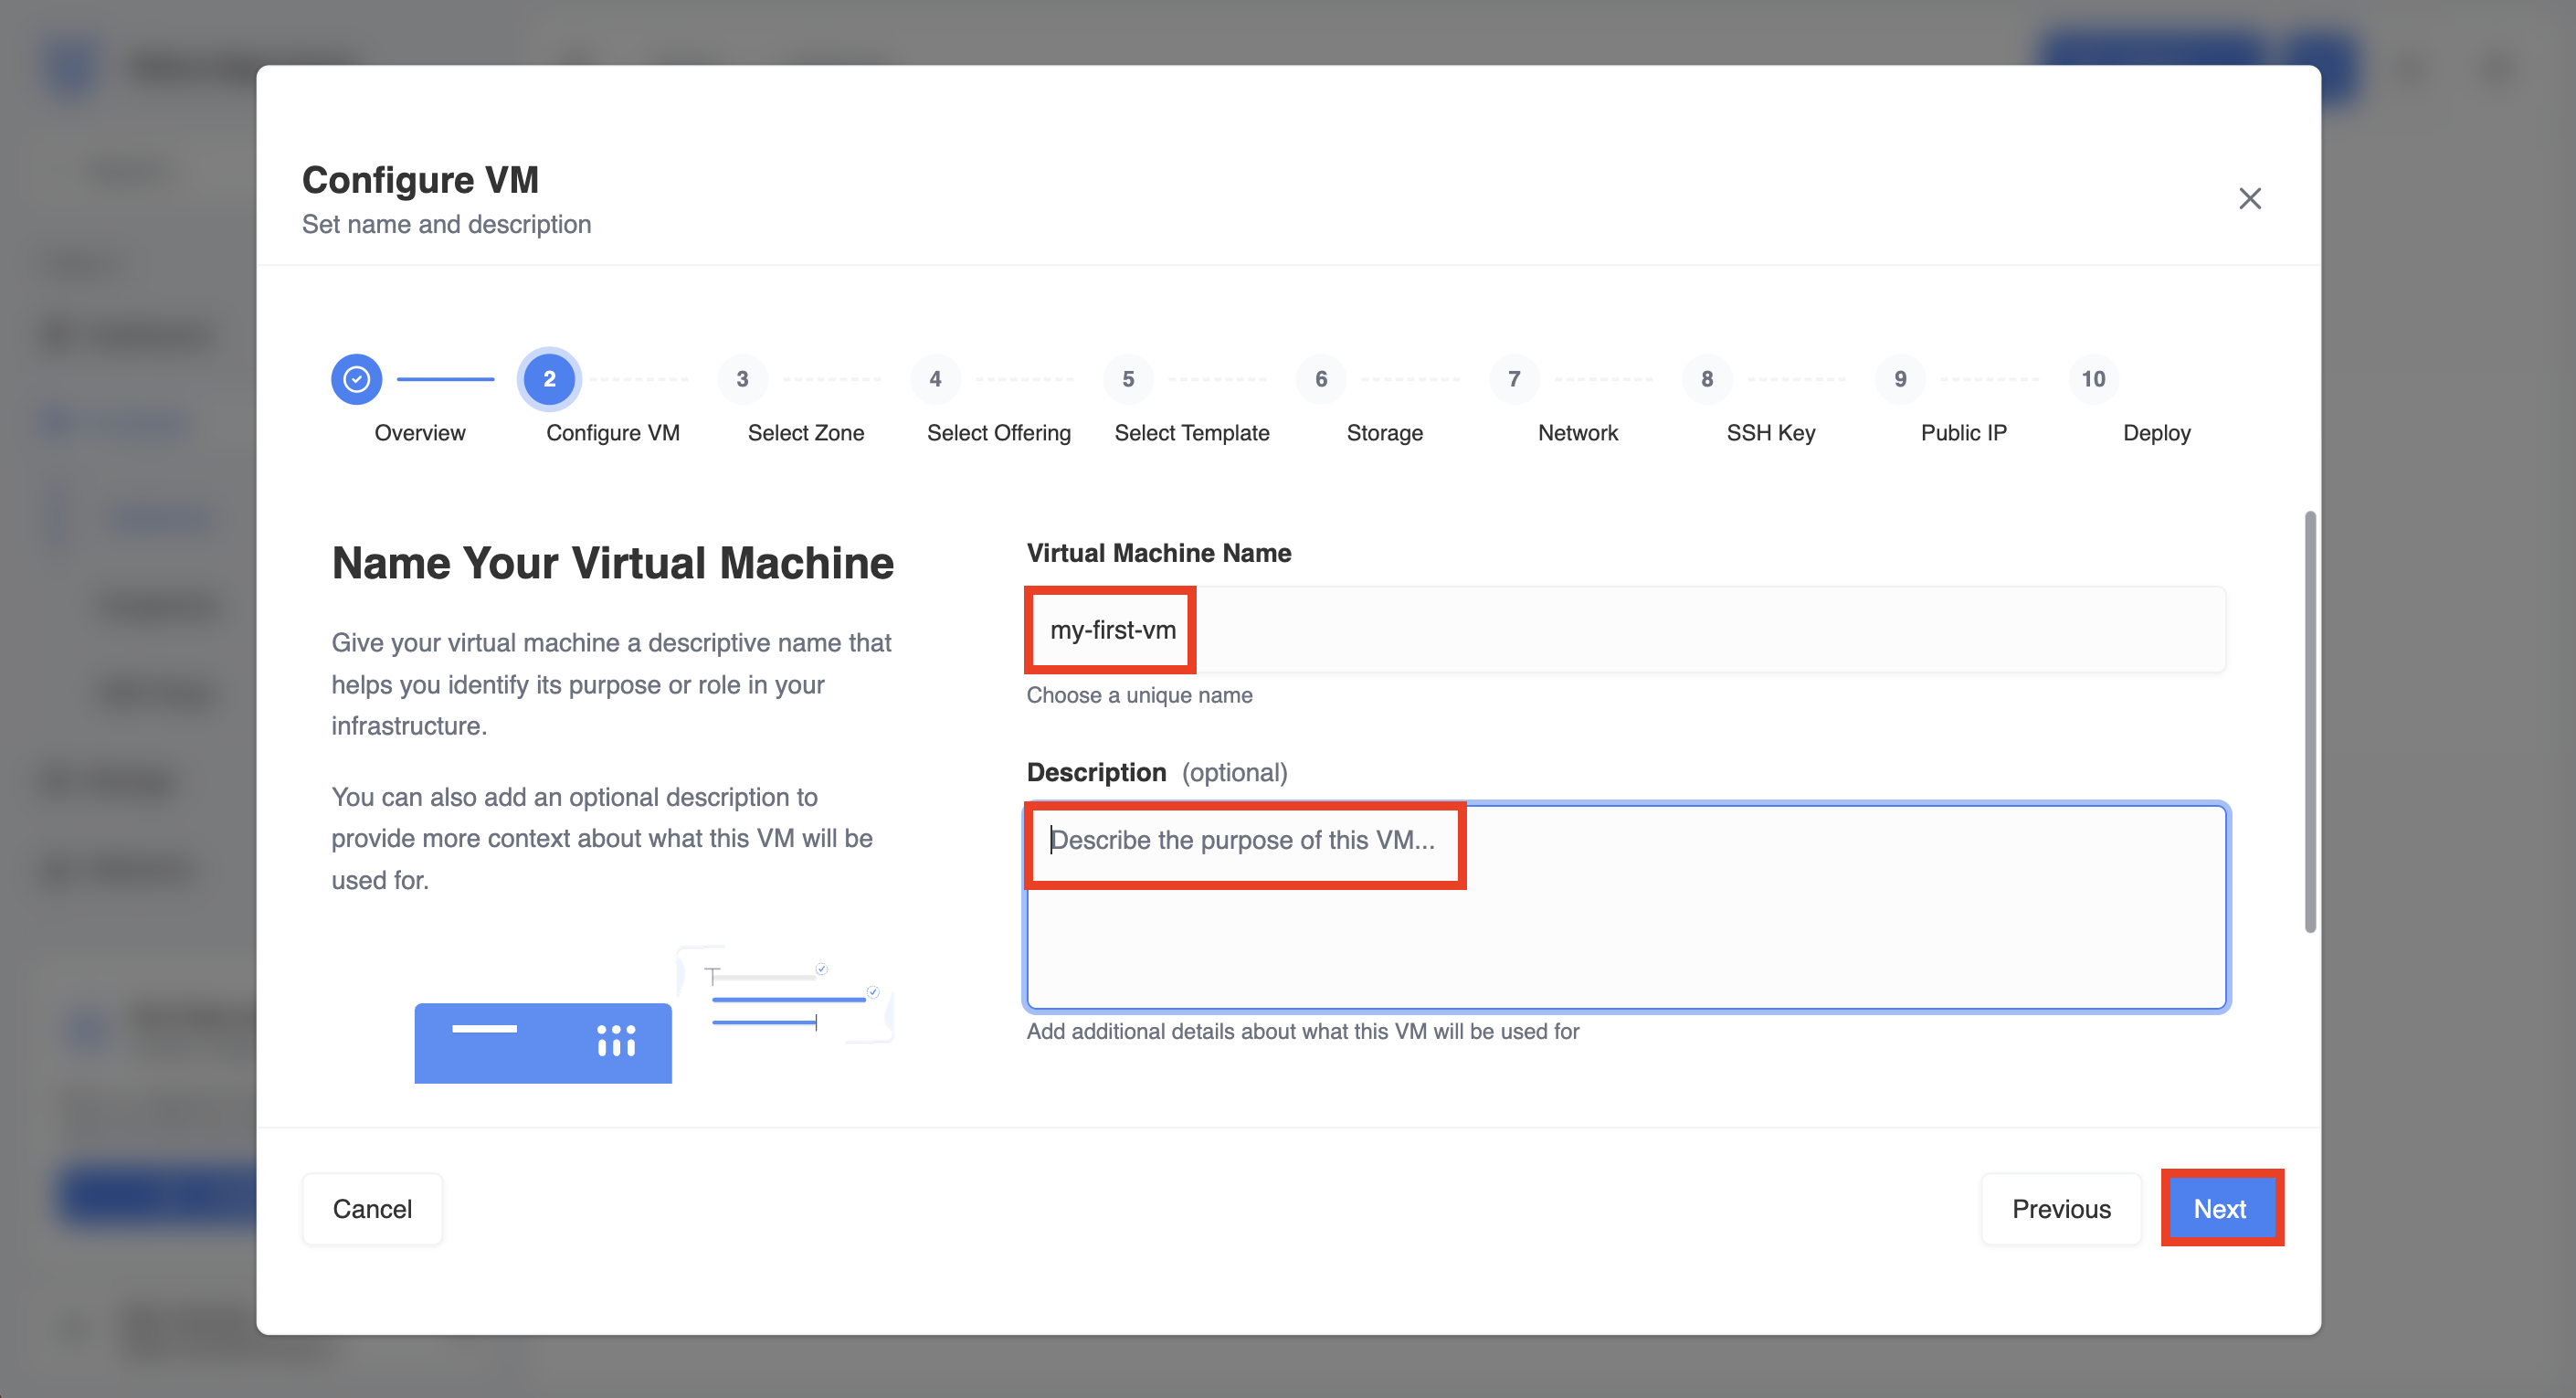
Figure 2 — Configure VM name and description.
Click Next to continue.
Step 3 — Select Zone
A deployment zone represents the physical data center where your VM will run.
Choosing the correct region can affect:
- latency for your users
- available hardware resources
- compliance or geographic requirements
Region selection options
You can browse available regions using the filters at the top of the page:
- All Locations
- West
- Midwest
- South
- Northeast
You can also:
- search regions using the Search regions field
- switch between Card View and Map View
In Map View, you can select deployment regions directly from the U.S. map.
Example:
- Princeton (USA) — good for East Coast users
- Roseville (USA) — better for West Coast workloads
Choose the region closest to your users to reduce latency.
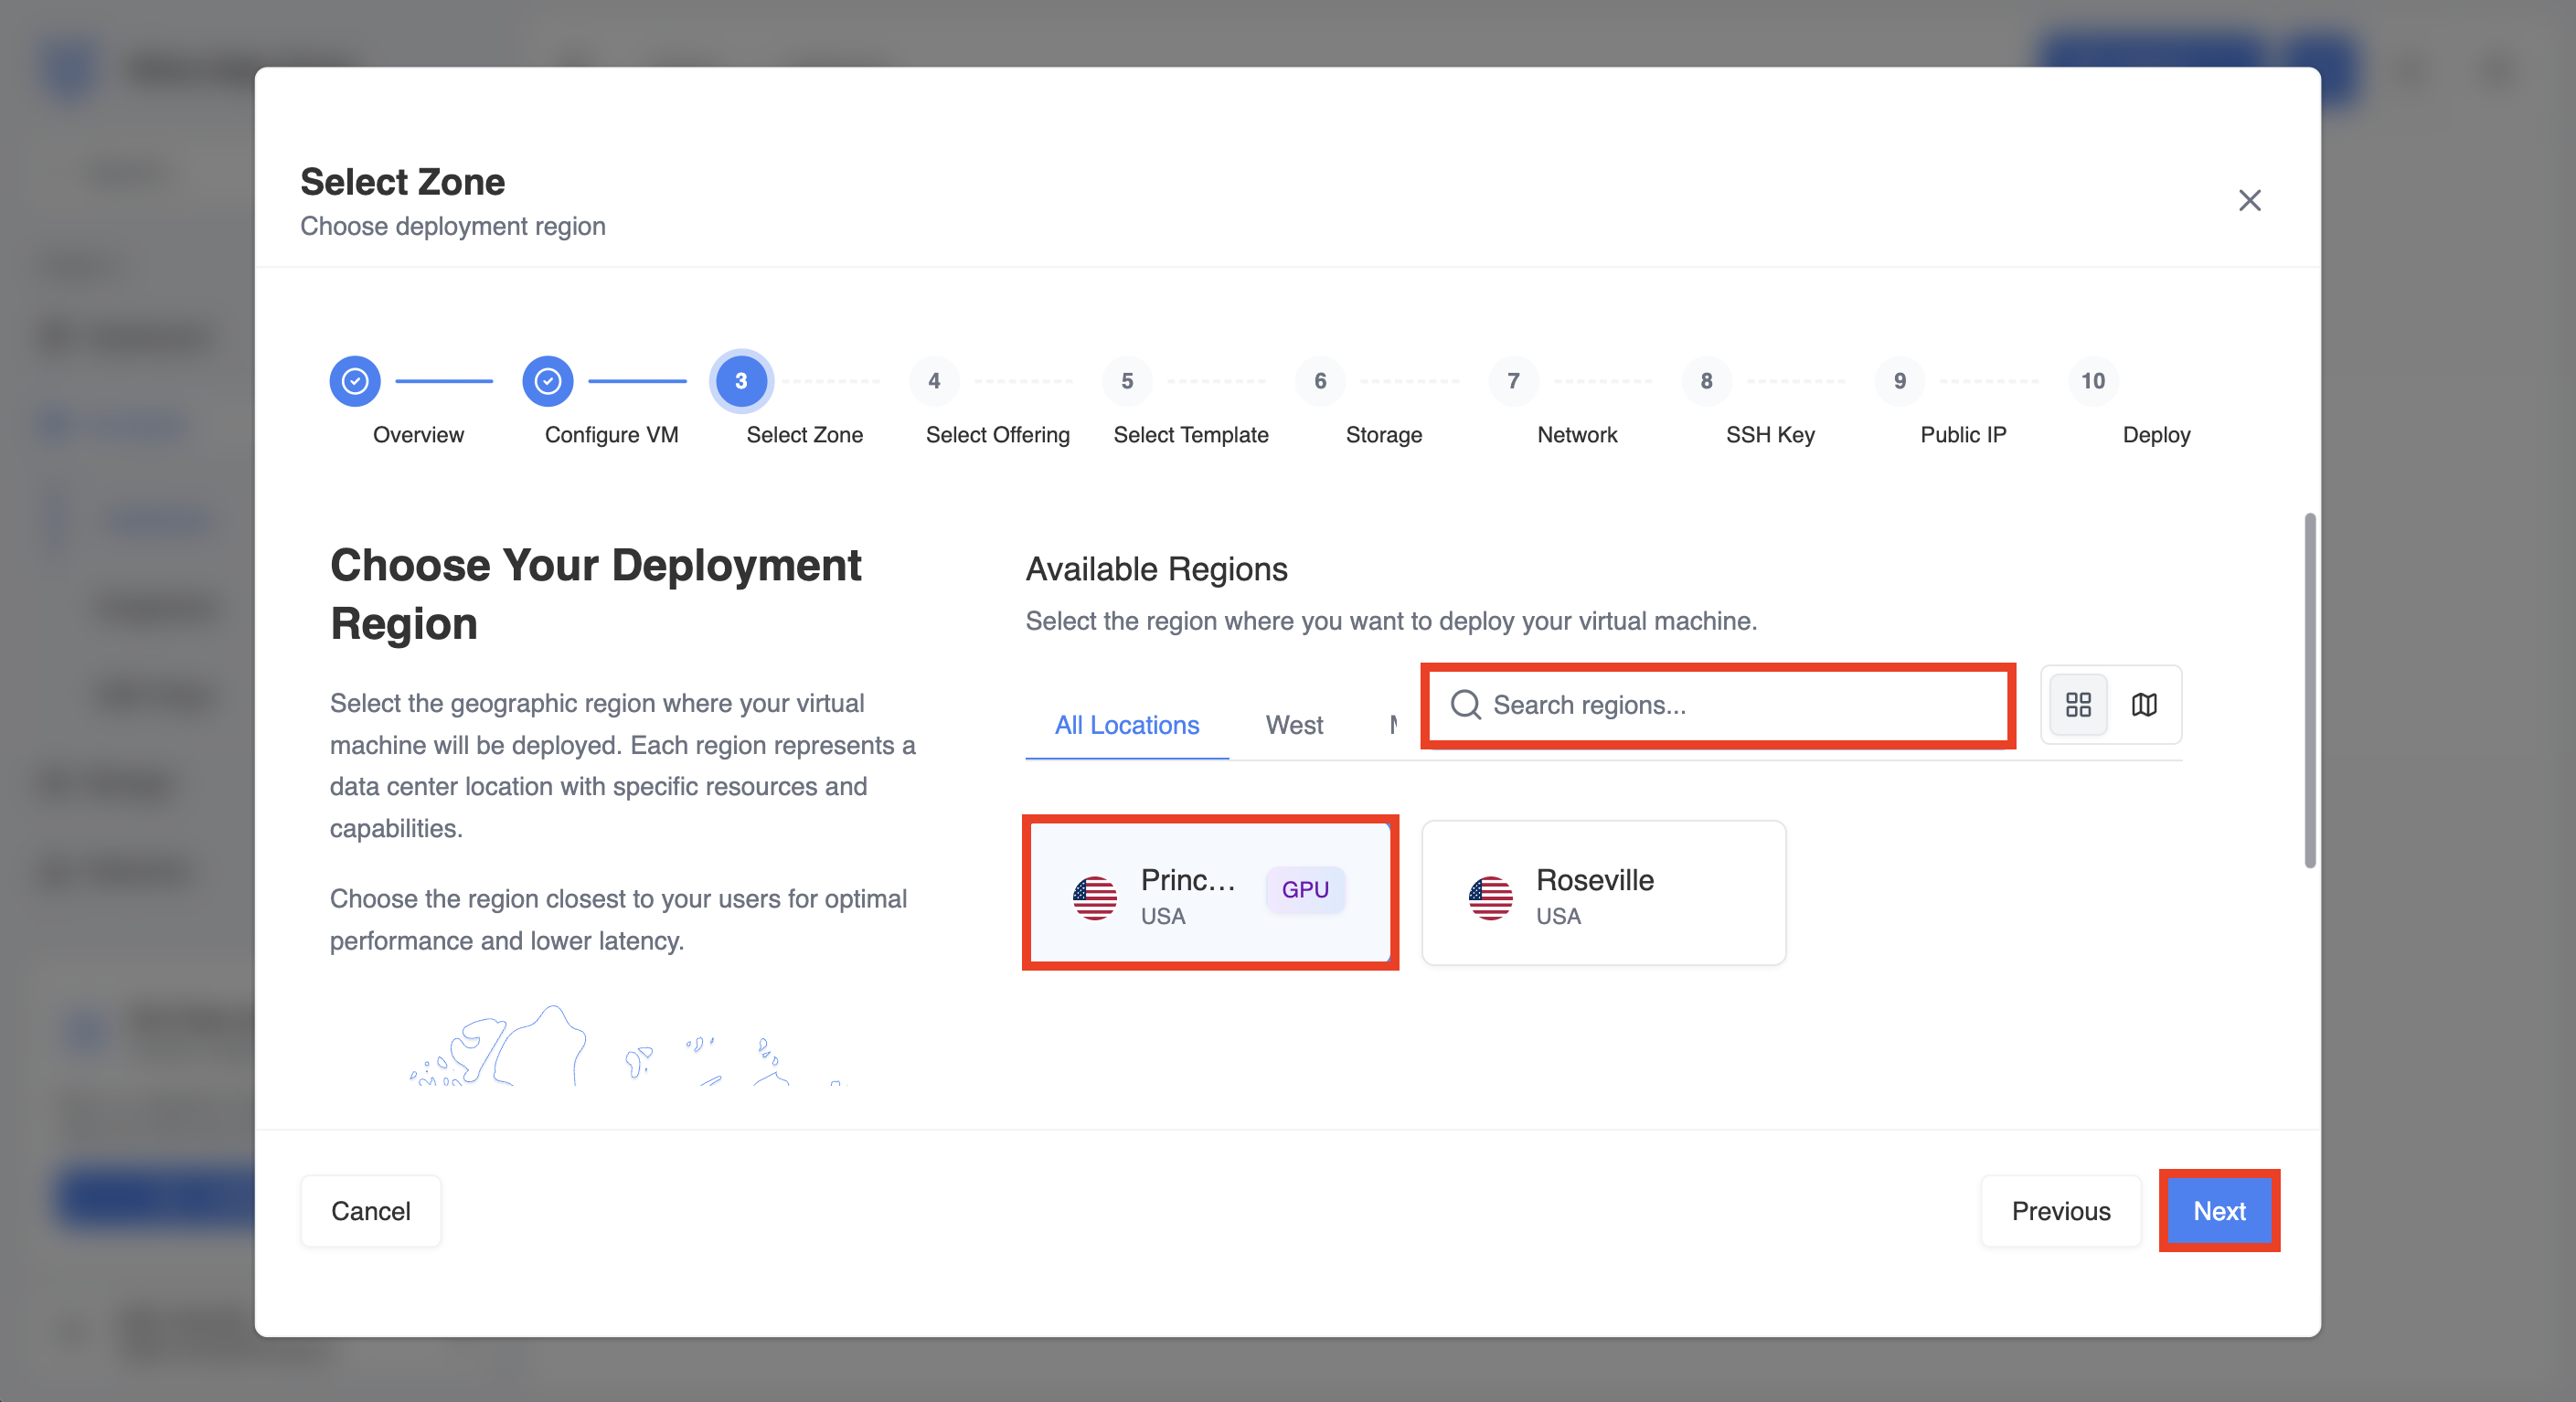 Figure 3 — Selecting the deployment region.
Click Next to continue.
Step 4 — Select Offering
A compute offering defines the hardware resources allocated to your VM.
Each offering specifies:
- number of vCPUs
- CPU speed
- amount of memory (RAM)
- data transfer allowance
- optional GPU resources
Example:
wa-gnp-1.1c-1gb- 1 vCPU
- 1 GB RAM
- General-purpose workload
- Suitable for lightweight services or testing
Offerings are organized into categories:
- All Offerings
- General Purpose
- Compute Optimized
- Memory Optimized
- GPU
- Others
You can also filter by CPU architecture:
- AMD
- Intel
Use the Search offerings field to quickly find a specific instance type.
Each row shows pricing based on a 30‑day billing cycle, including:
- hourly cost
- monthly estimated cost
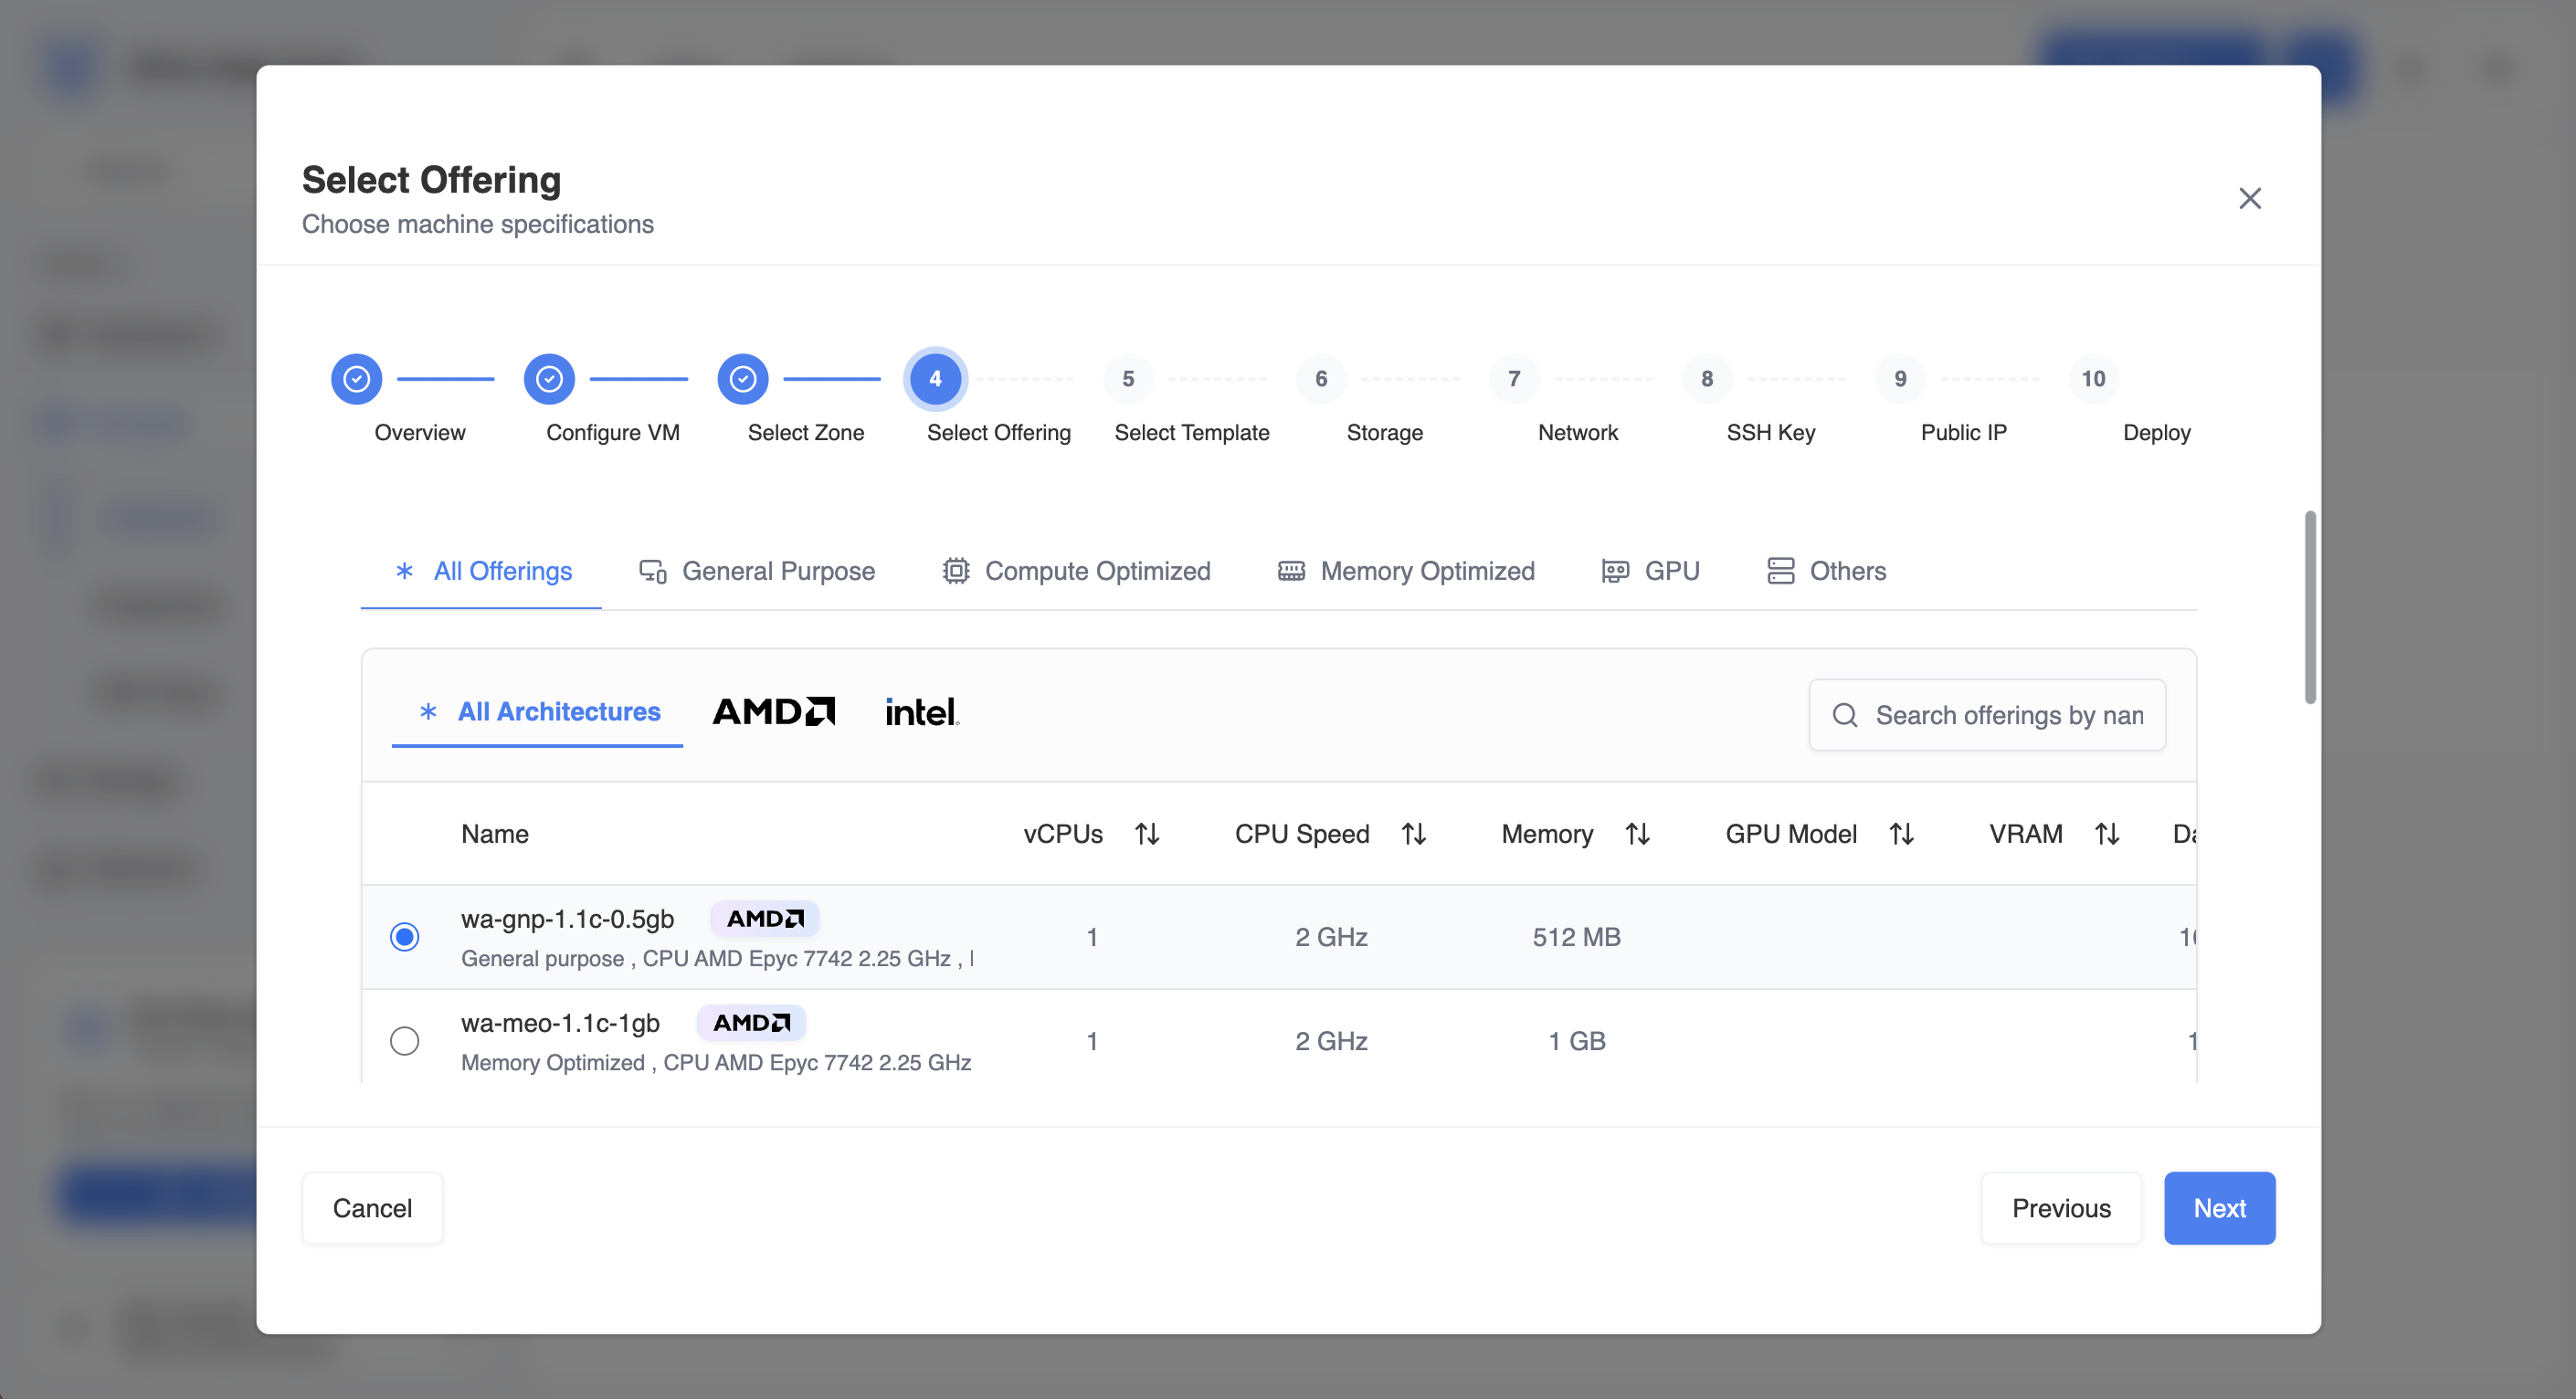 Figure 4 — Selecting a compute offering.
Click Next to continue.
Step 5 — Select Template
A template is a preconfigured operating system image used to create your VM.
Templates are organized into two main tabs:
Operating Systems
Standard OS images such as:
- Ubuntu
- Windows Server
Marketplace
Preconfigured application images such as:
- firewall appliances
- database servers
- application stacks
Example templates:
Ubuntu 24.04 LTS— general-purpose Linux serverPostgreSQL— preconfigured database instanceOPNsense— firewall appliance
Choose based on your workload (OS vs preconfigured app).
You can switch between table view and card view, and search templates using the Search templates field.
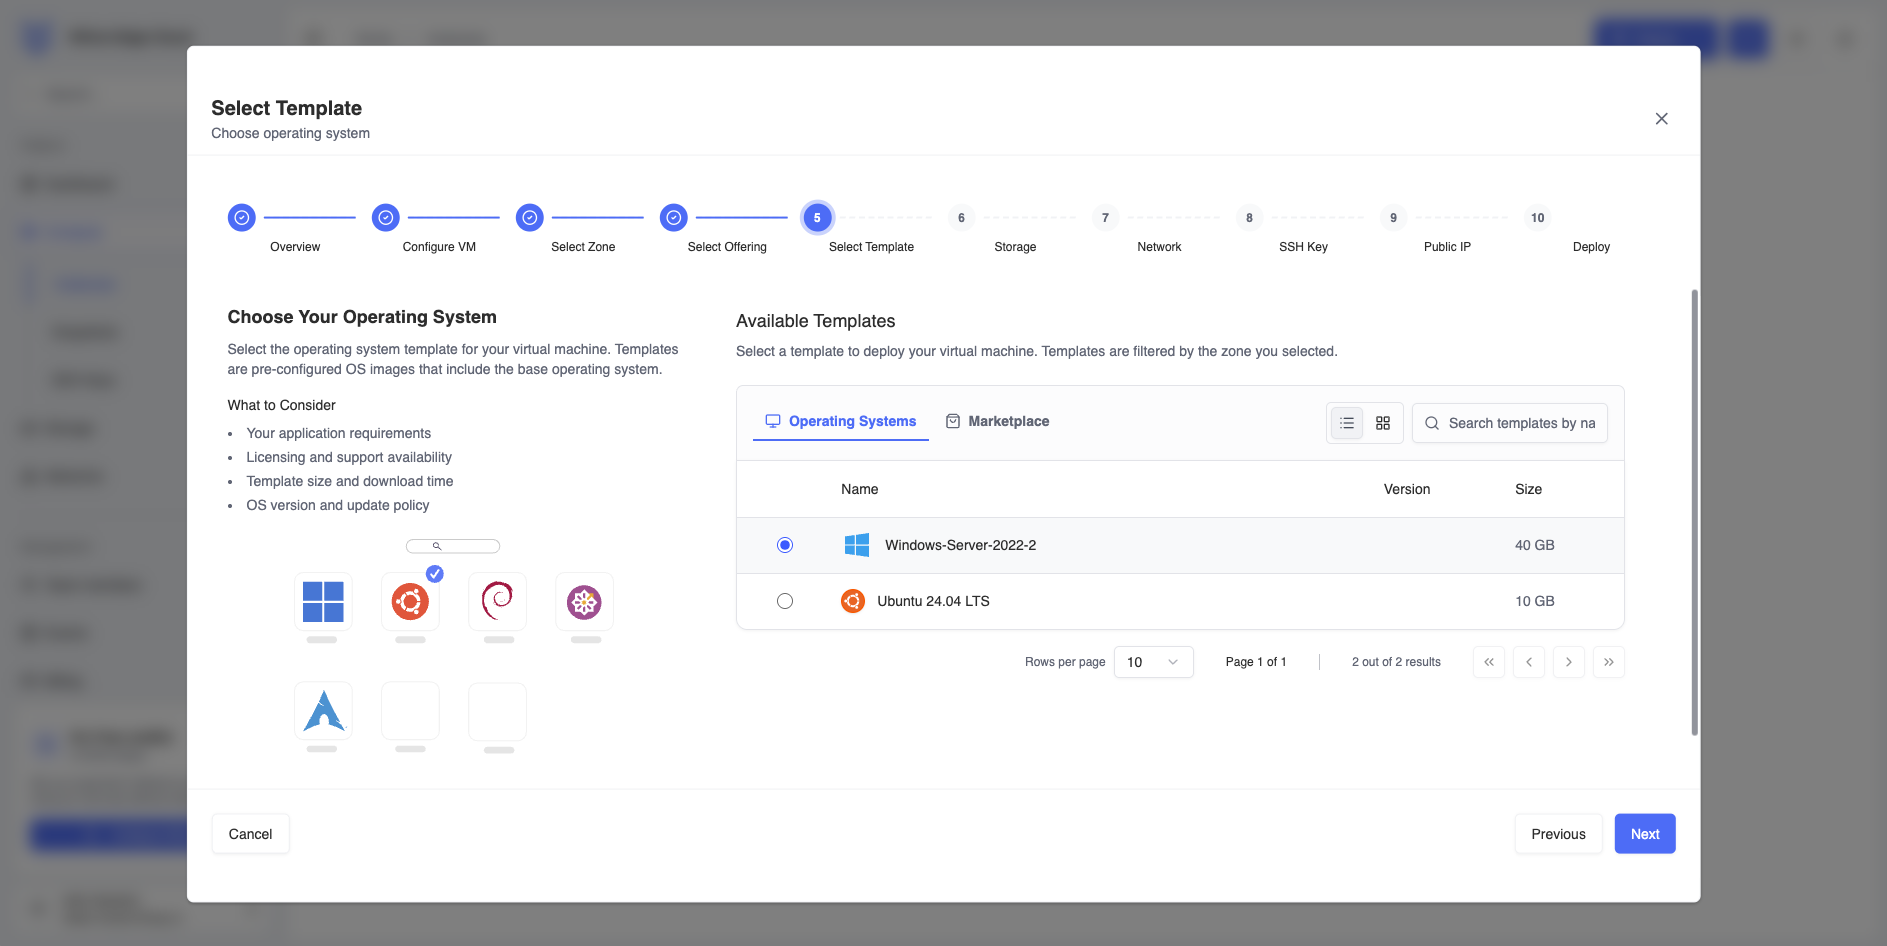 Figure 5 — Selecting an operating system template.
Click Next.
Step 6 — Storage
This step defines the root disk where the operating system and VM data will be stored.
Storage offerings determine:
- disk size
- performance characteristics
- storage pricing
Available options include:
- Fixed Size disk offerings
- Custom Size storage (allows flexible disk sizing)
Example:
s-nvme-1-30gb- 30 GB SSD storage
- Suitable for small applications or APIs
Larger disks improve capacity but increase cost.
Important considerations:
- Disk size must be equal to or larger than the template requirement.
- Storage performance affects I/O performance.
- Additional volumes can be attached later.
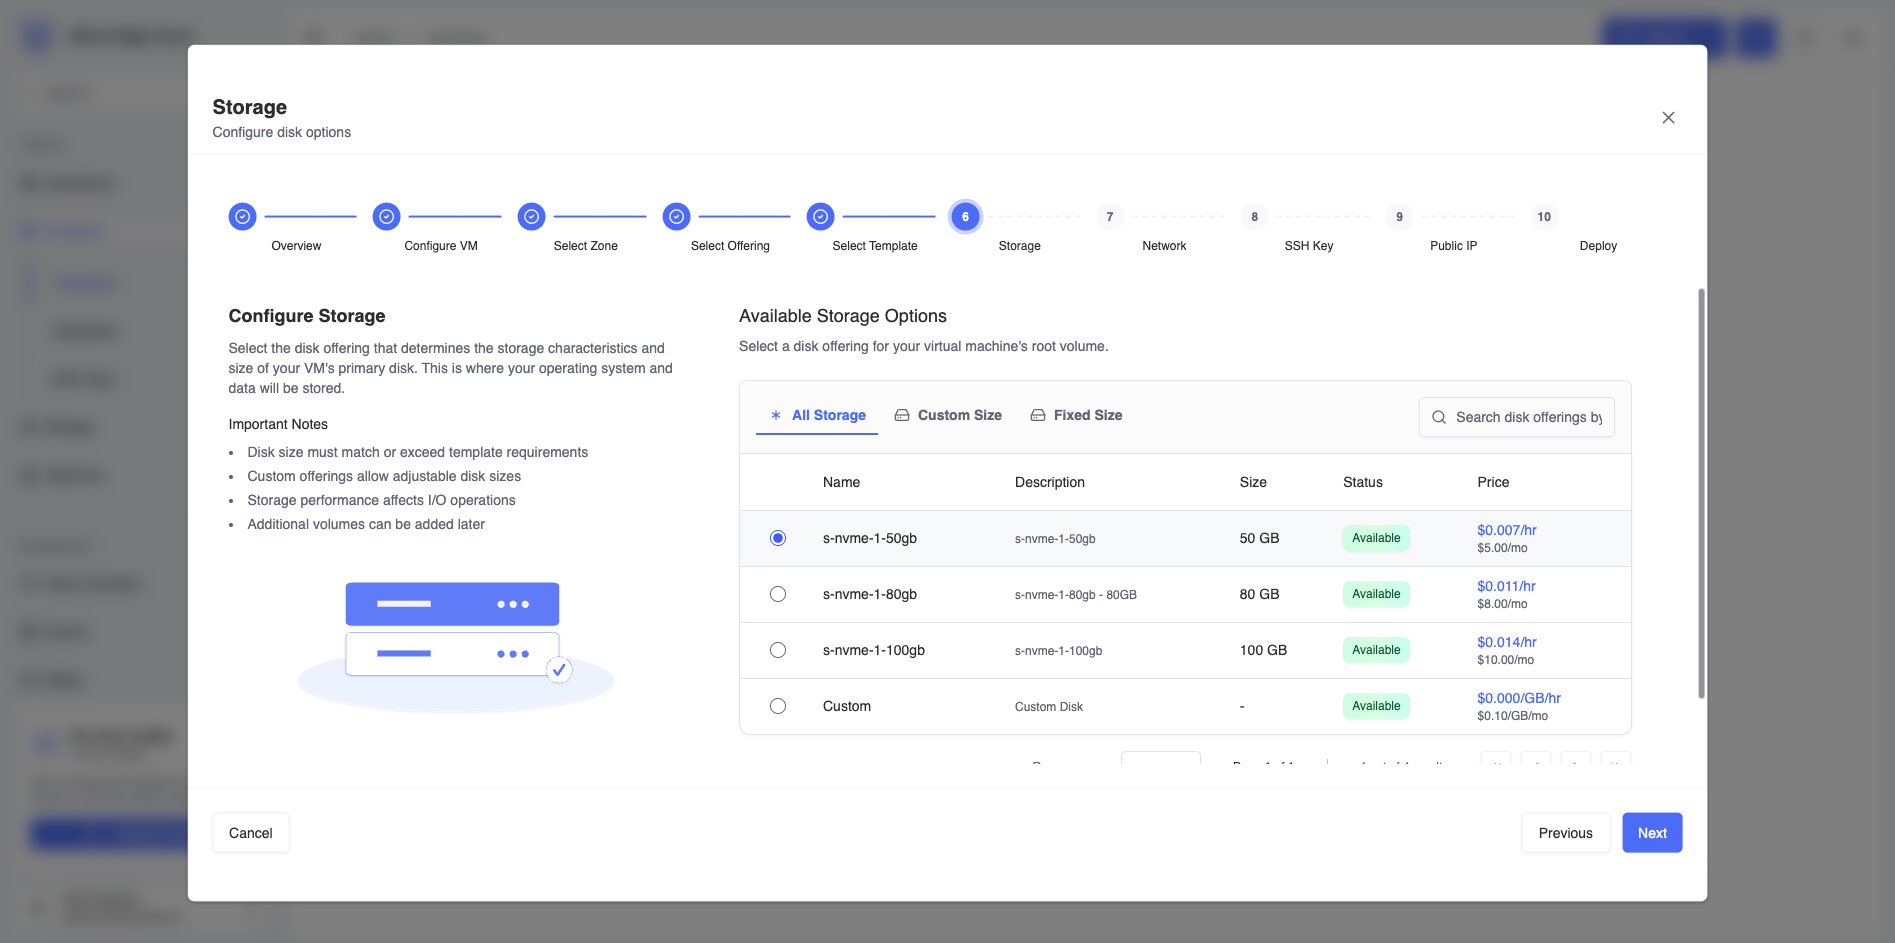 Figure 6 — Configuring storage for the VM.
Click Next.
Step 7 — Network
In this step the platform configures networking for the virtual machine.
If no network exists in the selected zone, the wizard will automatically guide you through creating a Virtual Private Cloud (VPC).
A VPC provides an isolated networking environment for your resources.
CIDR configuration
You must define a CIDR block for the VPC, such as:
10.0.0.0/22
CIDR notation defines the range of IP addresses available in the network.
Example:
10.0.0.0 – 10.0.3.255
Example:
- CIDR:
10.80.4.0/24 - Range:
10.80.4.0 – 10.80.4.255 - Gateway:
10.80.4.1
The platform automatically creates a default subnet if none exists.
The wizard automatically creates:
- a VPC
- a default subnet
- a network offering
You can also toggle Customize VPC Offering to select different networking capabilities such as:
- load balancing
- NAT
- firewall services
- VPN support
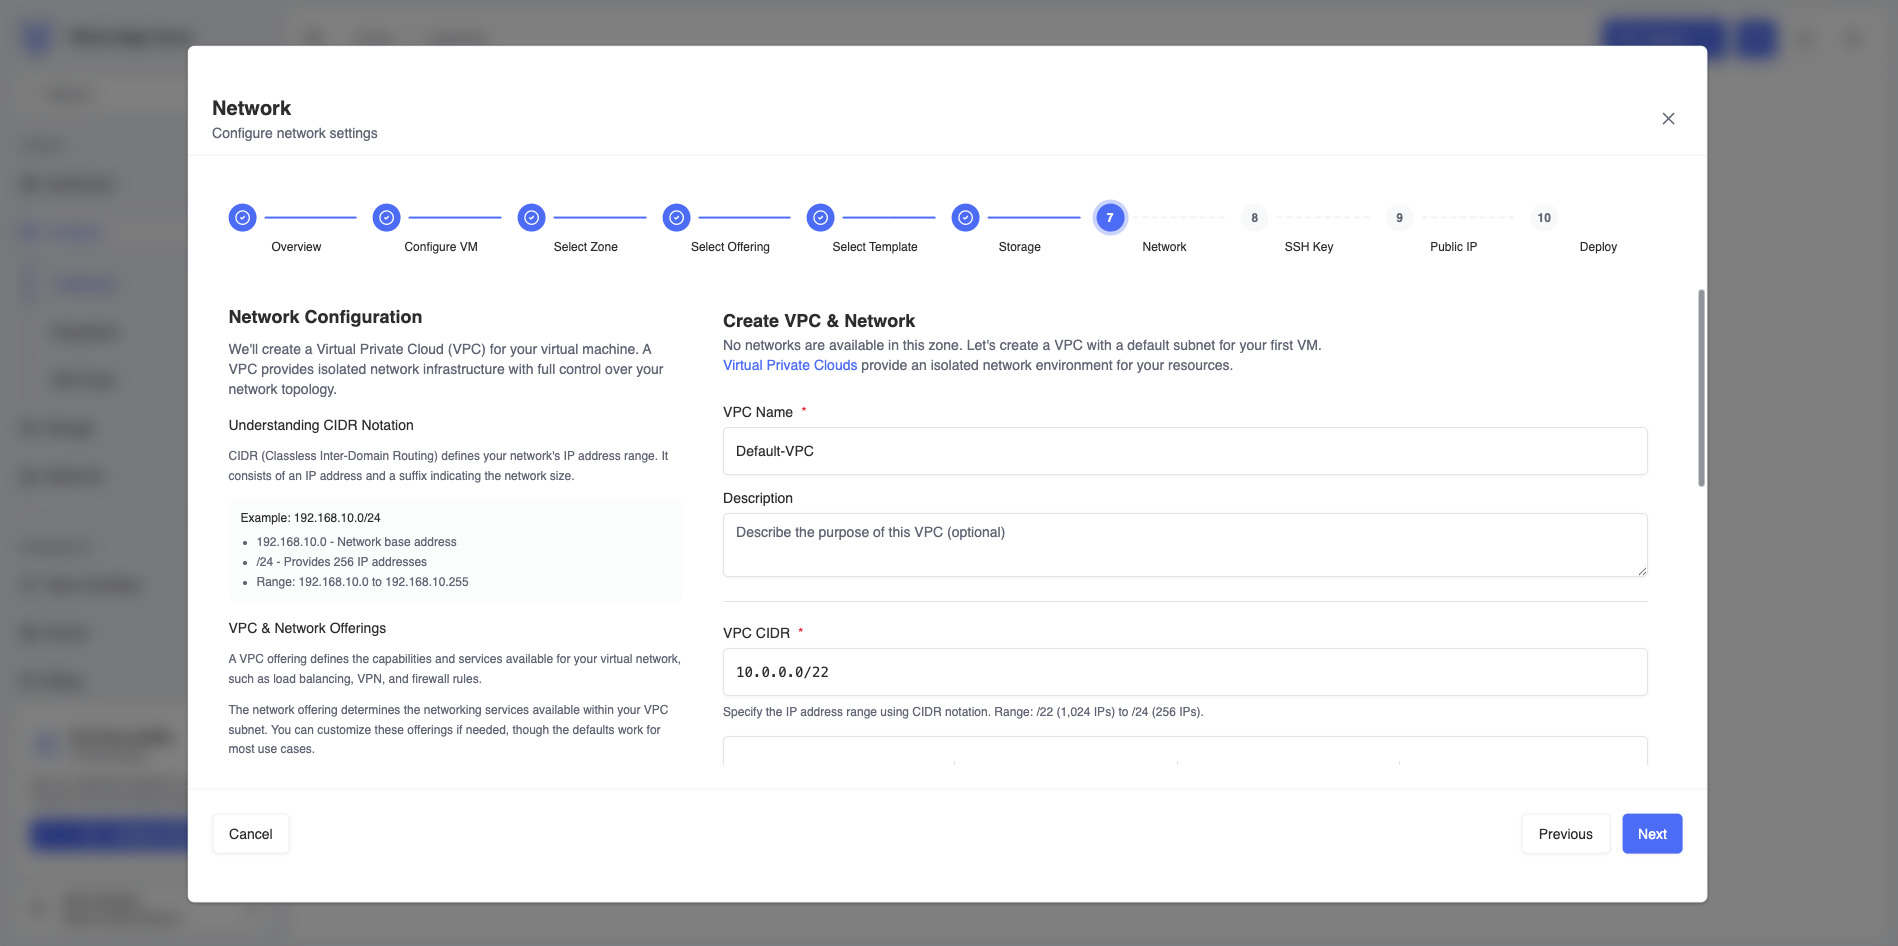 Figure 7 — Configuring VPC and subnet networking.
Click Next.
Step 8 — SSH Key
SSH keys provide secure access to your virtual machine.
Instead of passwords, SSH uses public‑key cryptography for authentication.
You can either:
- select an existing keypair
- create a new SSH keypair directly in the wizard
If you create a new key in the wizard, you must enter:
- Keypair Name – a label used to identify the key in the platform
- Public Key – the public portion of your SSH key
Paste the entire public key (starting with ssh-rsa) into the Public Key field.
Example:
ssh-rsa AAAAB3NzaC1yc2EAAAADAQABAAABAQC...
After deployment, connect using:
ssh user@<public-ip>
If you don’t have an SSH key yet, follow the SSH Keys guide to create one and add it to your account before continuing.
 Figure 8 — Adding an SSH key to access the VM.
Click Next.
Step 9 — Public IP (optional)
A public IP address allows your VM to be accessible from the internet.
Enable this option if your VM needs to:
- host a website or API
- allow SSH or RDP access from outside the cloud network
- receive traffic from external services
You can disable this option if the VM will be used only for:
- internal services
- private backend systems
- development environments
Example:
- VM with Public IP: accessible via
ssh user@34.x.x.x - VM without Public IP: accessible only داخل VPC (private network)
Public IP addresses incur an additional cost.
Example pricing:
- $0.0056 per hour
- $4.00 per month
You can also allocate a public IP later after deployment.
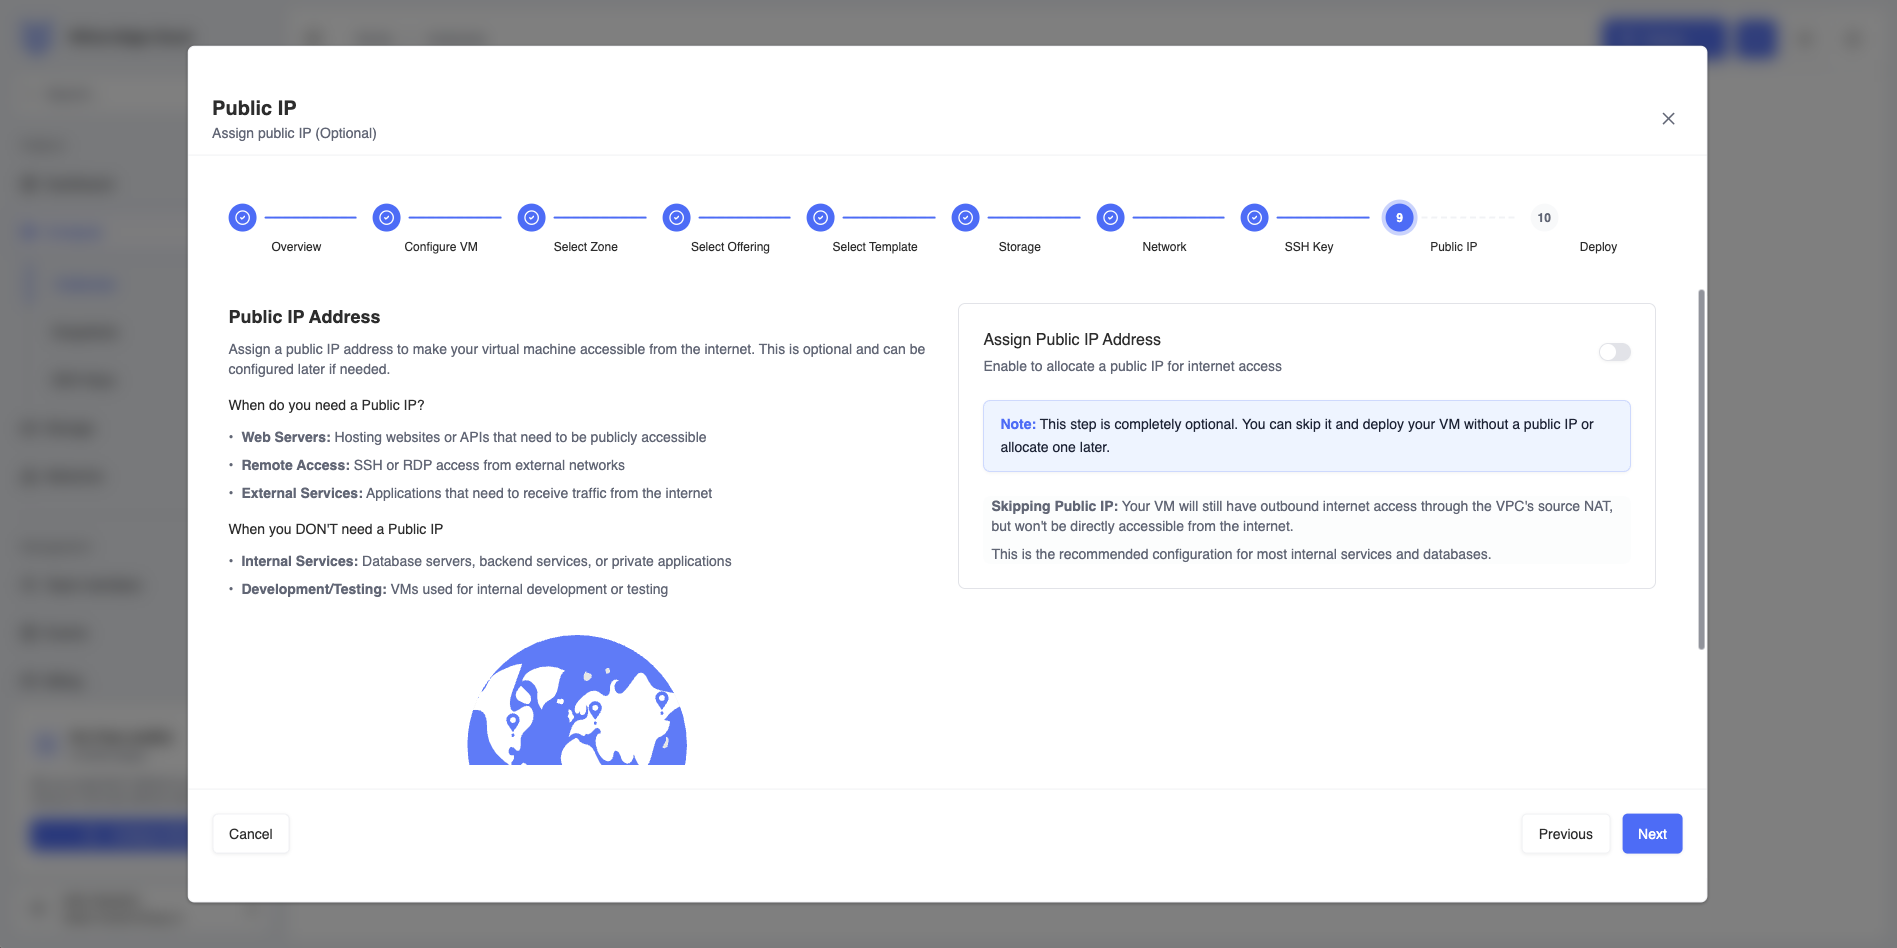 Figure 9 — Enabling public IP access.
Click Next.
Step 10 — Deploy
The final step displays a complete summary of your configuration.
This includes:
- VM name
- selected zone
- operating system template
- compute offering
- storage configuration
- VPC and subnet configuration
- SSH keypair
- estimated cost
Example summary:
- VM:
rag-vm - Zone:
Princeton - OS:
Ubuntu 24.04 LTS - Offering:
1 vCPU / 1 GB RAM - Storage:
30 GB - Public IP: enabled
- Estimated cost:
$0.018/hr
The summary panel also displays the estimated hourly and monthly price based on the selected resources.
Carefully review all settings before proceeding.
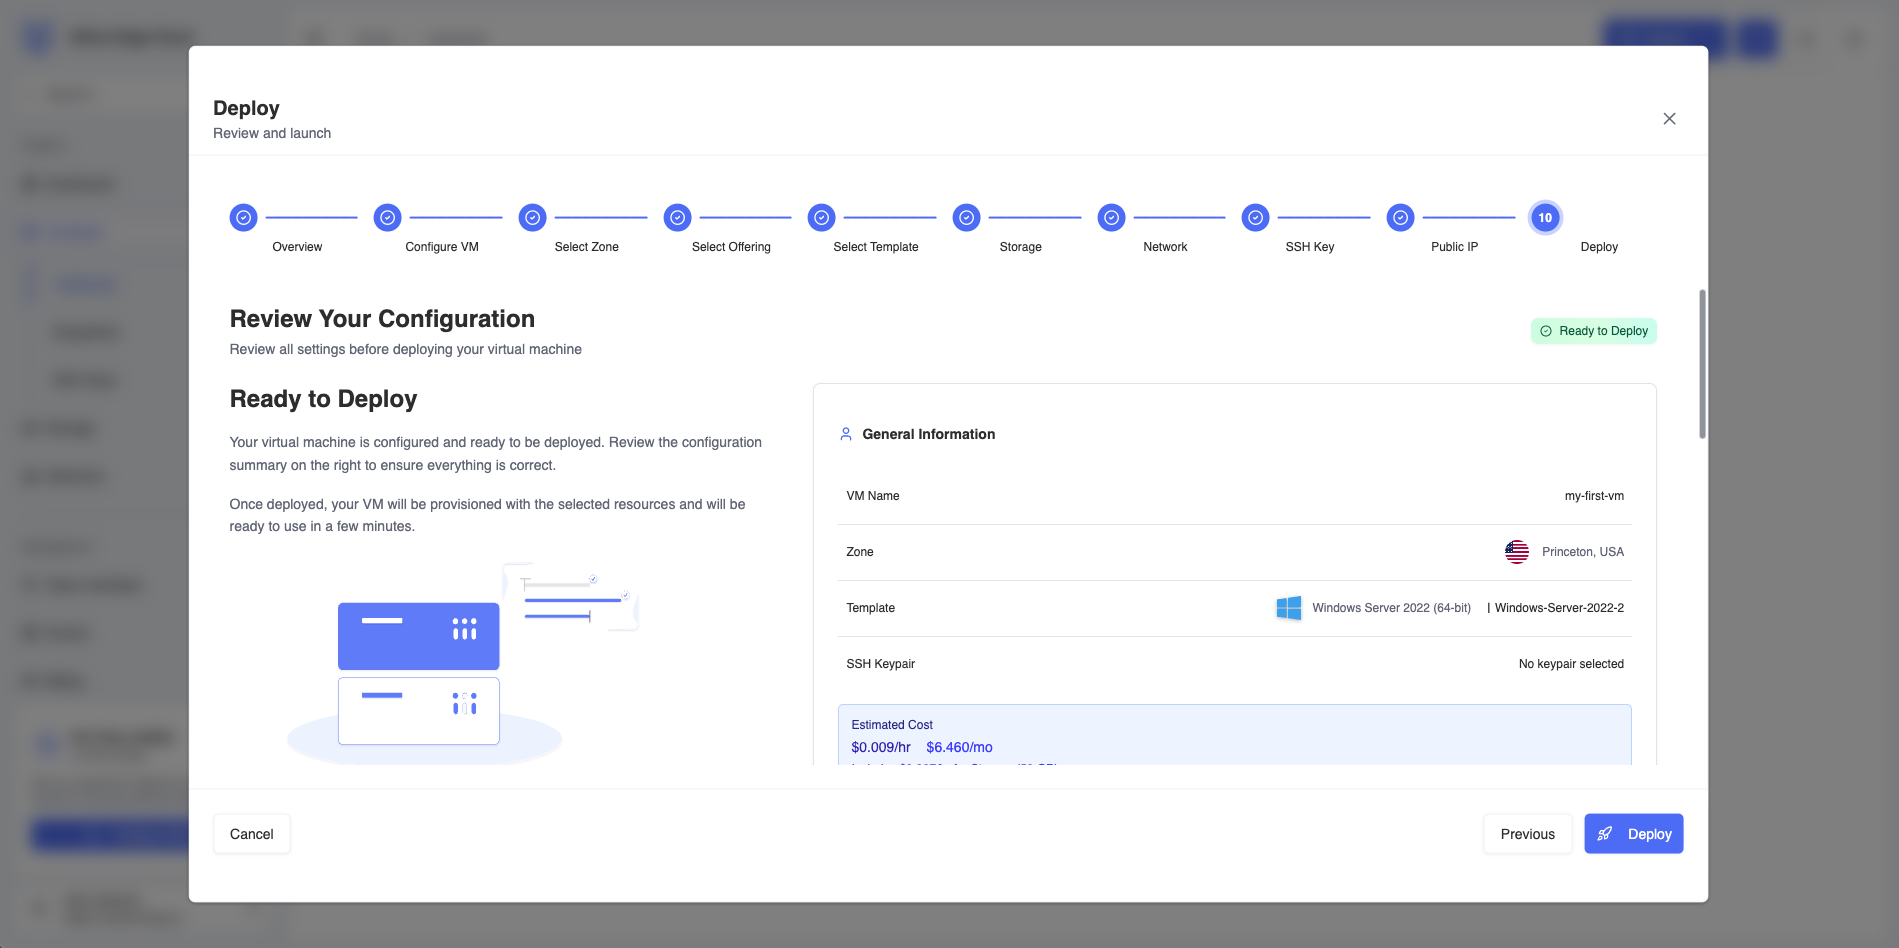 Figure 10 — Final deployment review screen.
Click Deploy Virtual Machine to start provisioning.
The platform will automatically:
- create the VM
- configure networking
- attach storage
- assign the public IP (if enabled)
Provisioning typically completes within a few minutes.
Once finished, the VM will appear in the Instances dashboard, where you can:
- view instance details
- connect via SSH
- start or stop the VM
- create snapshots
Next steps
After deploying your first VM, you may want to explore additional platform features:
- Create and manage VPC networks
- Configure subnets and firewall rules
- Manage SSH keys
- Attach additional storage volumes
- Create VM snapshots and backups
These topics are covered in the following sections of the documentation.